Making a Men's shirt for my husband | My Valentine's project | Sewing tutorial with pattern making

Making a Men's shirt for my husband | My Valentine's project
Welcome or welcome back to my channel!
In today's video, I'm going to share with you how I made a Men's shirt for my husband. This is my first time trying to make men's clothes. So it took me a bit of time to understand the pattern and sewing process. But the result turned out not too bad on my husband.
So I hope you will learn something from it.
WHAT YOU’LL NEED
1.5m of linen fabric
Pattern paper
Sewing machine
Pins
Scissors
Ruler
Long stick
MAKING THE PATTERNS
Here’s the pattern for the project. To get a clear understanding of all the measurements needed for the pattern, watch the video from 0:32 to 10:33.
Remember, you can adjust these measurements to fit your own dimensions!
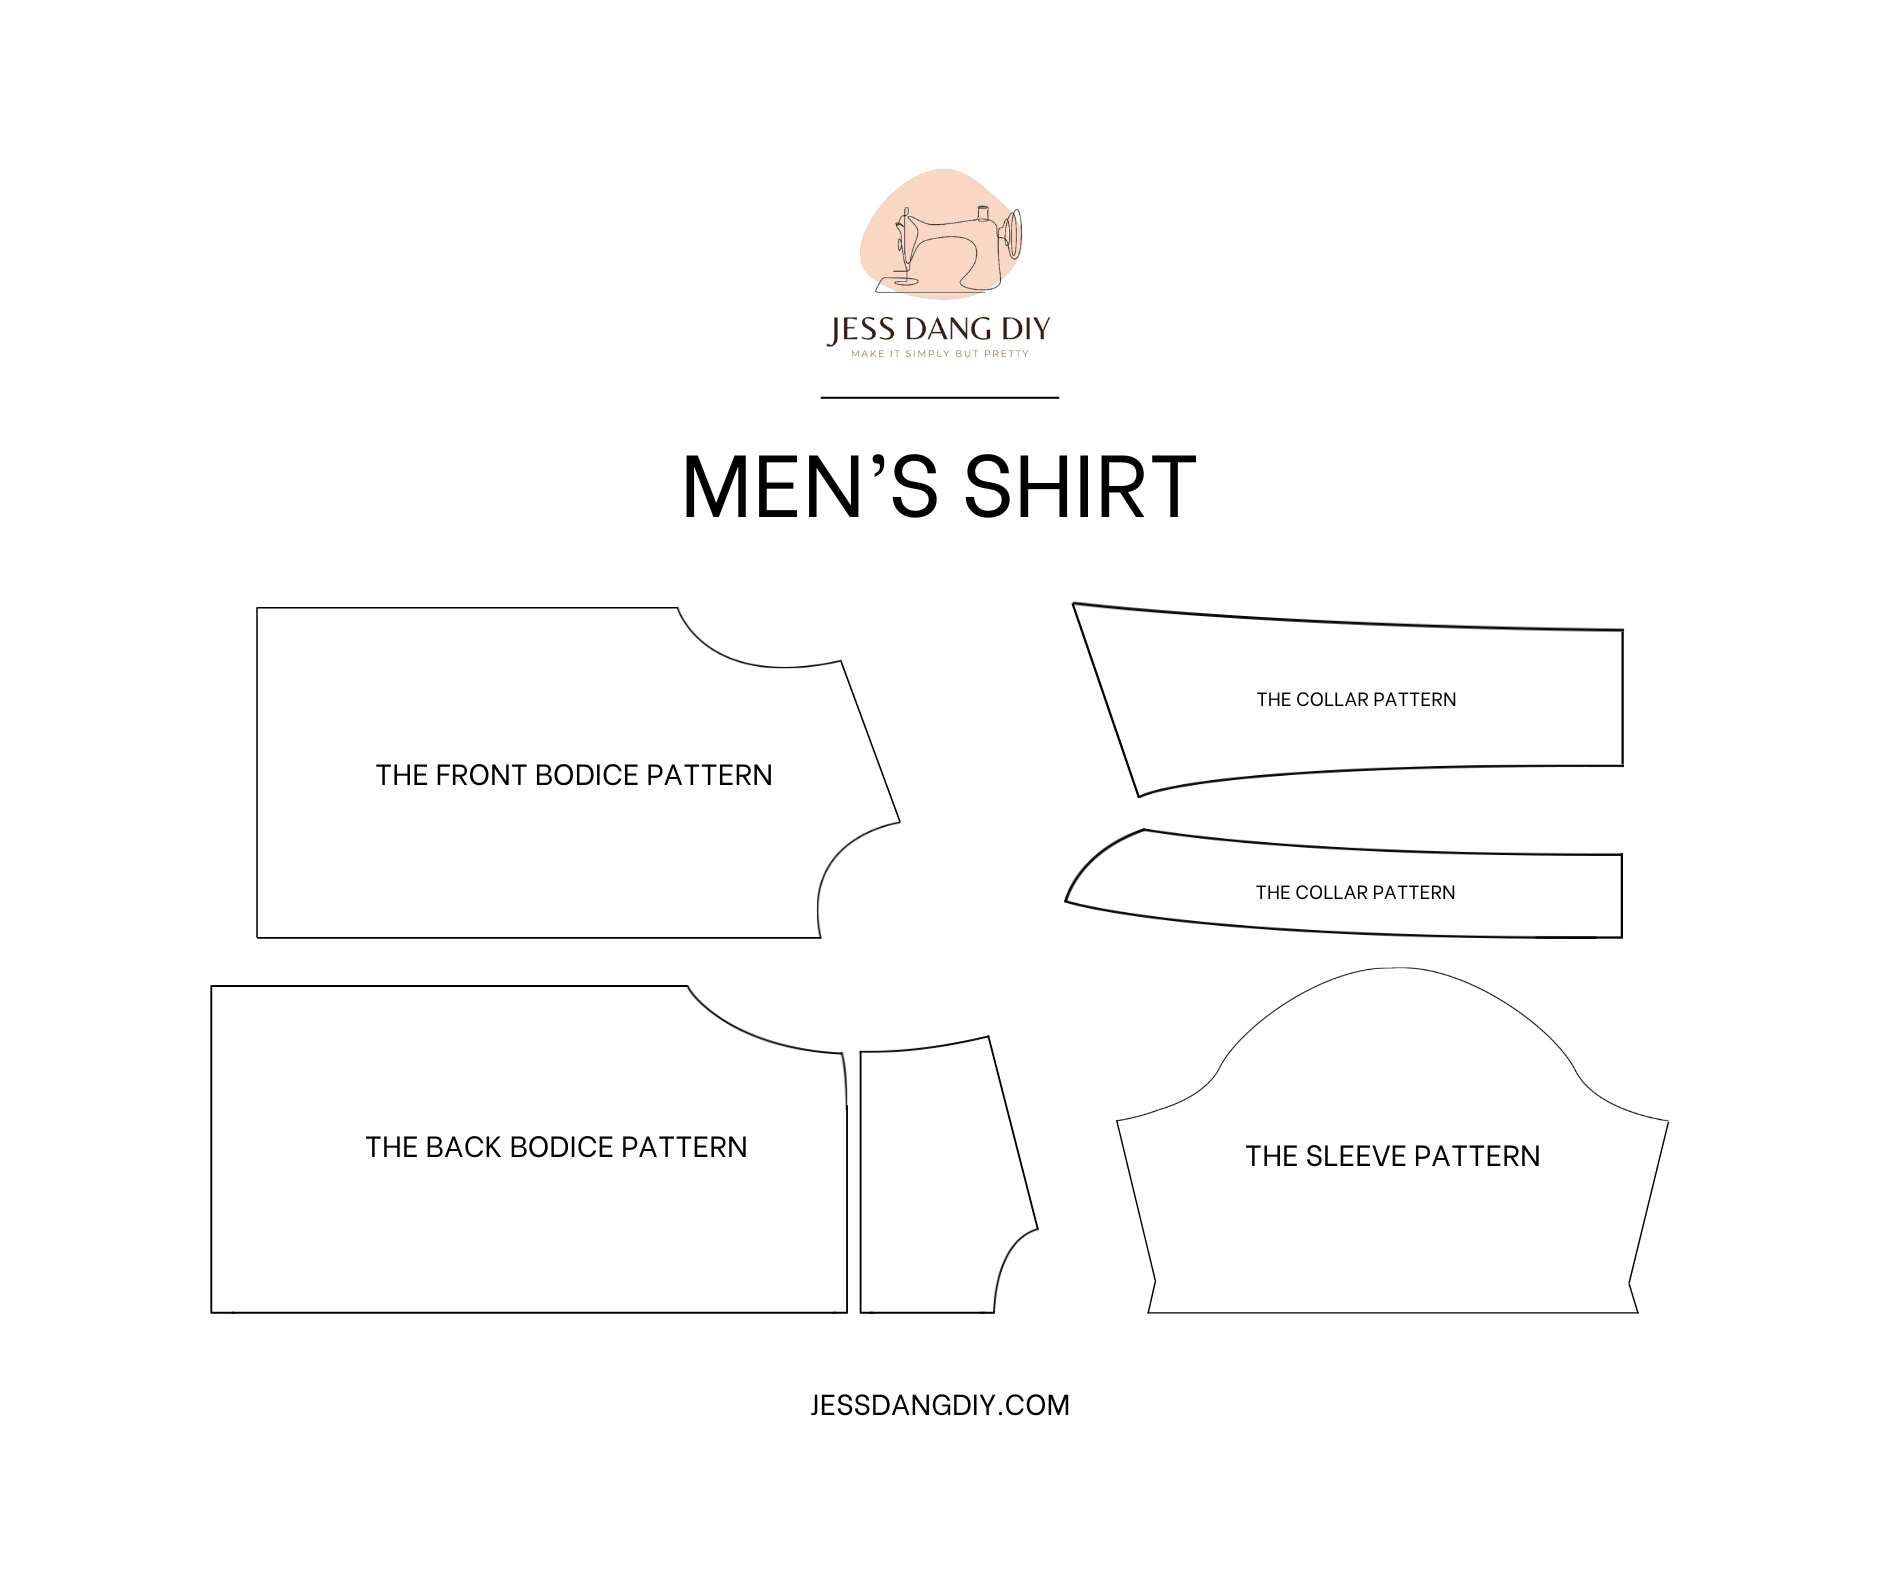
THE FRONT BODICE PATTERN
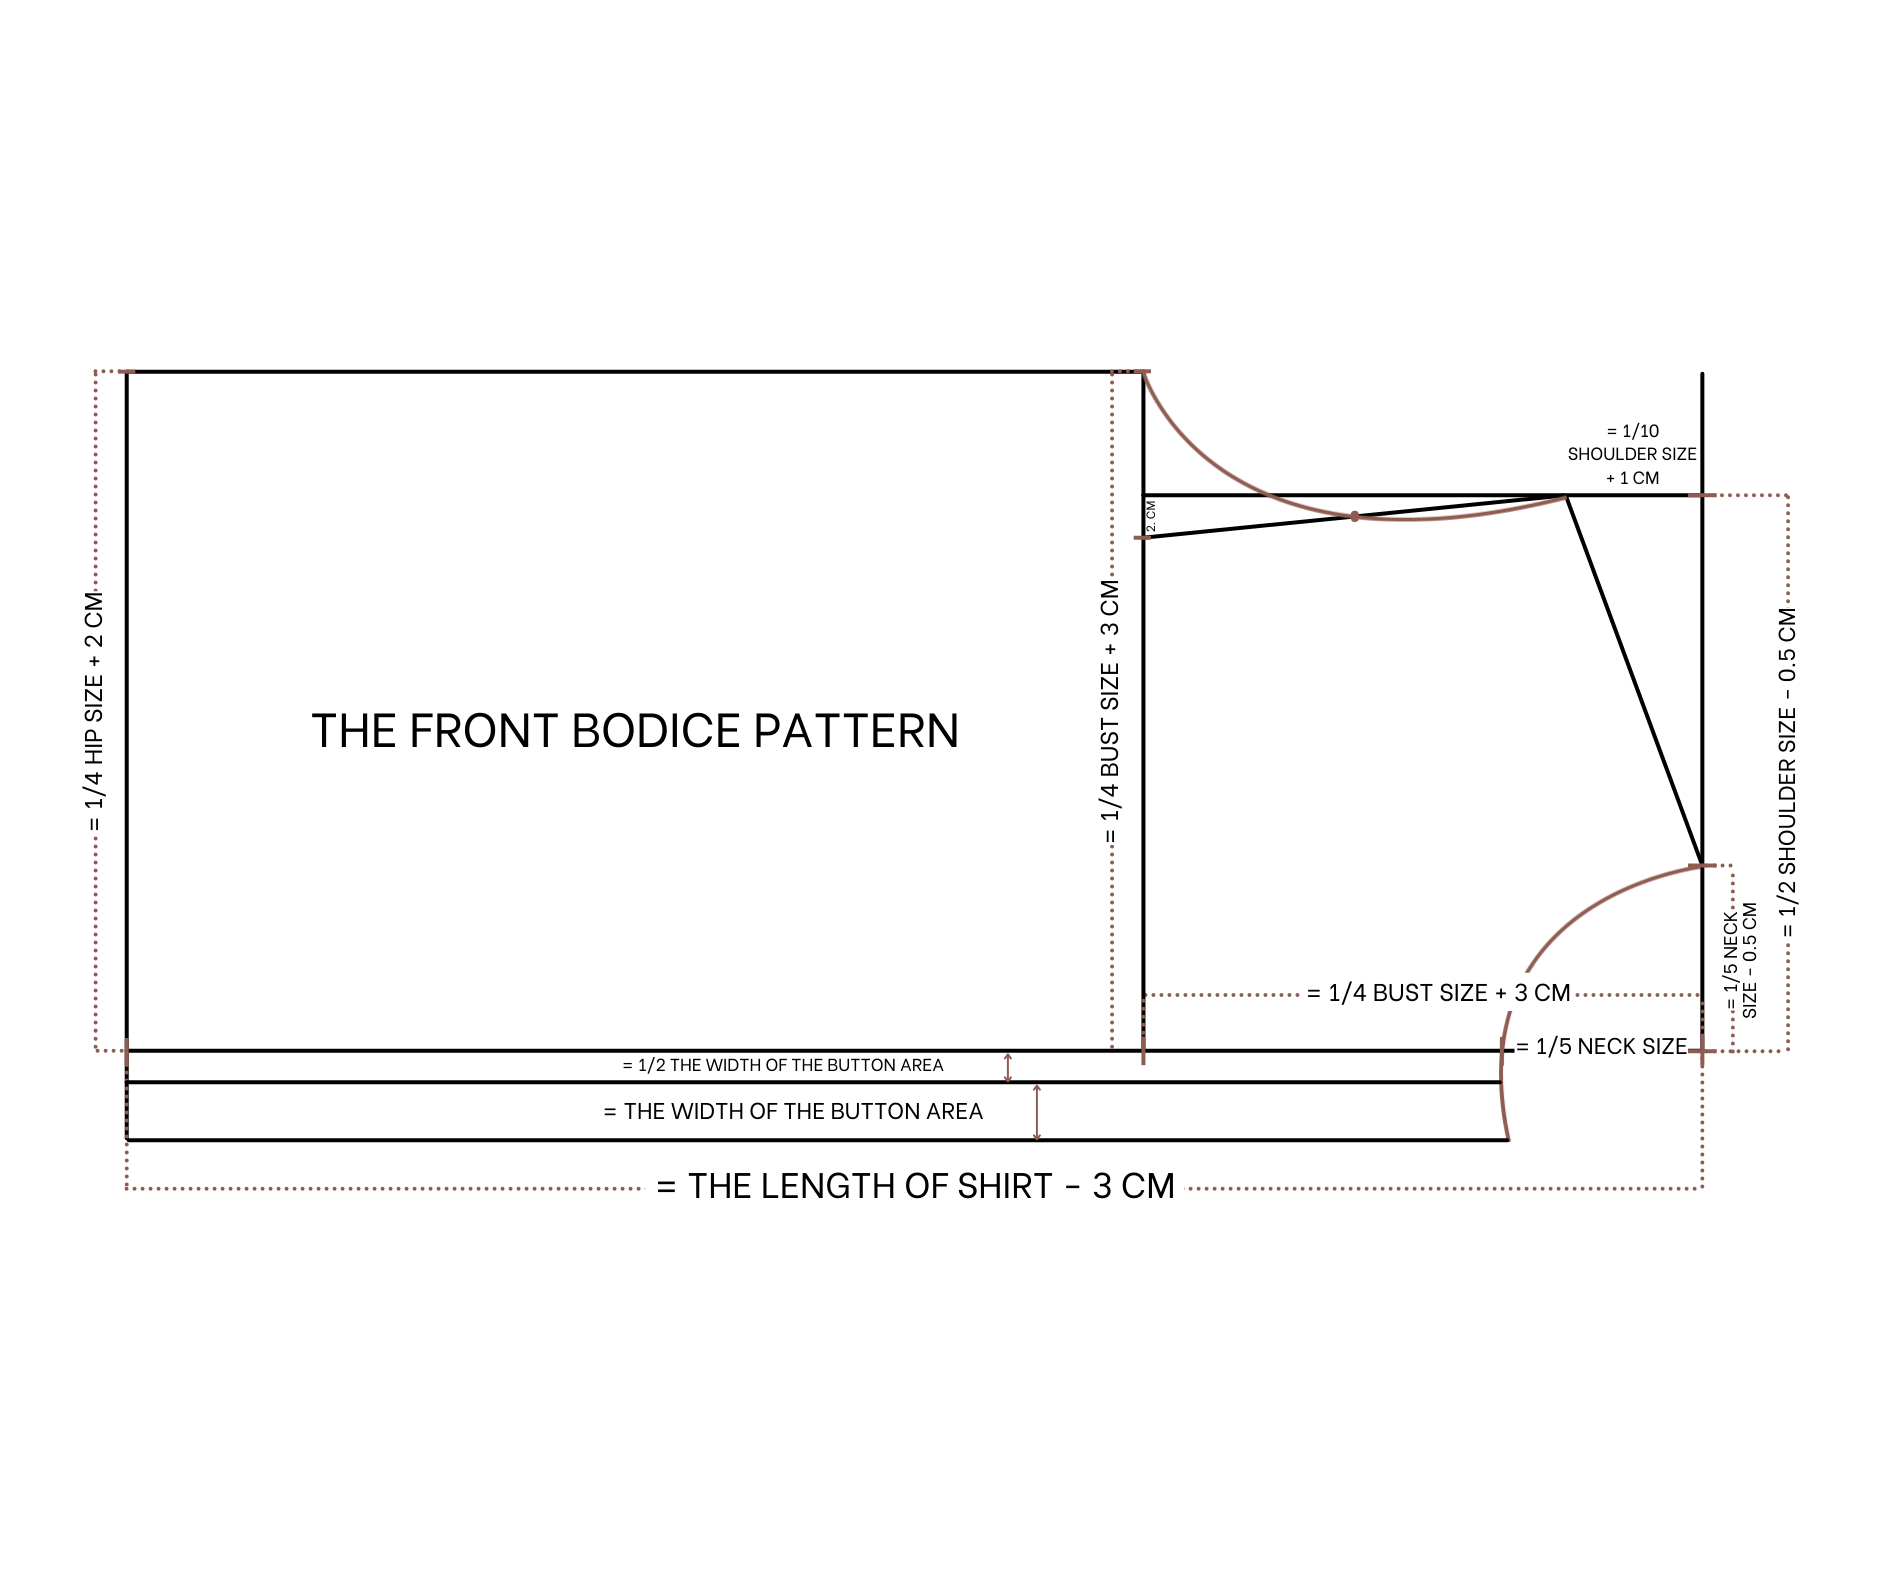

The front pattern
To make the front bodice pattern, draw a straight line and a horizontal line cutting each other first. from The cutting point, mark up 7.5 cm which is a half of the neck size minus 0.5 cm.
From the cutting point, keep marking up 22 cm which is a half of the shoulder size minus 0.5 cm. From this new mark, draw a perpendicular line with it and mark at 5.5 cm on this line which is one tenth the shoulder size plus 1 cm, then connect this mark to the first one on the straight line to create a shoulder line for the front bodice.
From the cutting point on the horizontal line, mark to the left 8 cm which is one per five the neck size then draw a curved line from that Mark to connect to the first mark on the straight line to create the neck line for the front bodice.
From the first straight line, draw another one at 27 cm from it, it's a quarter of the bust size plus 3 cm. From the cutting point between the new straight line and the horizontal line, mark up 27 cm which is a quarter of the bust size plus 3 cm.
After that, continue the perpendicular line at the shoulder to cut the bust line at one point. From this cutting point, mark to inside of the bust line 2 cm then connect this mark to the end of the shoulder line.
After that, mark in the middle of the new slanted line then draw a curved line from the mark on the bust line through this mark and finish at the end of the shoulder line to create the sleeve line for the front bodice.
From the first straight line, keep drawing another one at 67 cm from it, it's the length of the shirt from the shoulder to the hip minus 3 cm. From the cutting point of this new straight line and the horizontal line, mark up 27 cm which is a quarter of the hip size plus 2 cm, it's also the same with the mark on the bust line. Connect this mark to the mark on the bust line to create a side line for the front bodice.
From the horizontal line, draw another one at 1.5 cm outside it, it's a half of the width of the button and the button hole area that you want. After that, keep drawing another line at 3 cm from the second one which is the width of the button and the button hole area.
We have the front bodice pattern after cutting. Add 1 cm for seam allowance at the button and the button hole area, the neck line and the shoulder line. Add 1.5 cm for seam allowance at the sleeve line the side line and the ending line.
THE BACK BODICE PATTERN
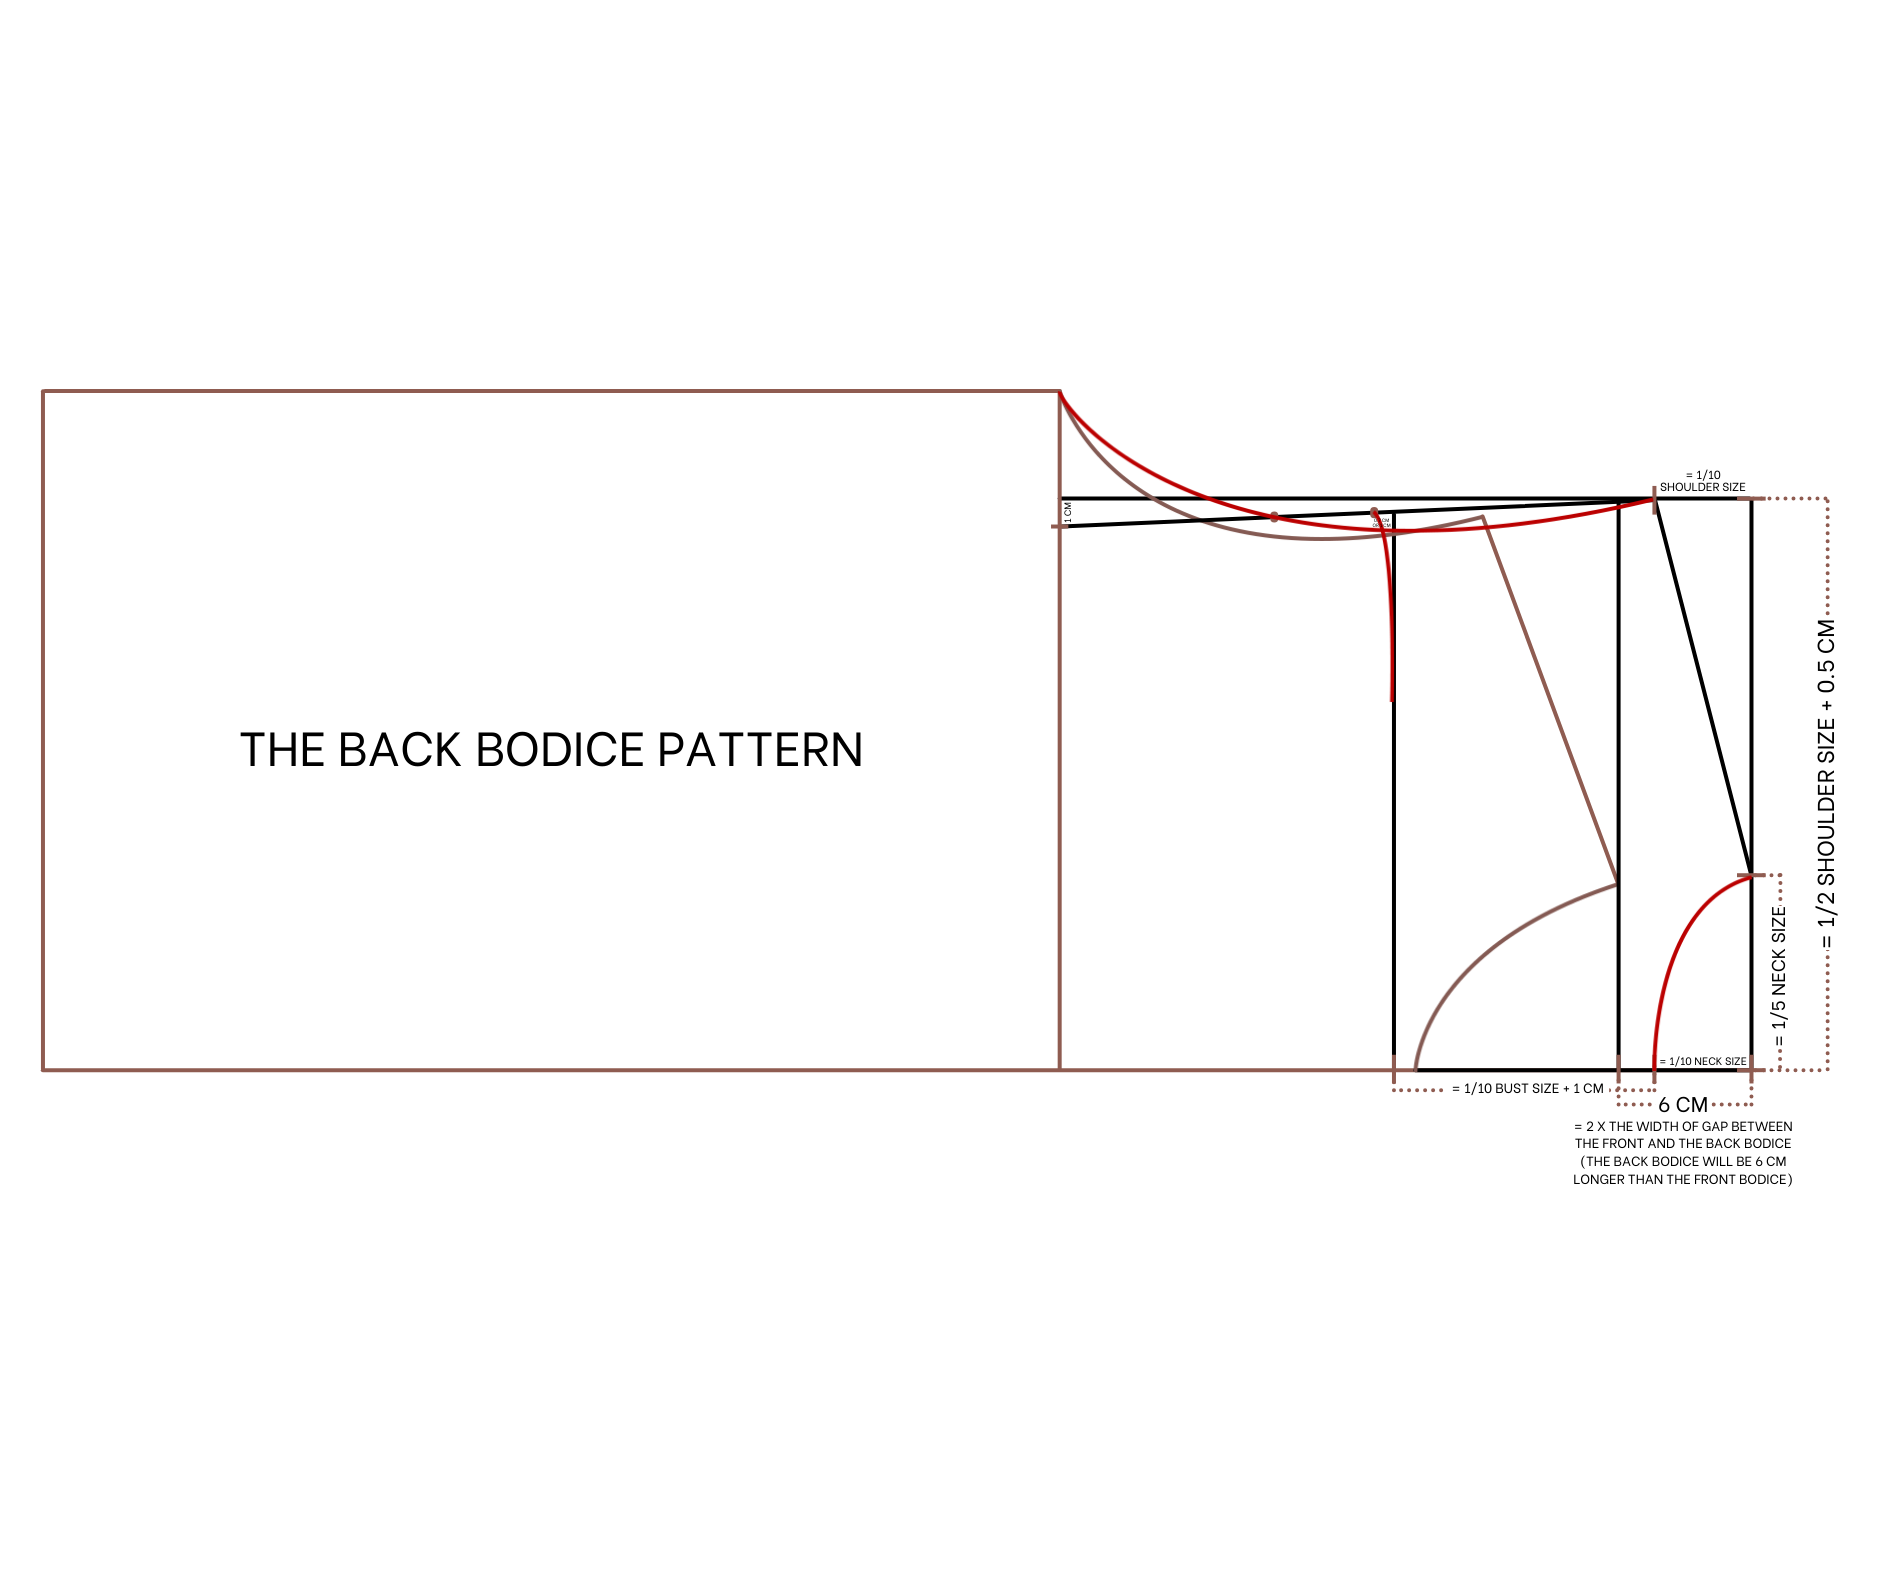

The back bodice pattern
Copy the front bodice pattern without the button and the button hole area to the paper first. From the straight line at the shoulder, draw another one at 6 cm on the right side so the back bodice will be 6 cm longer than the front bodice.
From the cutting point between the new straight line and the horizontal line, mark up 8 cm which is one per five the neck size. Keep making another mark at 23 cm on the straight line which is a half of the shoulder size plus 0.5 cm.
Draw a perpendicular line from that mark, the width of this line will be 4.5 cm which is one per ten the shoulder size. Then connect the end of the perpendicular line to the first mark on the straight line to create a shoulder line for the back bodice. Make sure the width of the shoulder line at the front and the back bodice will be the same.
From the cutting point on the horizontal line, mark to the left side 4 cm which is one per ten the neck size, it's also the depth of the neck at the back bodice. Then draw a curve line from that mark to the first one on the straight line to create the neck line for the back bodice.
Continue the perpendicular line at the shoulder to cut the bust line at one point. From the cutting point, mark to inside 1 cm then connect this mark to the end of the shoulder line. After that, mark inside one per three of this slanted line then draw a curve line from the mark on the bust line to this mark and finish at the end of the shoulder line to create the sleeve life for the back bodice.
From the mark on the horizontal line, keep making another one at 10.6 cm which is a quarter of the bust size plus 1 cm, it's the length of the yoke area at the back bodice. From the cutting point between this line and the sleeve line, mark down on the sleeve line around 0.7 to 1 cm then redraw from that mark to the straight line I've just made before.
We will have the back bodice pattern after cutting. Add 1 cm for seam allowance at the neck line and the shoulder Line, 1 and 1/2 CM for seam allowance at the sleeve line the side line and the ending line.
You need to cut this pattern in folded fabric at the horizontal line and the yoke area need to be cut two pieces in the grain line.
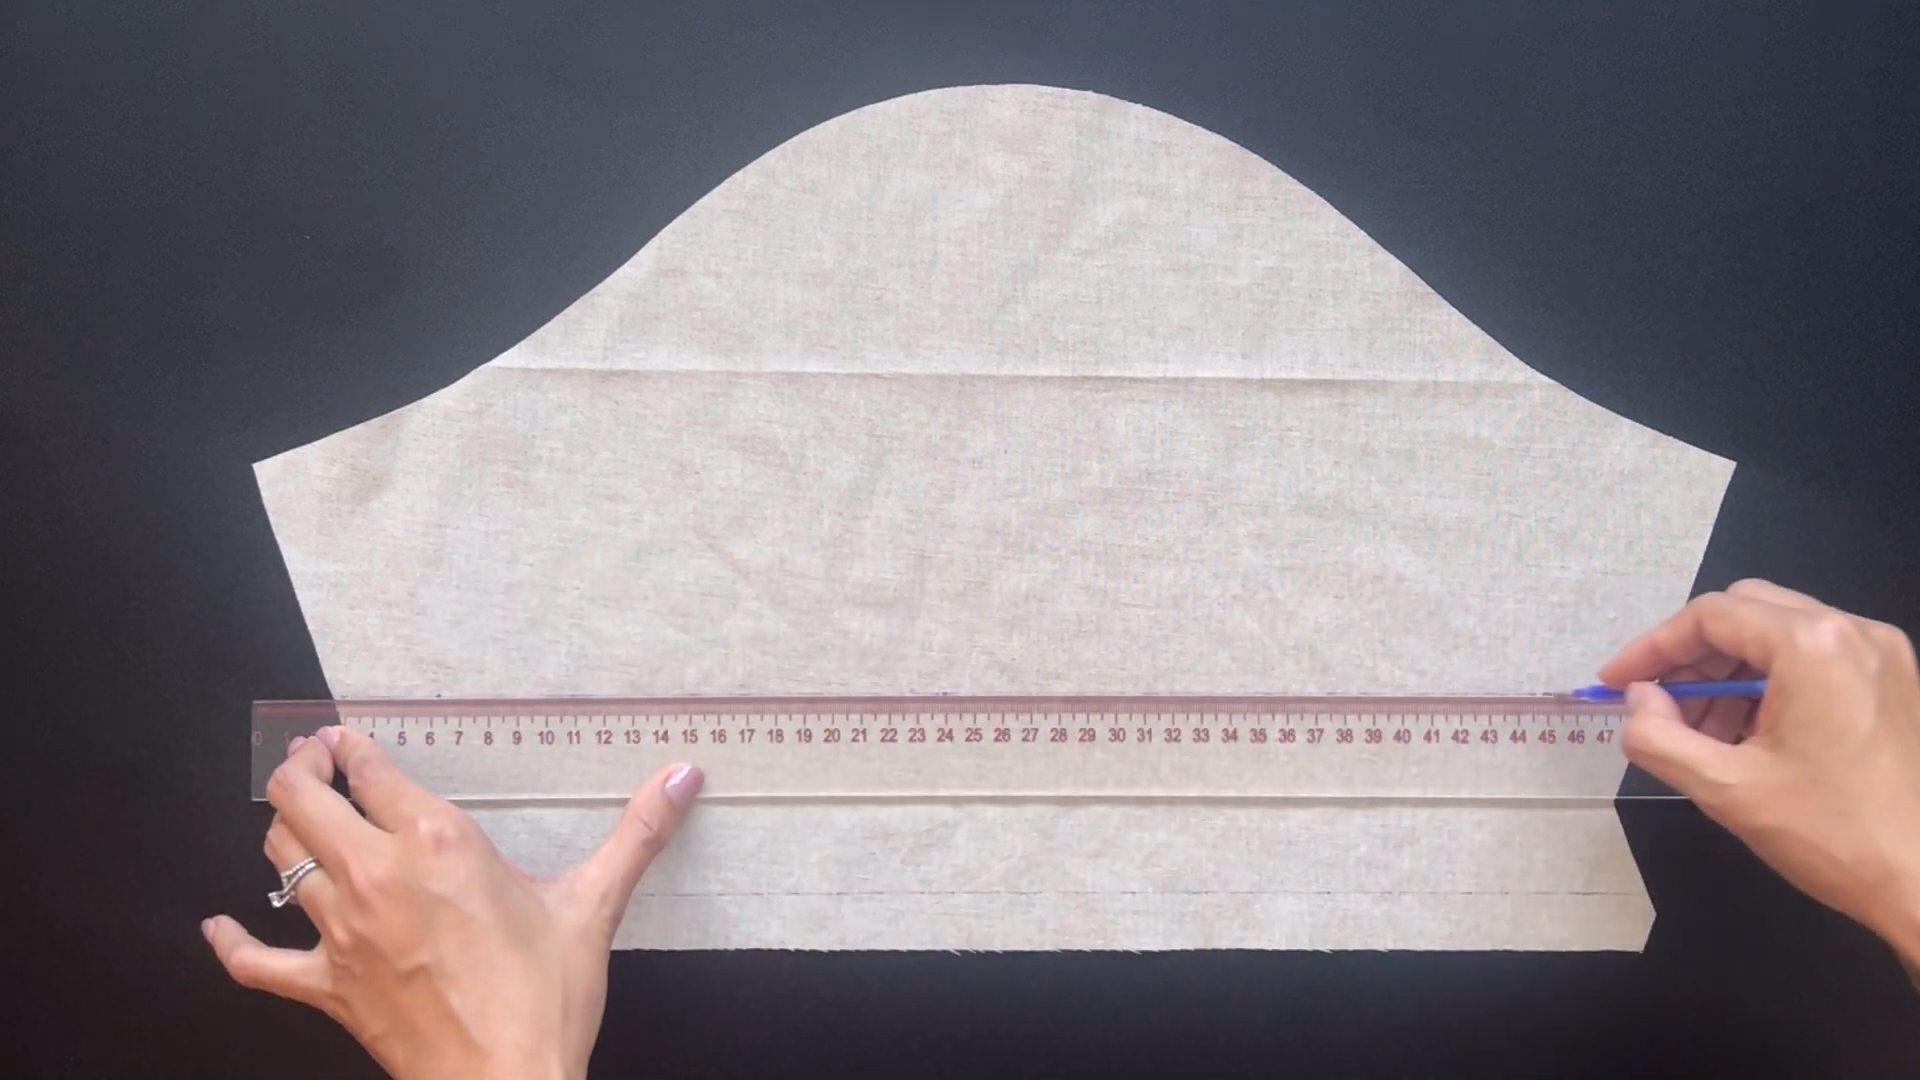
THE SLEEVE PATTERN
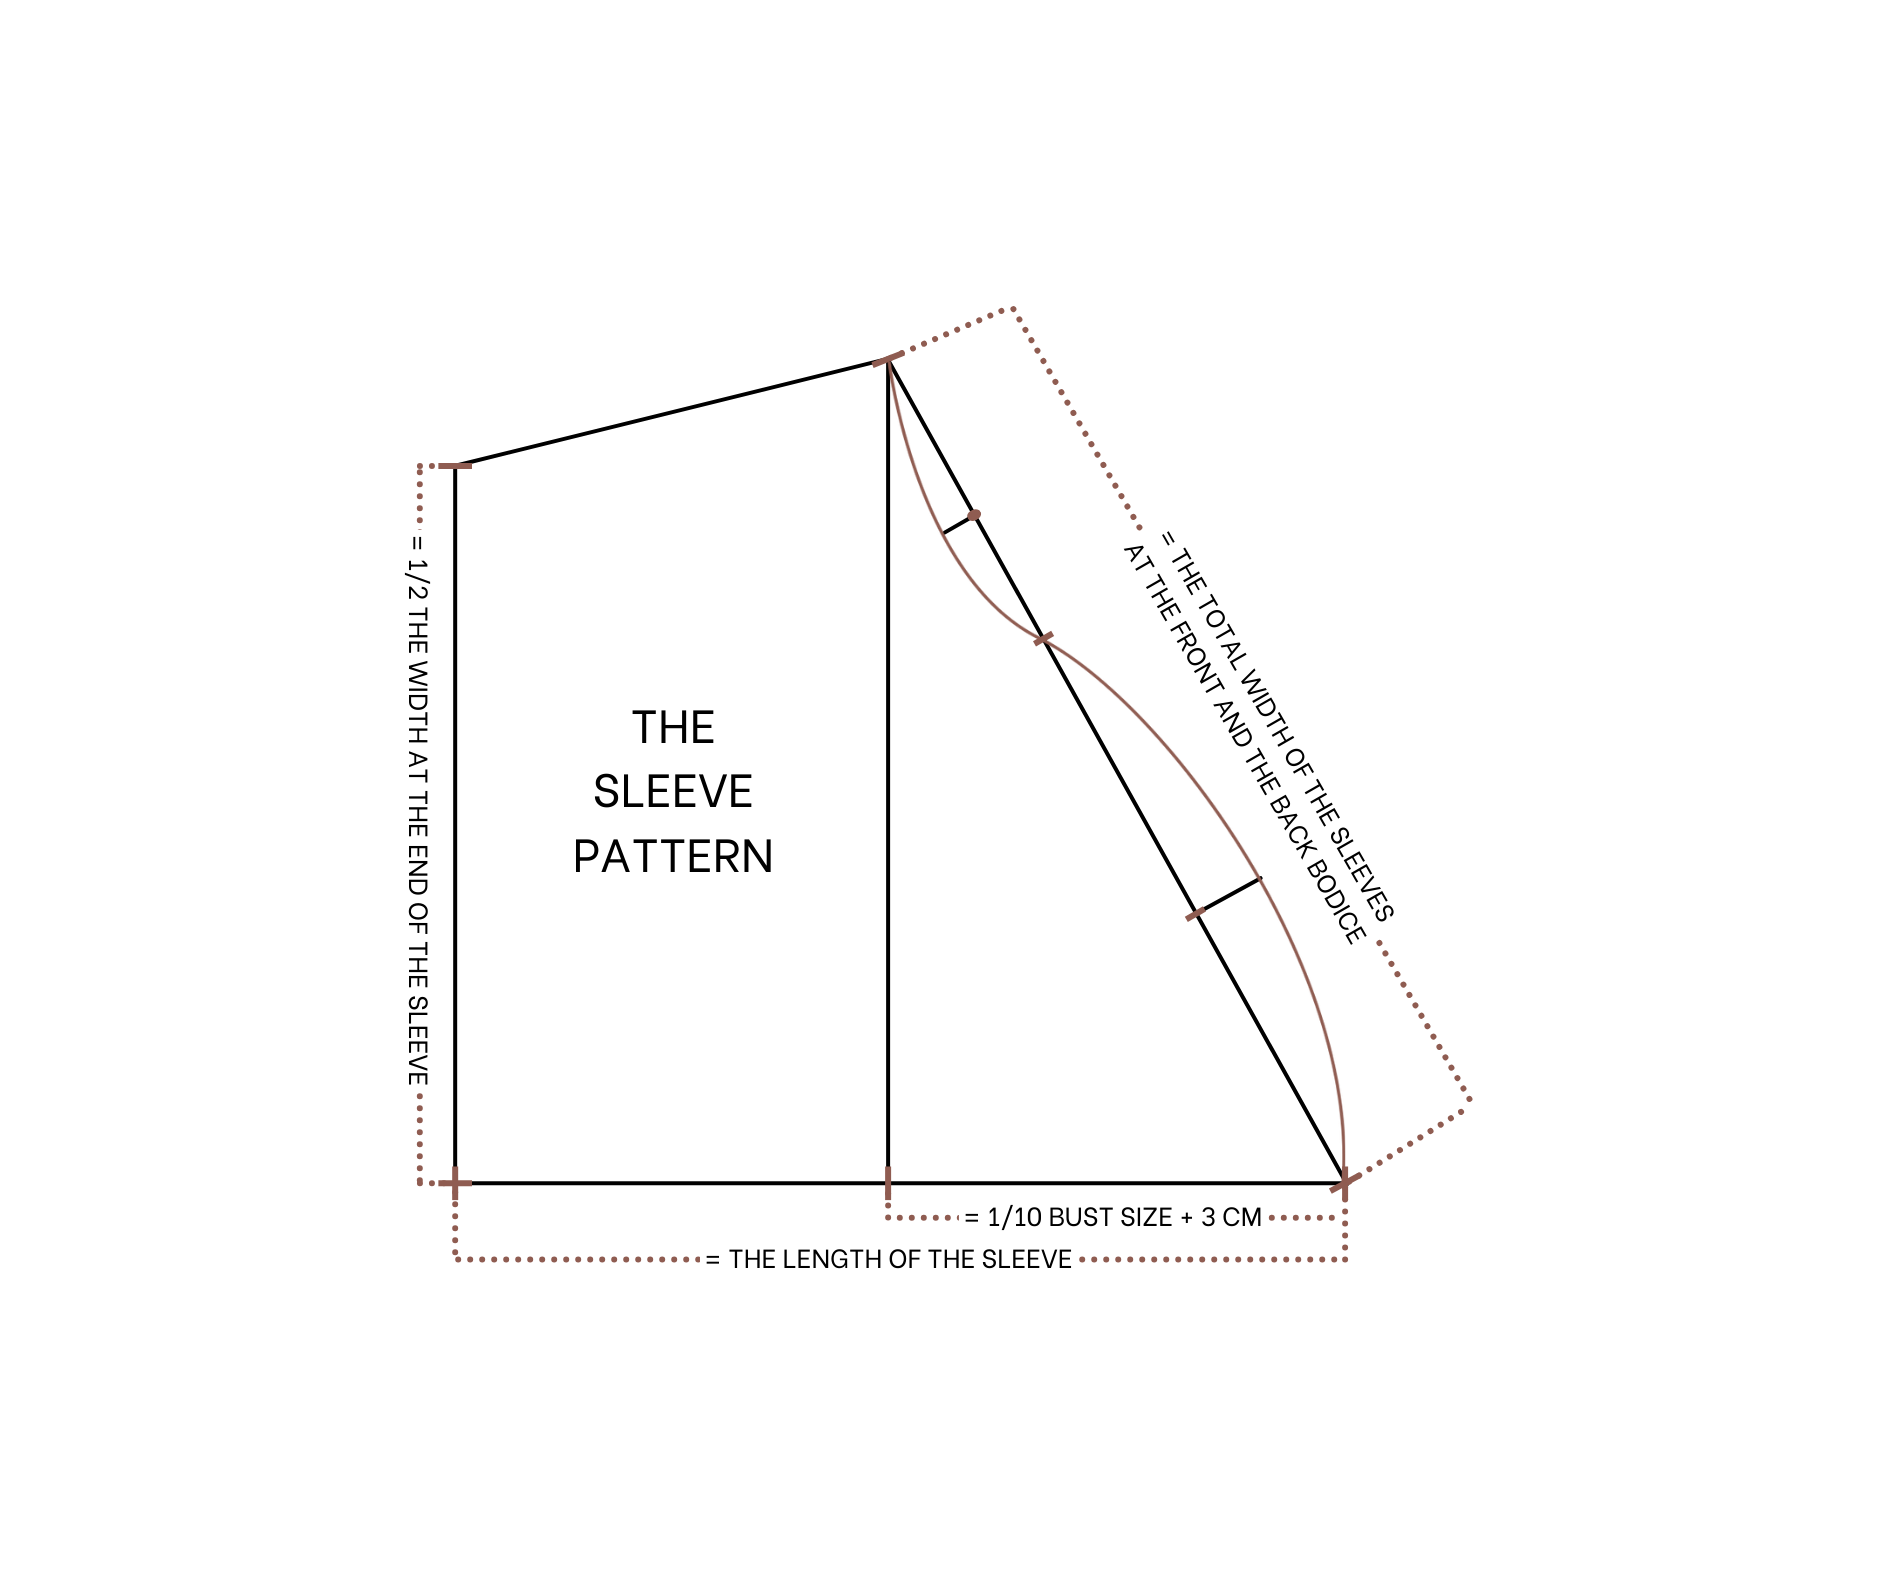

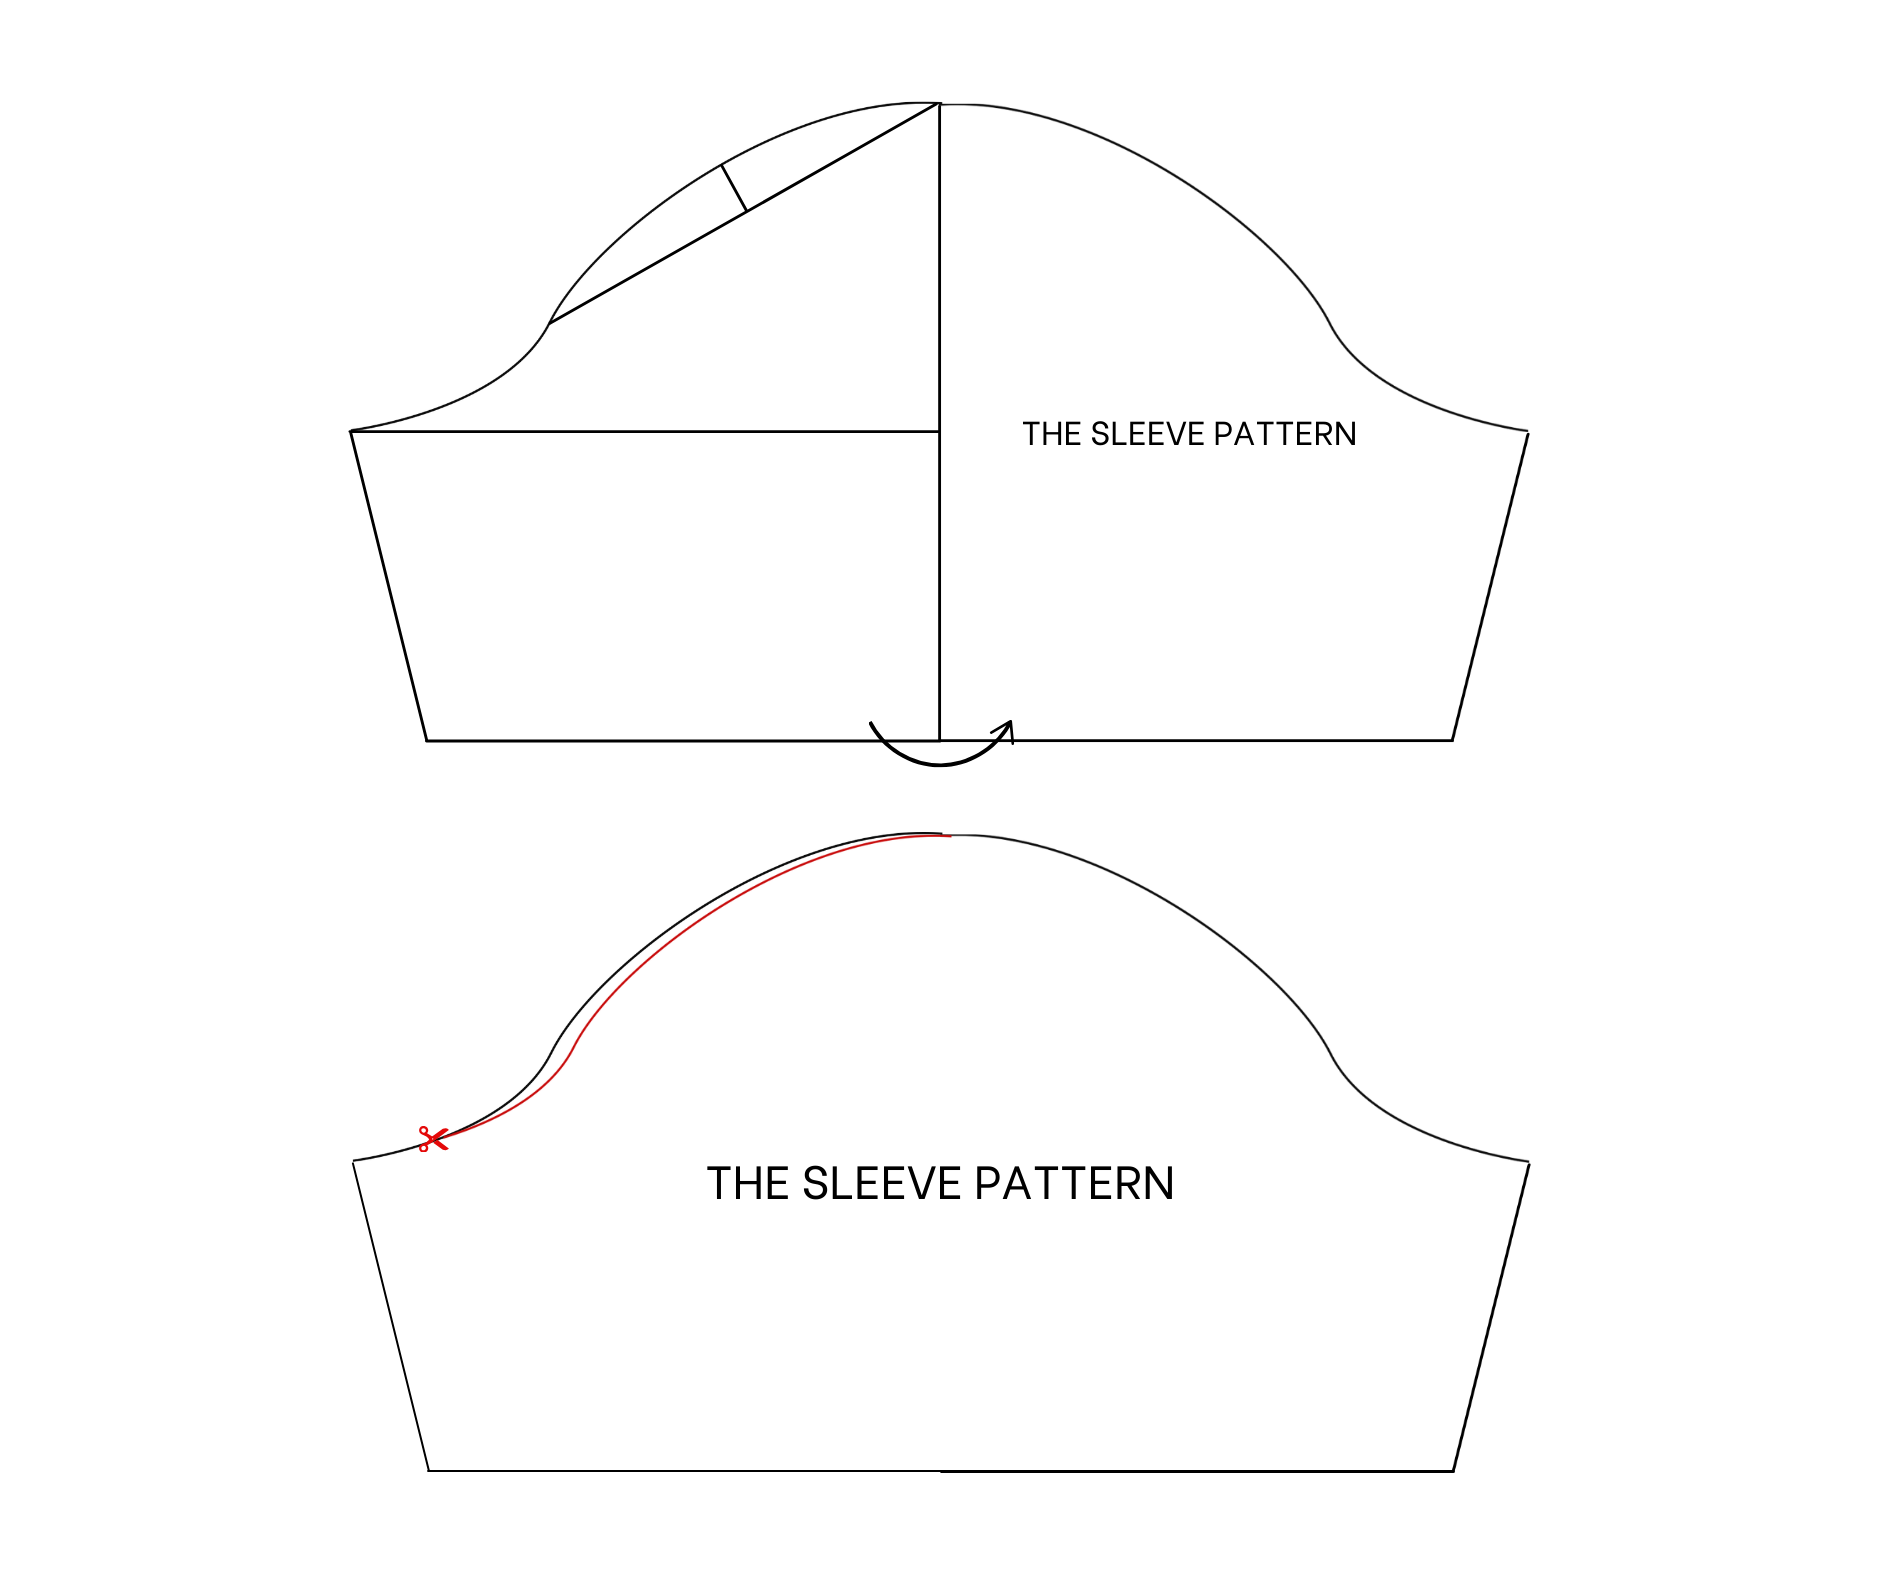
The sleeve pattern
Measure the width of the sleeve line at the front and the back bodice first. After that, draw a straight line and a folding horizontal line cutting each other.
From the cutting point, mark to the right side 12.6 cm which is one per ten the bust size plus 3 cm then draw a slanted line from this mark and cut the straight line. Make sure the width of the slanted line is the total width of the sleeve line at the front and the back bodice that you’ve just checked before.
Divide this slanted line into three equal parts. From the middle of the first two parts, draw an outside perpendicular line with 2 cm length; from the middle of the third part, draw an inside perpendicular with 0.5 cm length. Then draw a curve line through these marks to create the sleeve line for the sleeve pattern.
From the top of the sleeve line, mark at 25 cm on the folding horizontal line which is the length of the sleeve that you want. From the cutting point between the new straight line and the folding horizontal line, mark up 20 cm which is a half width at the end of the sleeve that you want. Then connect this mark to the end of the sleeve line to create the under arm big line of the sleeve pattern.
To make the front part of the sleeve pattern, move one under arm big line inside the other one 1 cm first then redraw the sleeve line later.
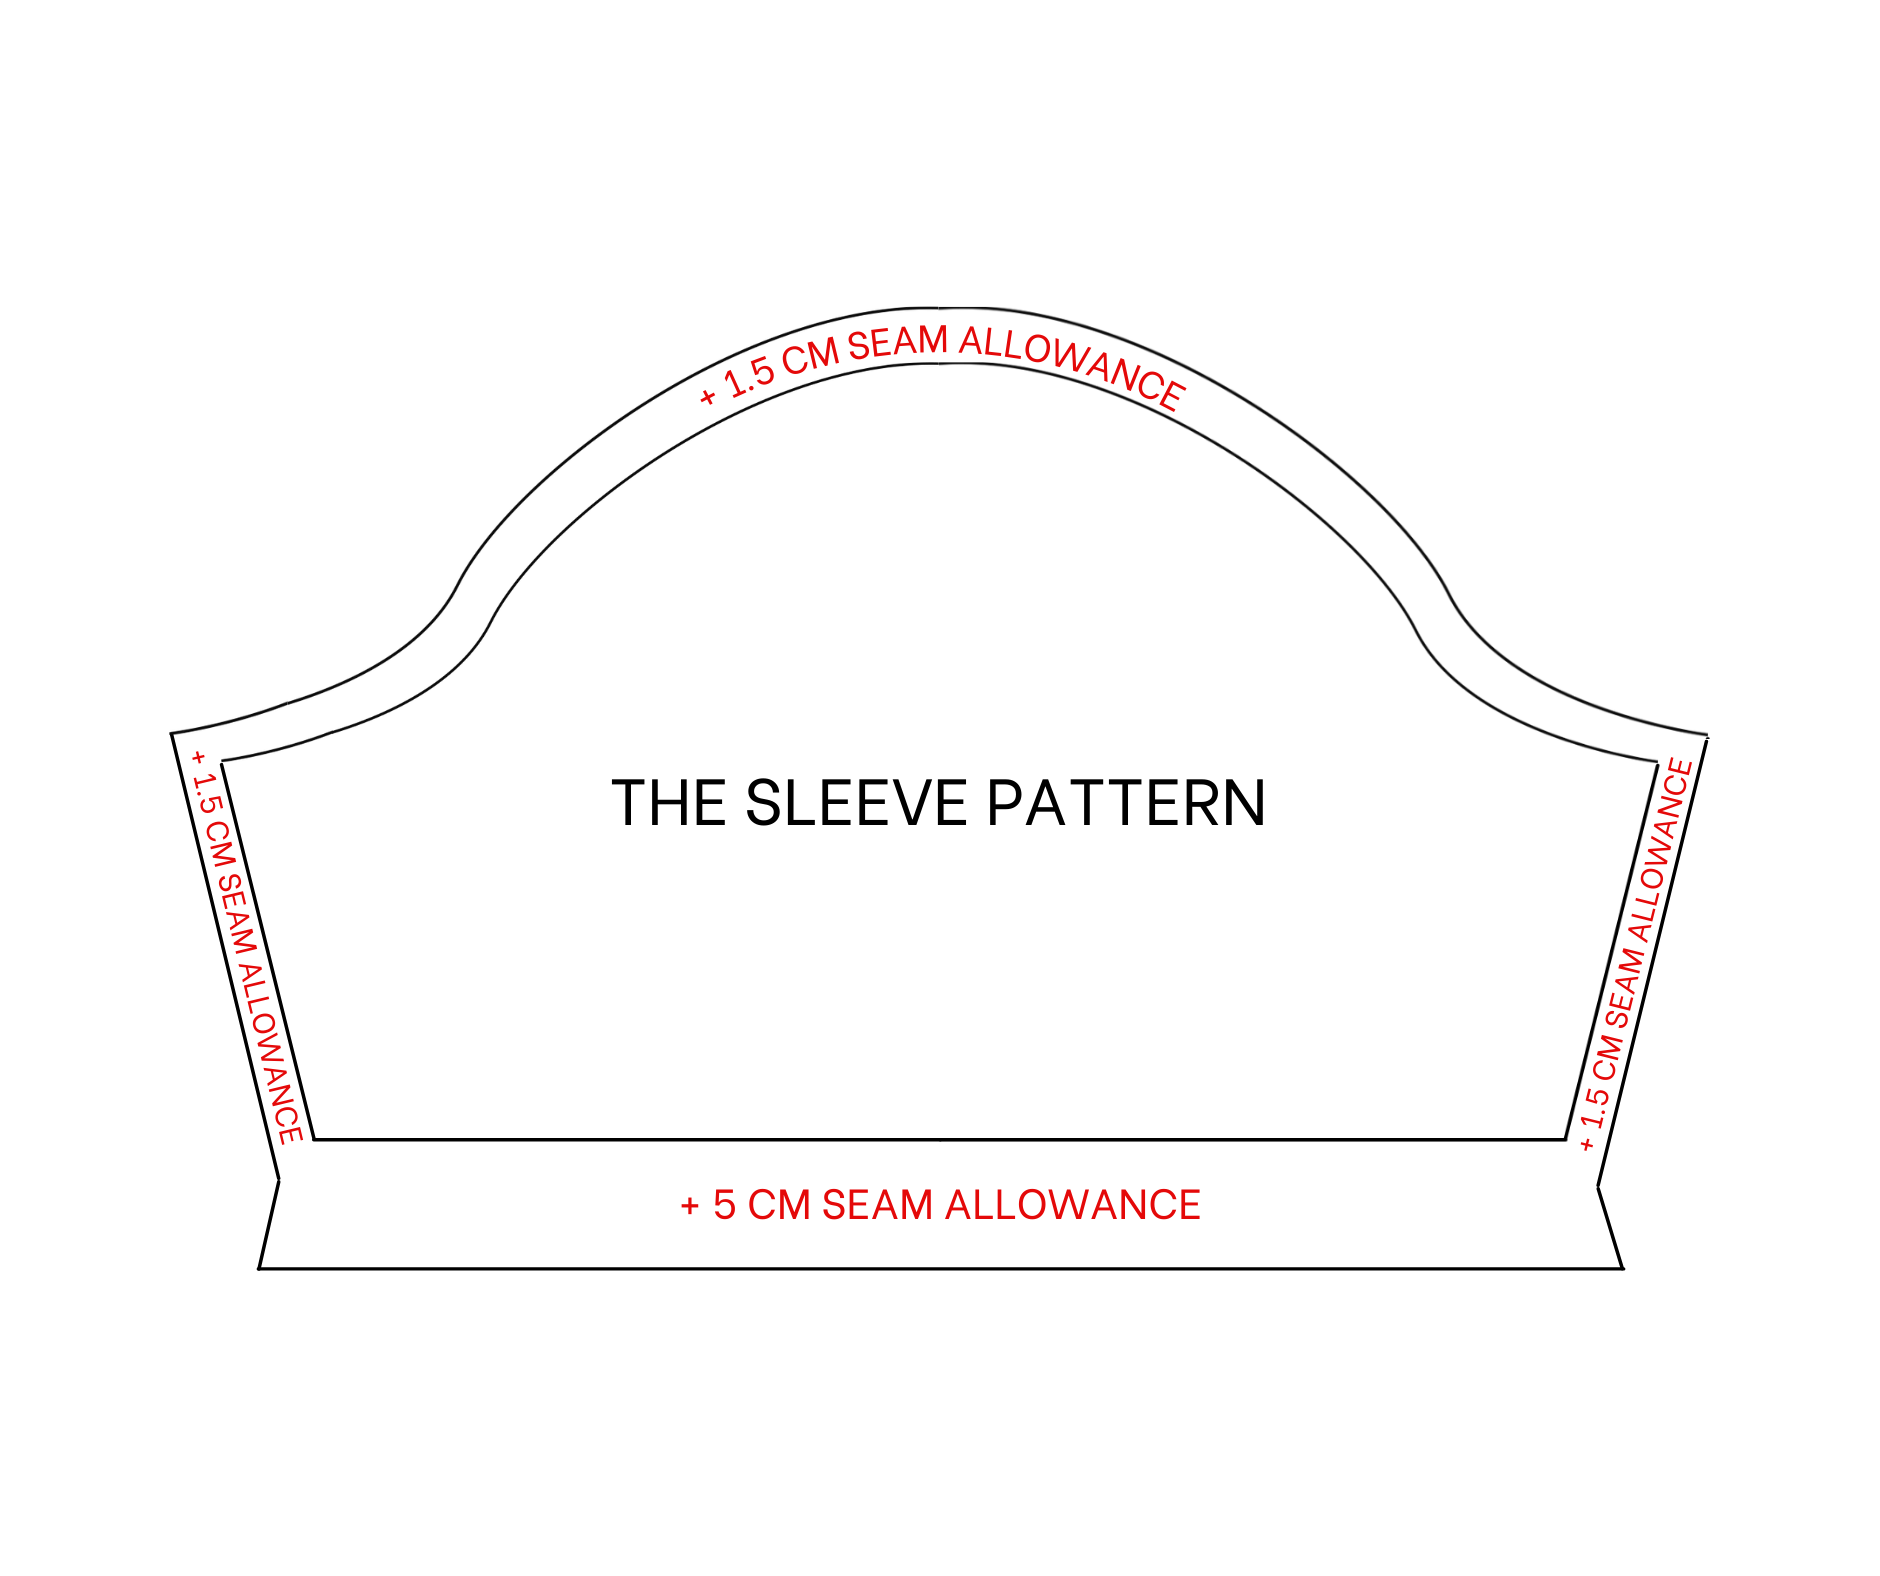
We will have the sleeve pattern after cutting. Add 1.5 cm for seam allow at the under arm big line and the sleeve line, add 5 cm for seam allowance at the ending line.
THE COLLAR PATTERN
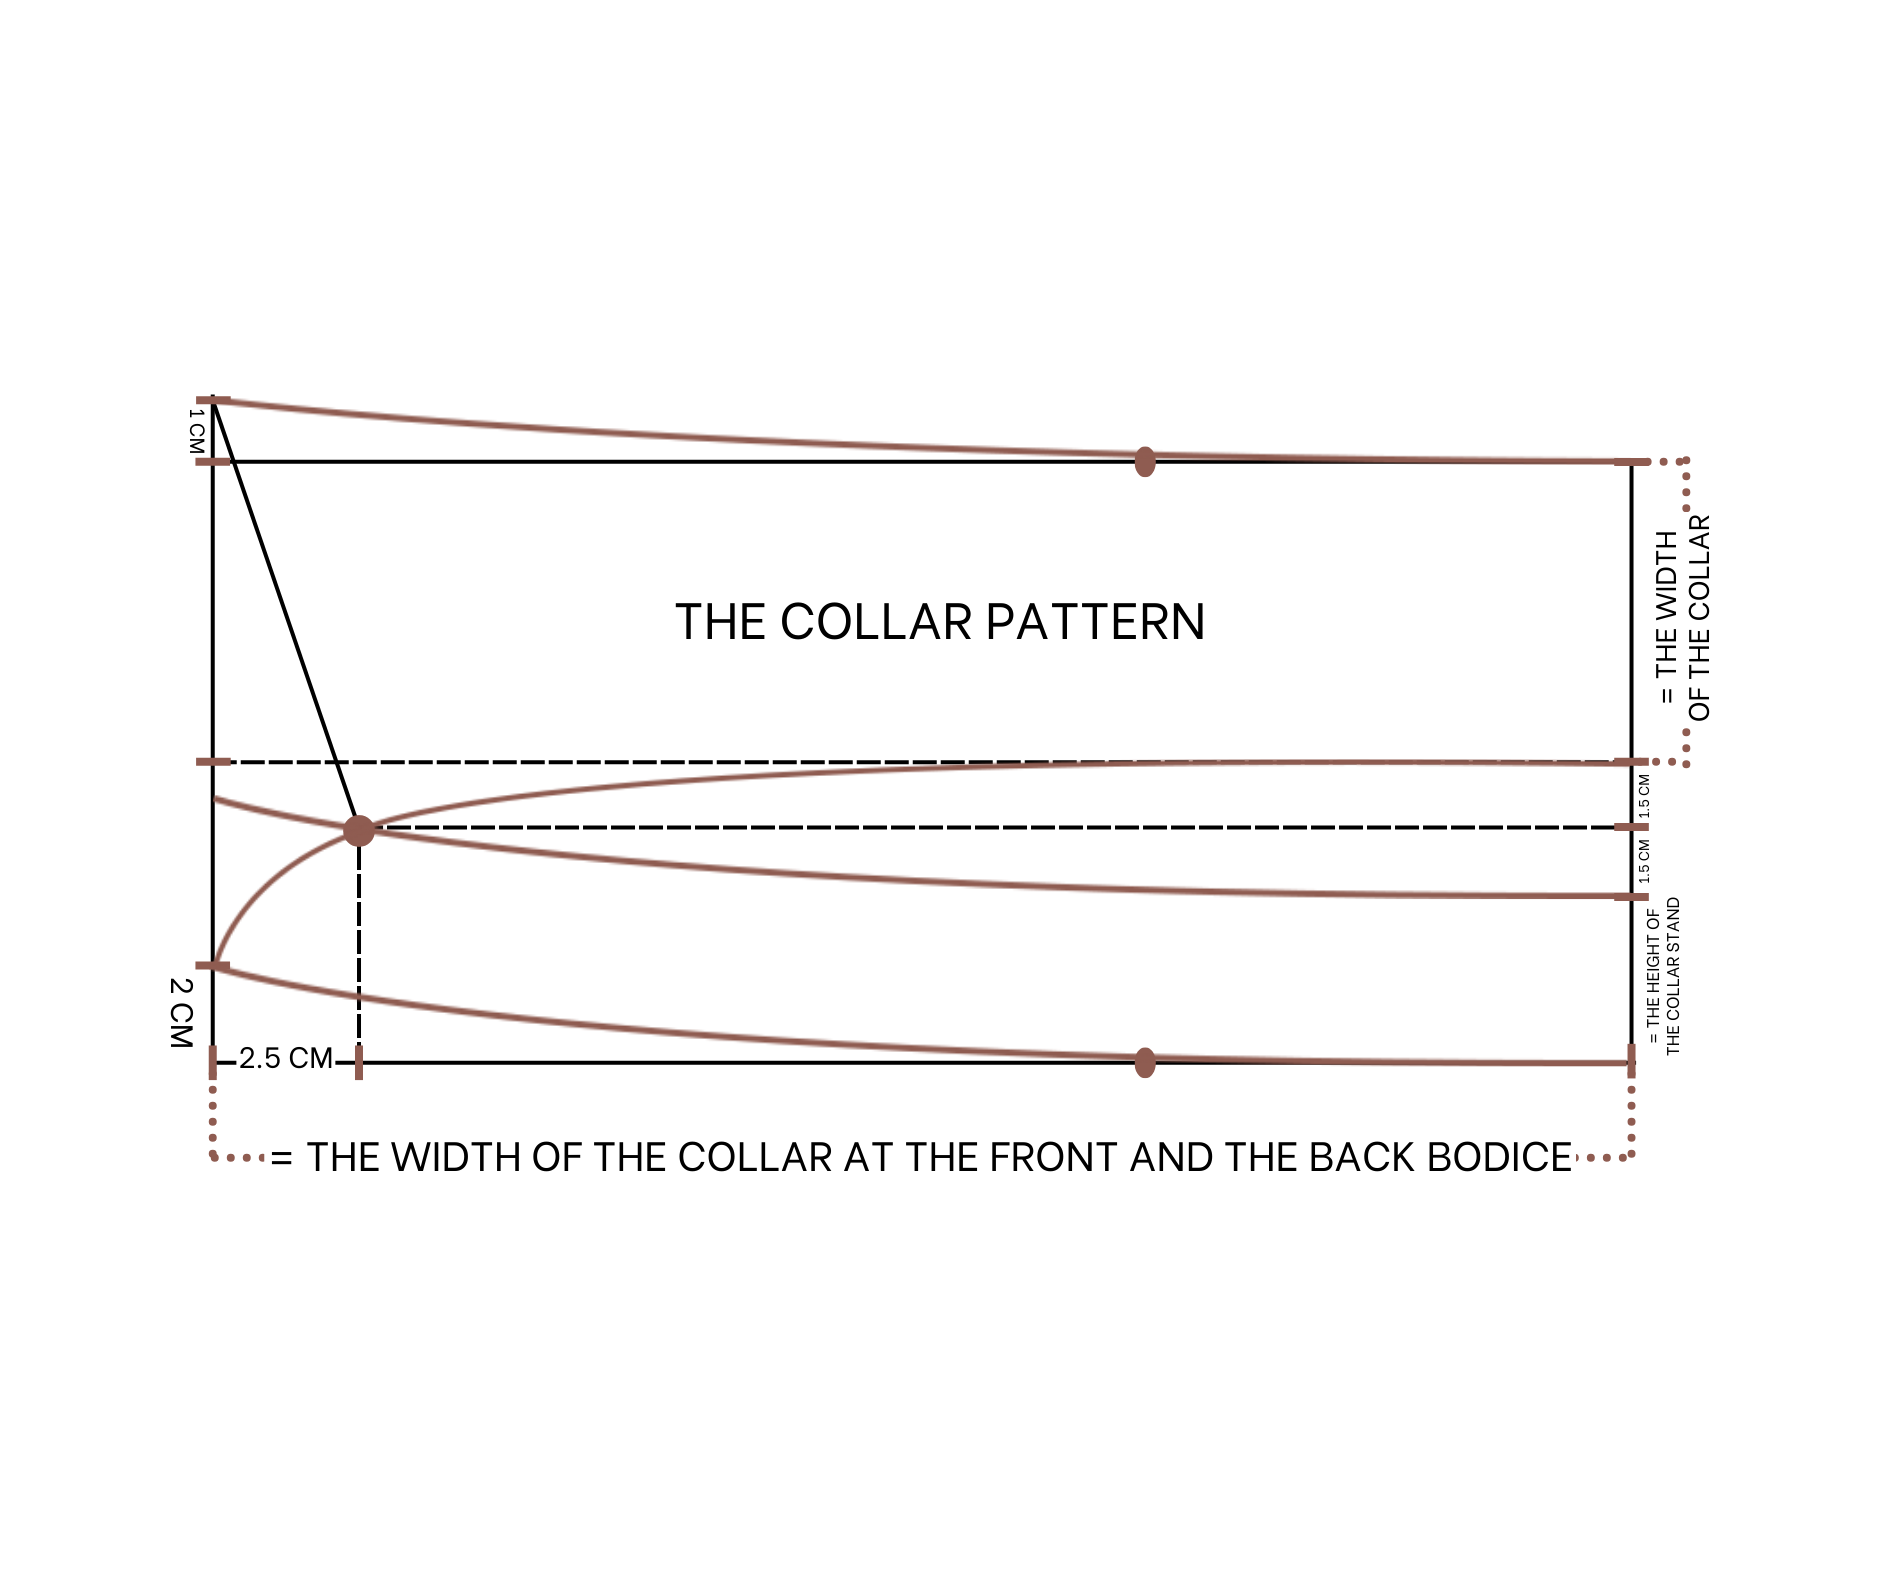
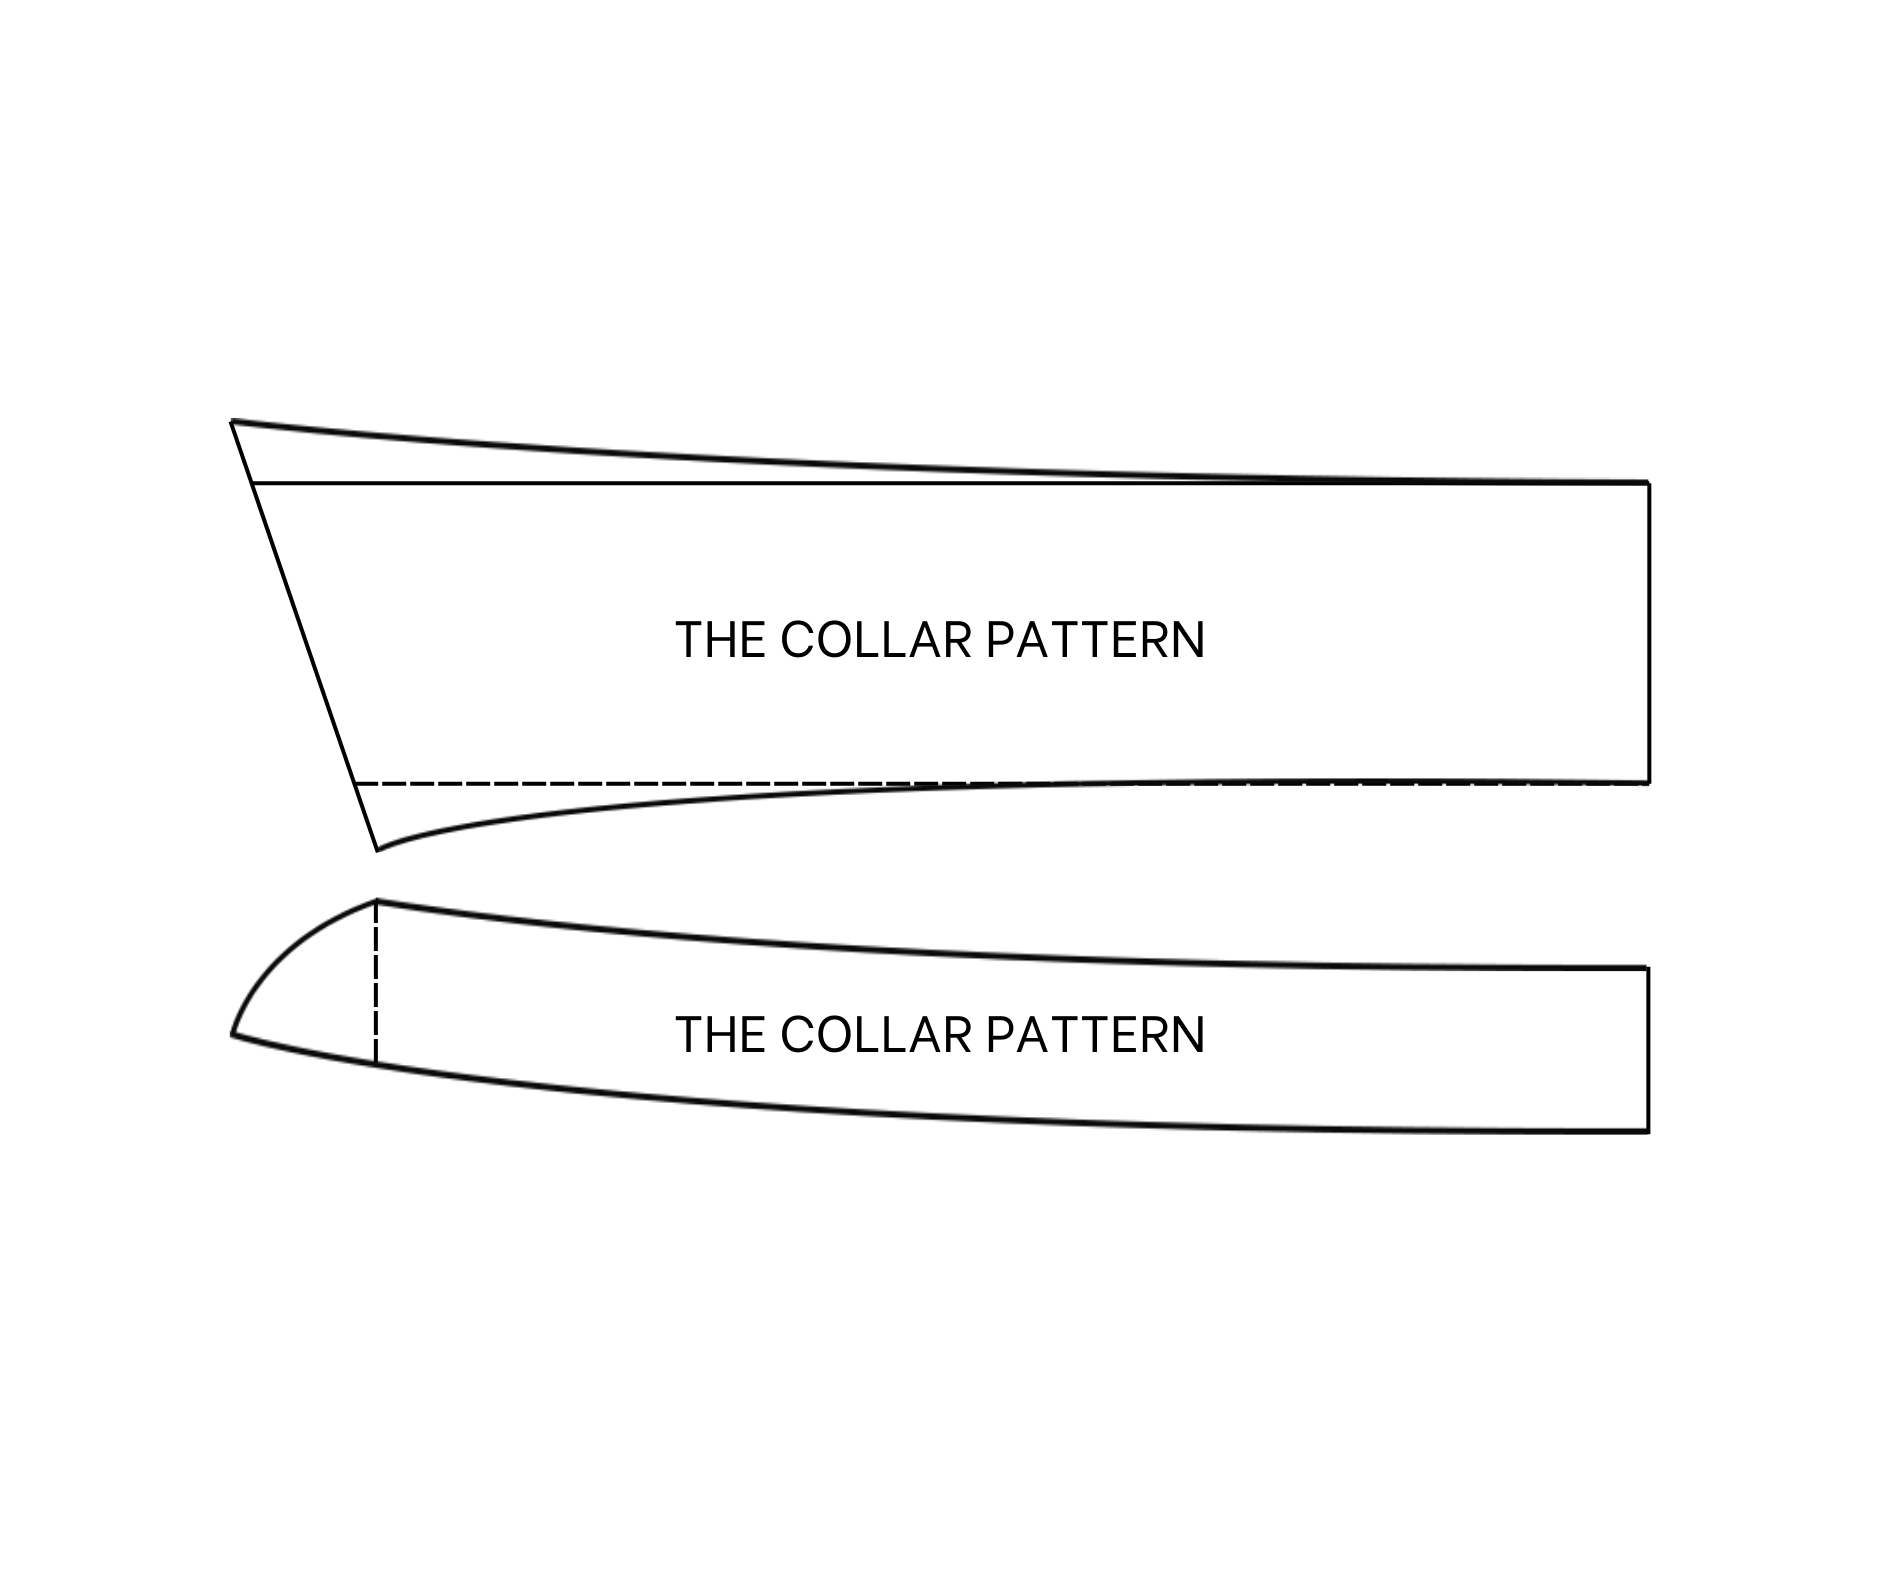
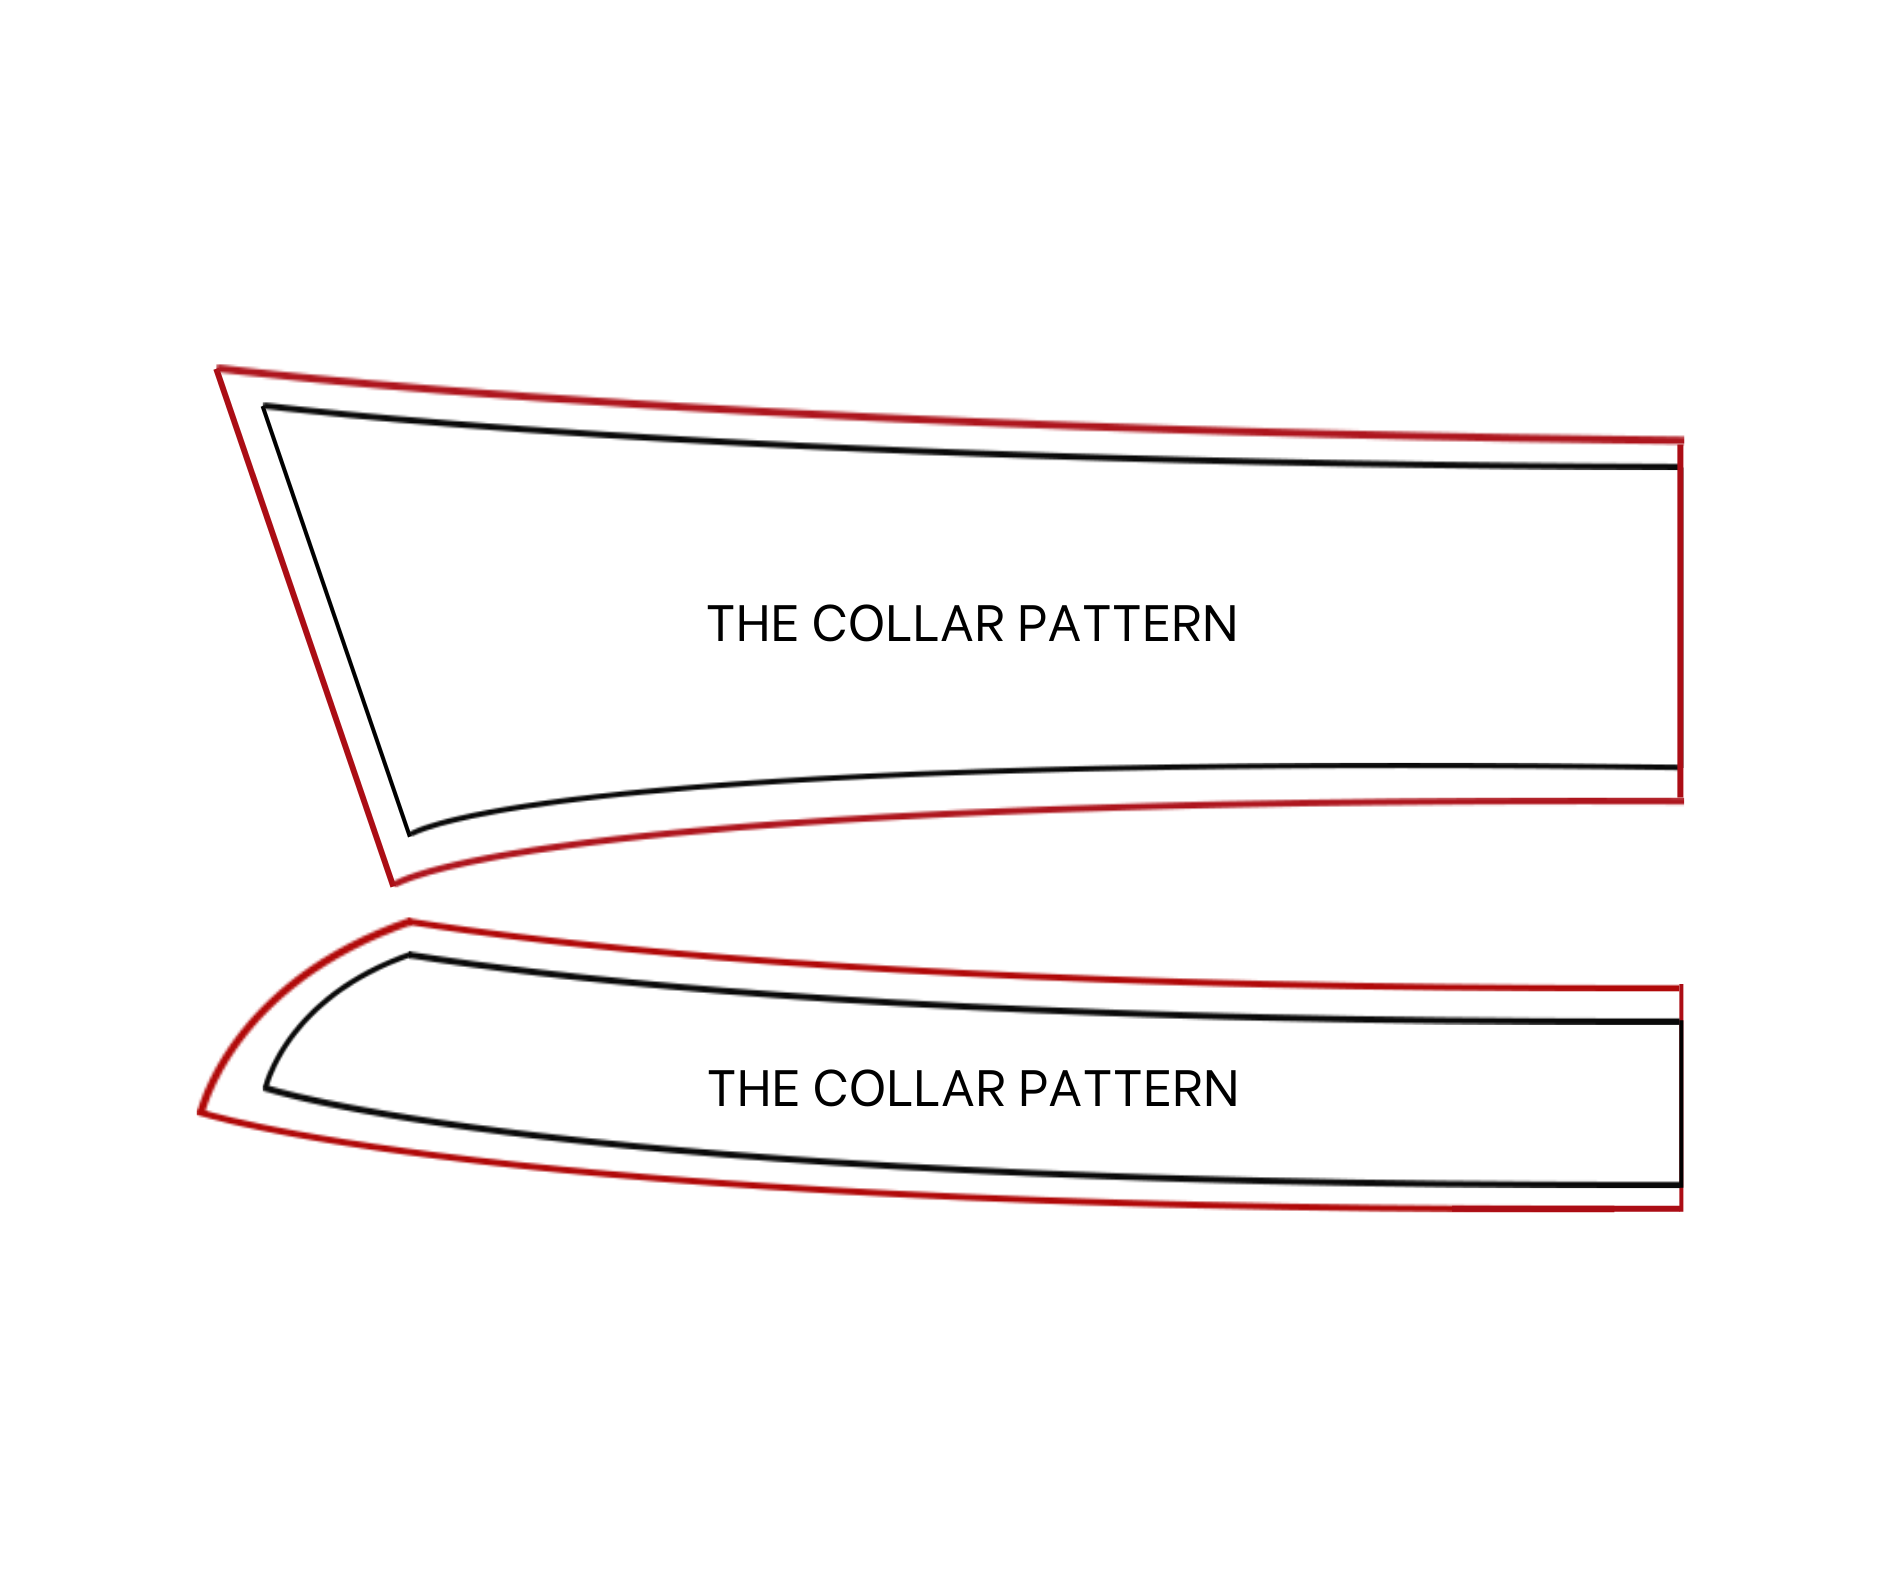
The collar pattern
Measure the width of the neck line at the front and the back bodice patterns first. Then draw a straight line and a horizontal line cutting each other later.
From the cutting point, mark to one side of the horizontal line 24 cm which is the total width of the neck line at the front and the back bodice that you’ve just checked before. Then draw a straight line through that mark.
From the cutting point between the new straight line and the horizontal line, mark up 2 cm then mark at one per three the width between two marks on the horizontal line before drawing a curve line to this mark and finish at the one on the second straight line. Based on this curved line, draw another one that is 3 cm away and parallel with it. 3 cm is the height of the collar stand that you want.
From the second straight line, draw another one at 2.5 cm from it. This new line will cut the second curve line at one point then connect that cutting point to the end of the first curve line by another curve line.
After that, measure the line from the cutting point to the horizontal line to mark the same length from the horizontal line to the first straight line. Measure again the length from the new mark to the cutting point between the straight line and the second curve line then make another mark with the same length. After that, draw a curve line that is opposite with the second one.
From the cutting point between this new curve line and the first straight line, draw a horizontal line. Mark up 4.5 cm from this cutting point which is the length of the collar that you want.
Based on that mark, draw a new horizontal line. This new horizontal line will cut the second straight line at one point. From this cutting point, mark up 1 cm then connect that mark to the one on the second curve line. Mark at one per three the last horizontal line first then draw a curve line from that mark to the one on the second straight line that I've just made before.
And we have the collar pattern after cutting. Add 1 cm for seam allowance except the first straight line and you will cut this pattern in the full fabric at that line.
SEWING THE SHIRT
THE BACK BODICE
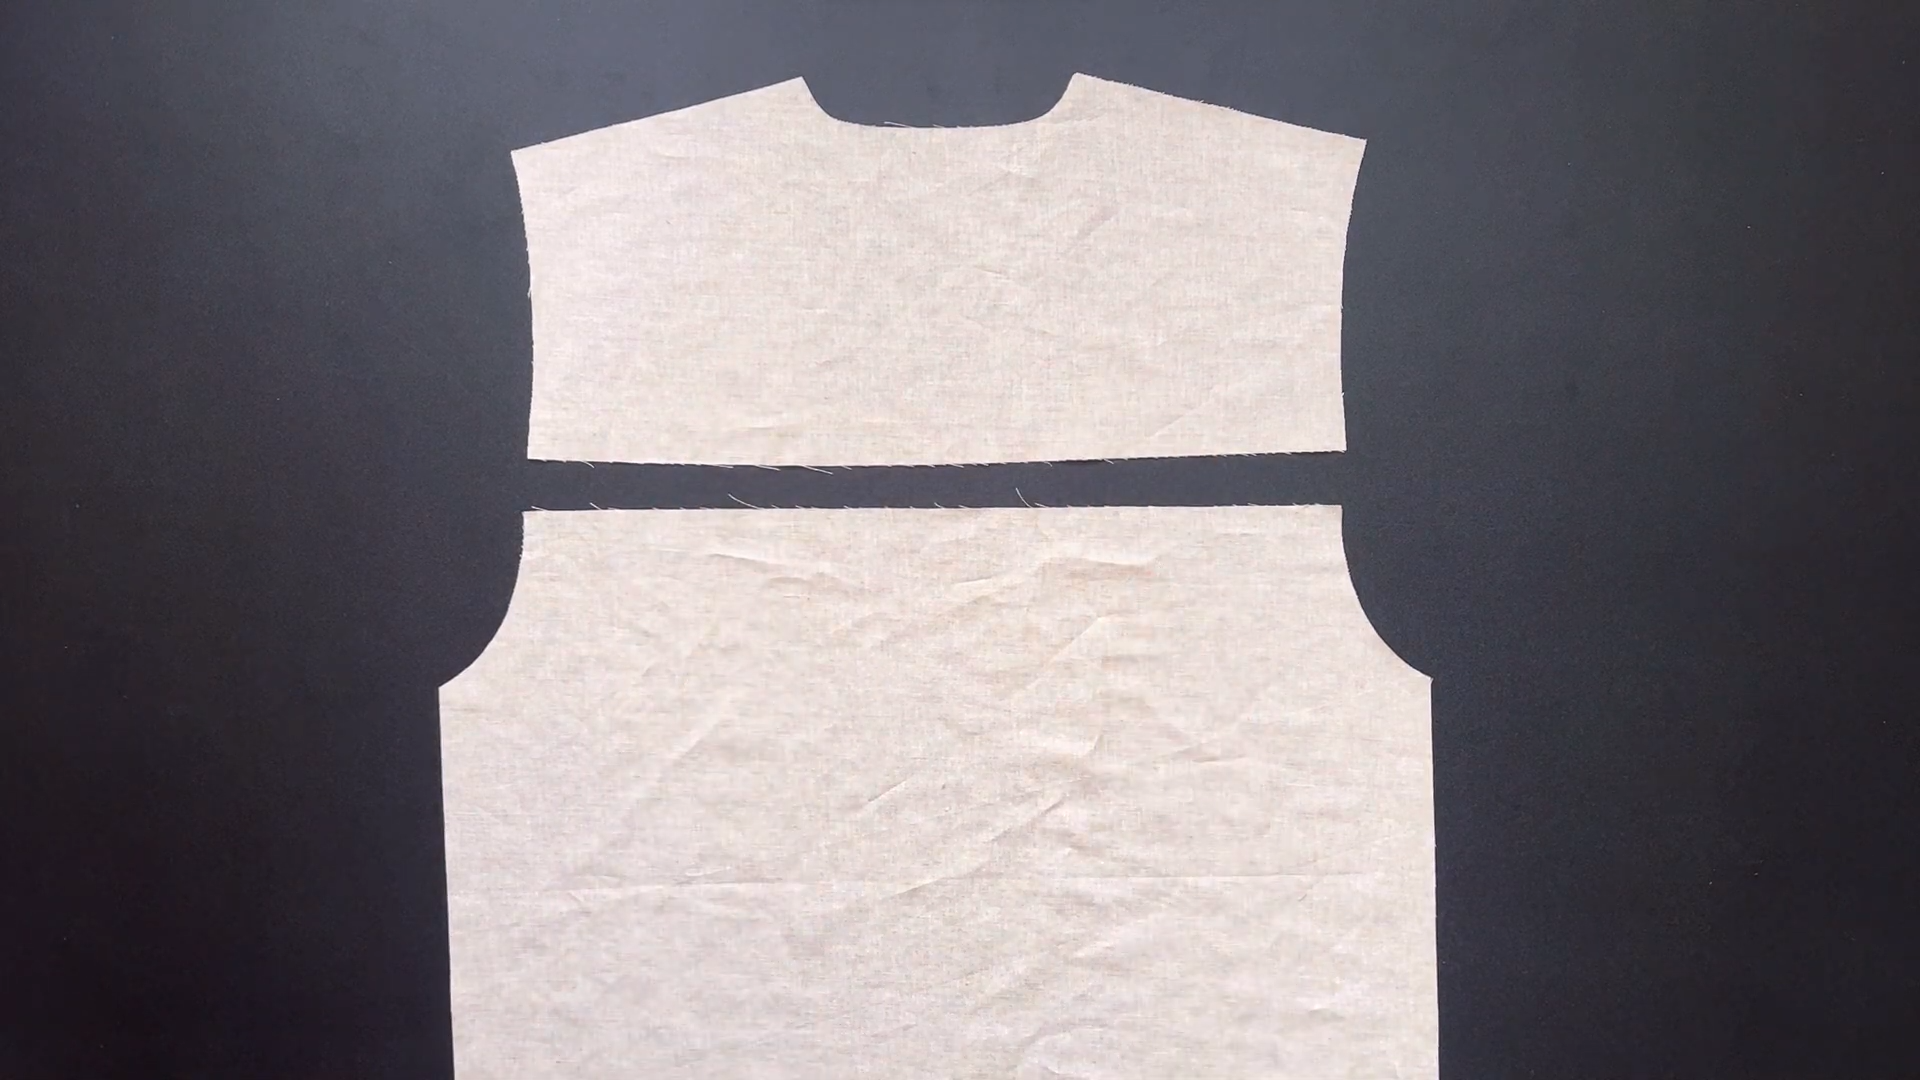
Cut out one piece for the lower part of the back bodice and two pieces for the yoke.
Connect these pieces together. Ensure that the lower part is positioned in the middle between the two yoke pieces.
Sew them together, creating a strong seam.
To secure all the loose fabric ends, add an over-stitching seam along the edges.
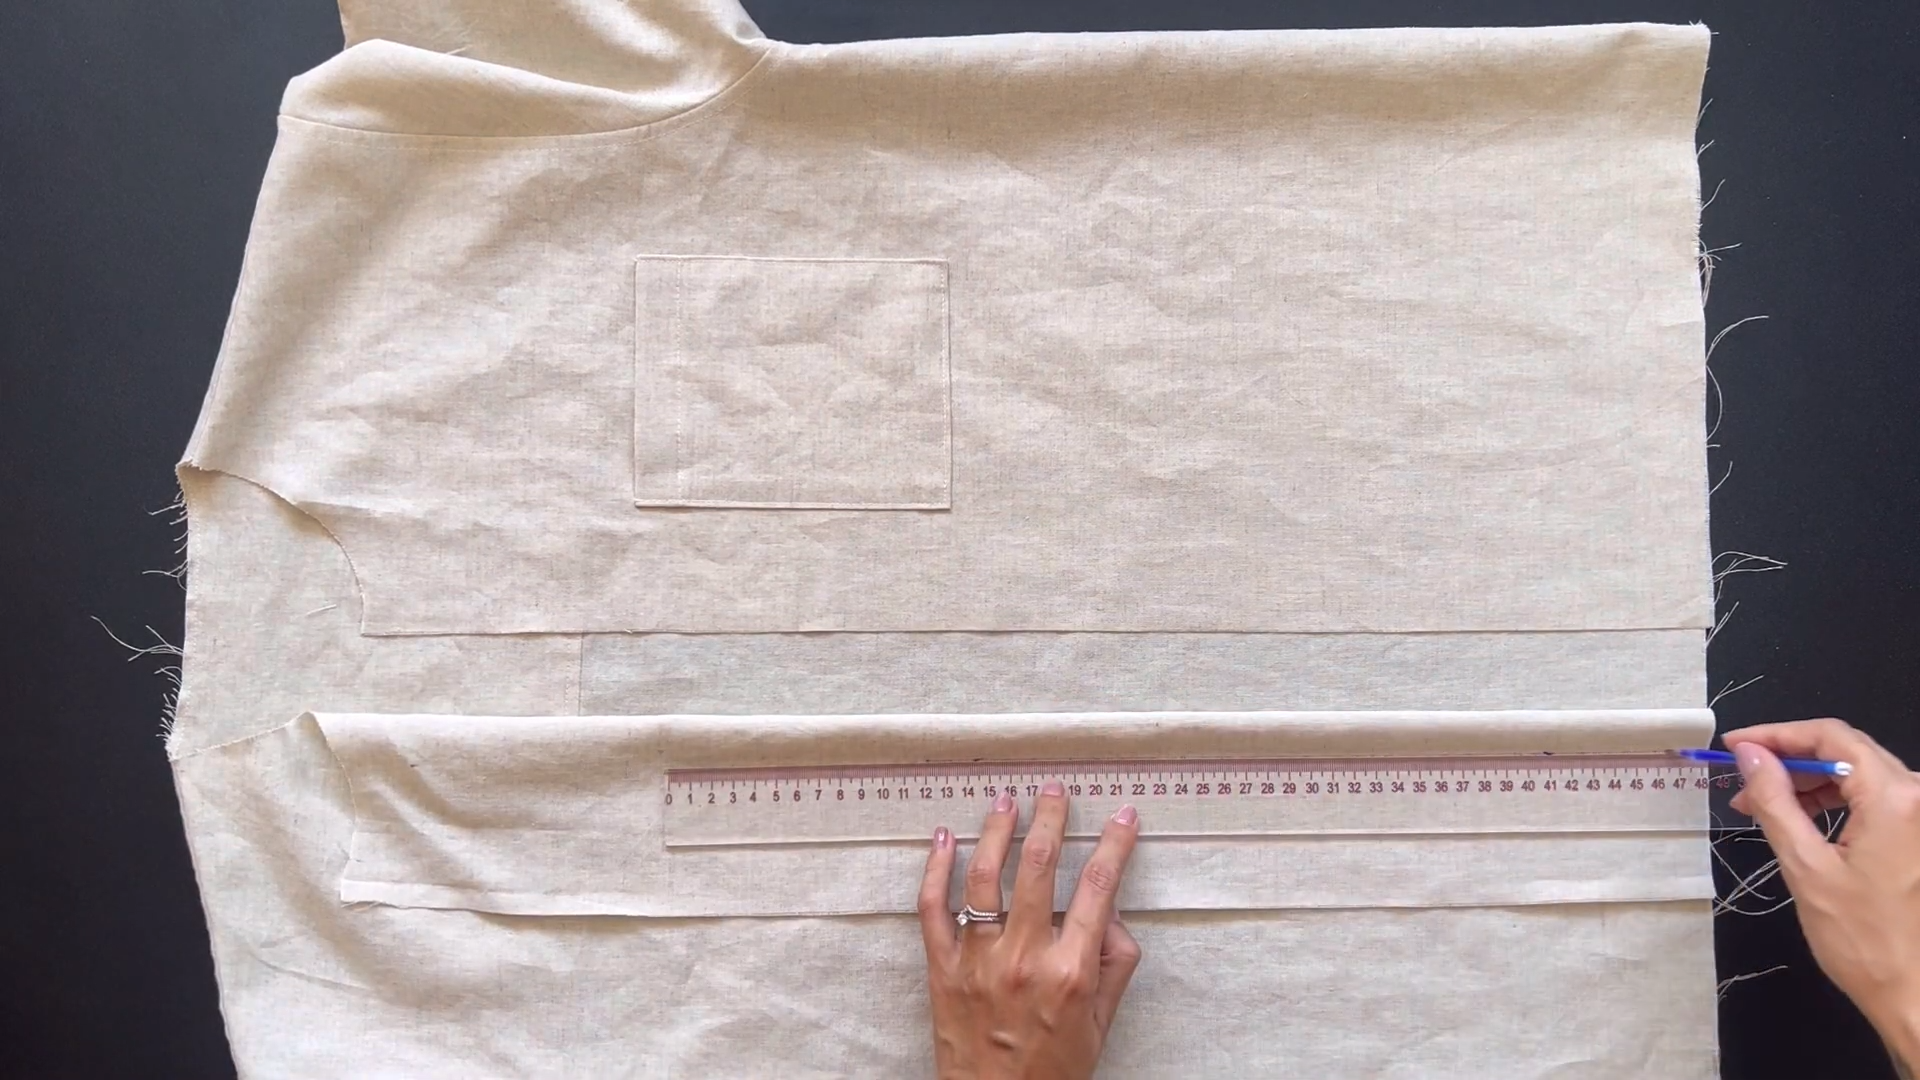
THE FRONT POCKET
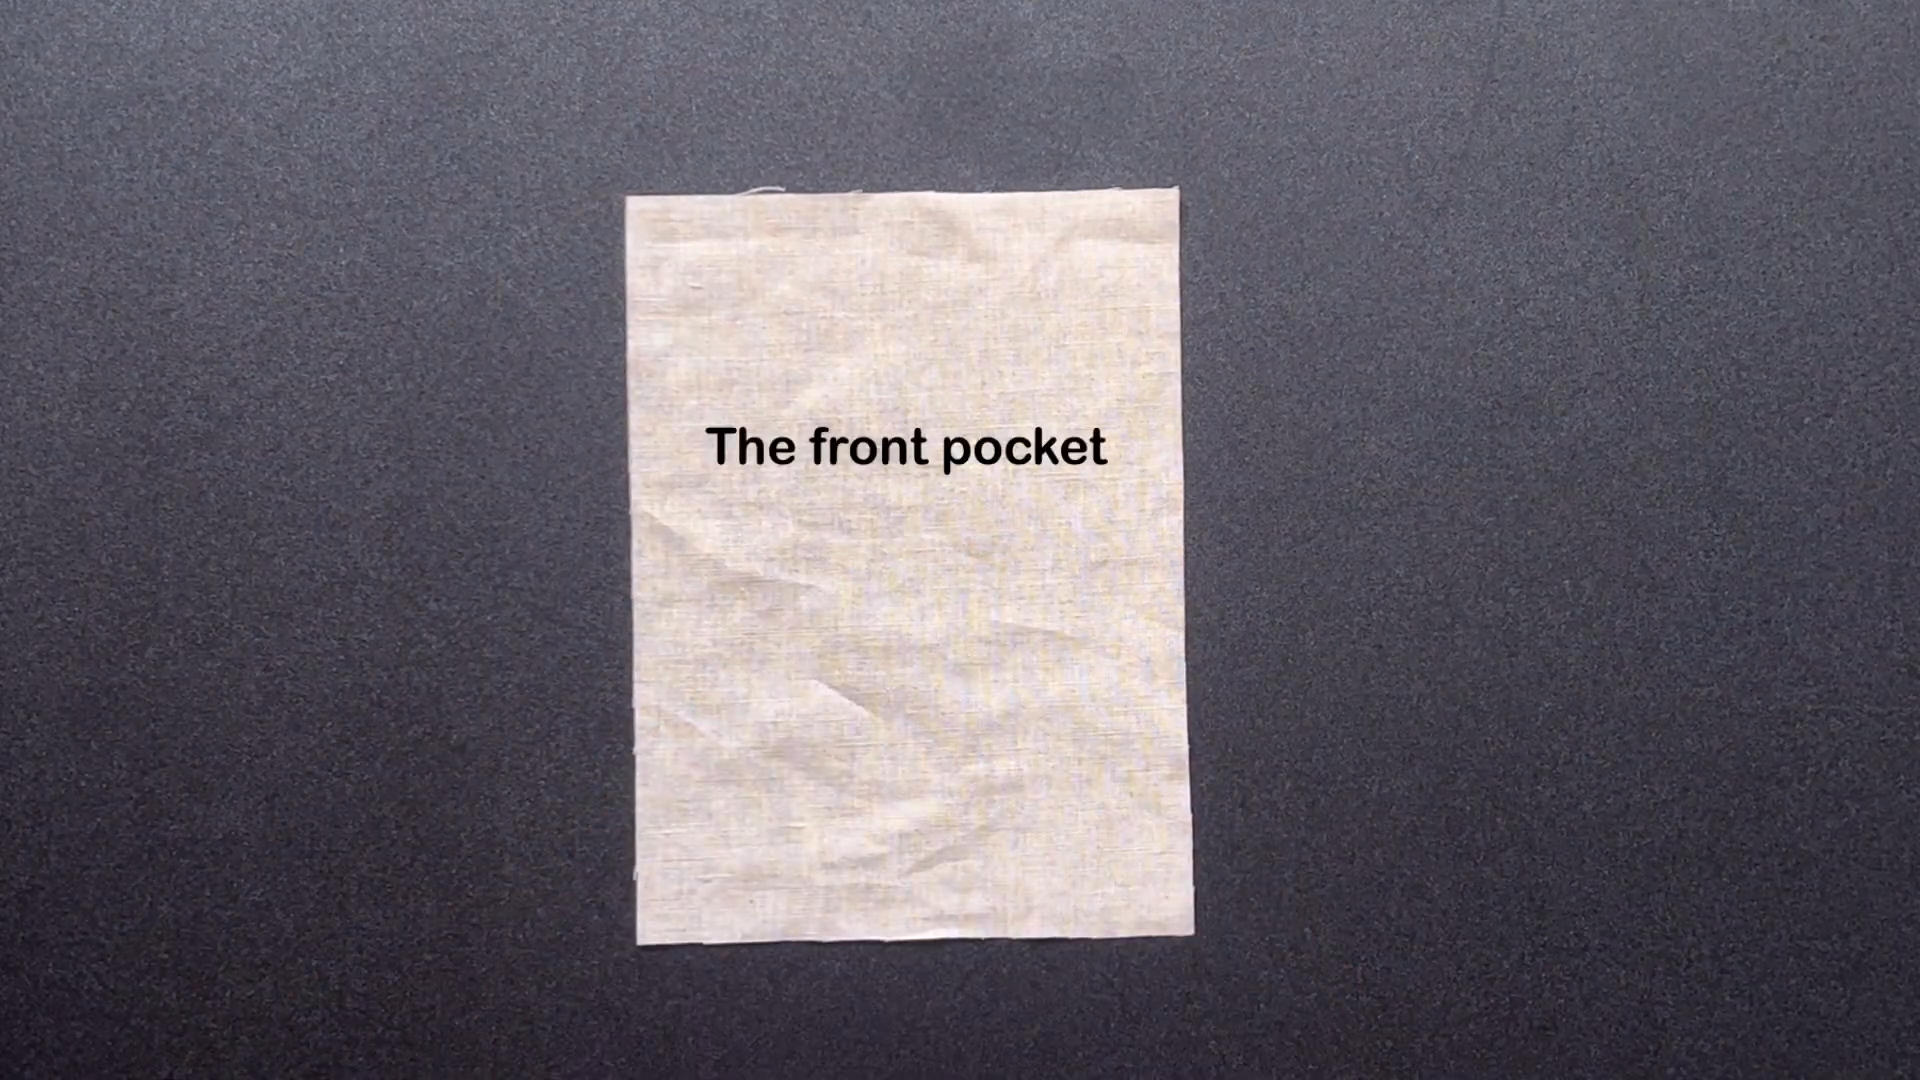
Start by cutting a rectangular piece of fabric. Make it 18 cm long (height of the pocket + 5 cm for seam allowance) and 14 cm wide (width of the pocket + 3 cm for seam allowance).
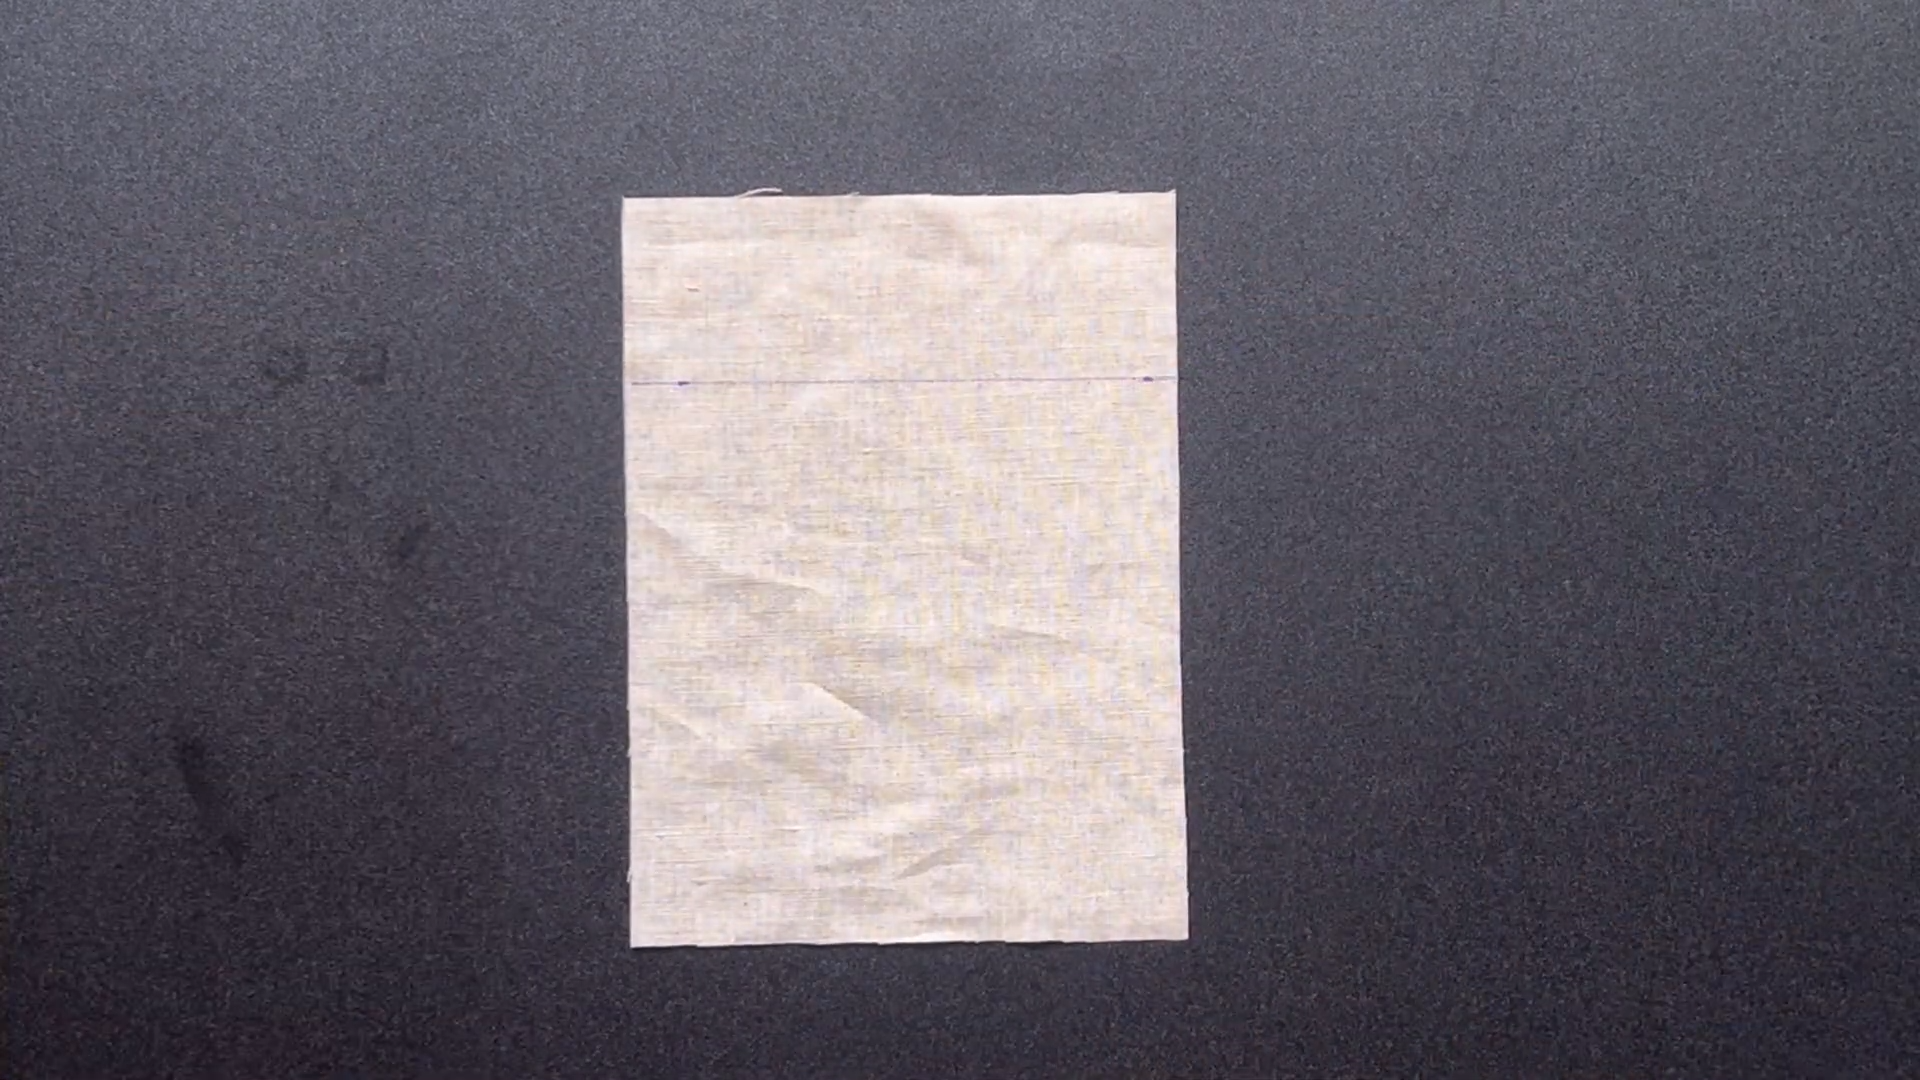
Measure 5 cm down from the top edge of the fabric and draw a line across.
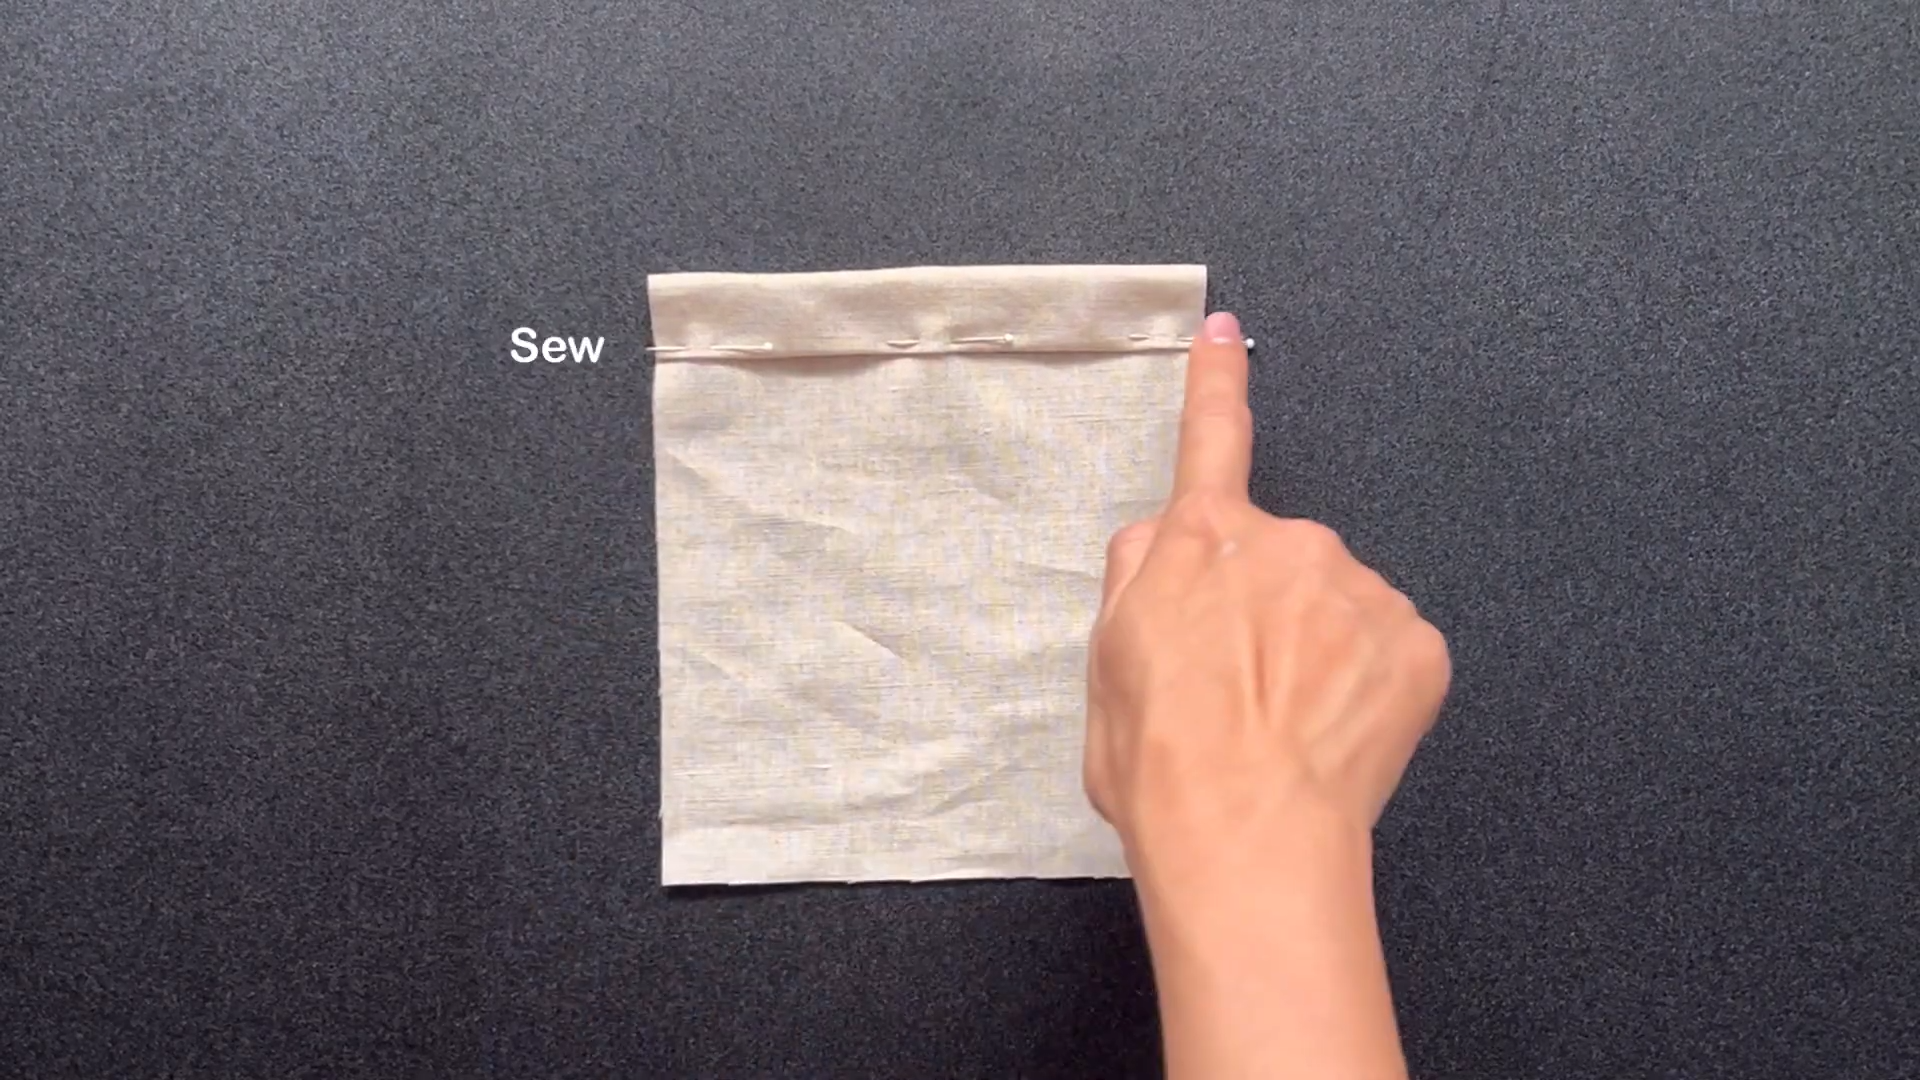
Fold the top edge twice: first by 1 cm, then down to the 5 cm line.
Sew along the folded edge to secure it.
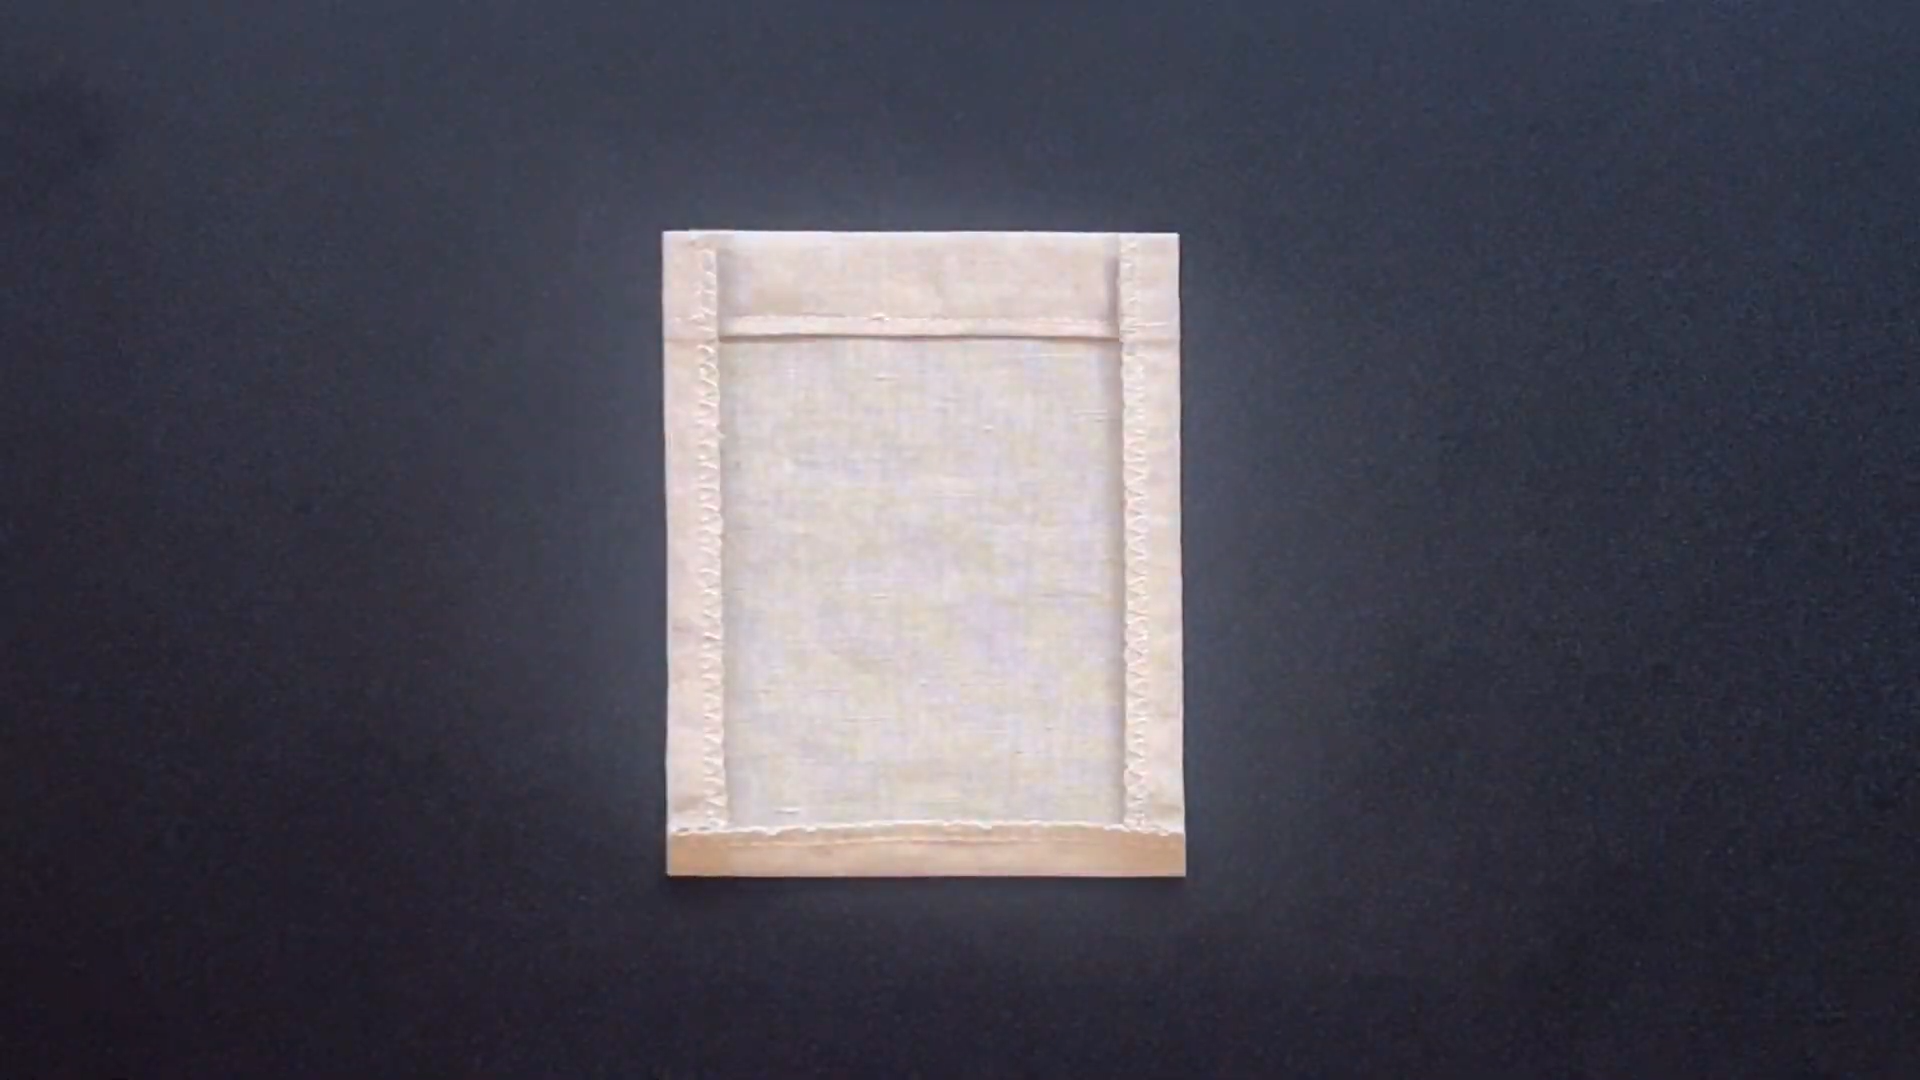
Use an iron to press the folds at 3 sides of the pocket.
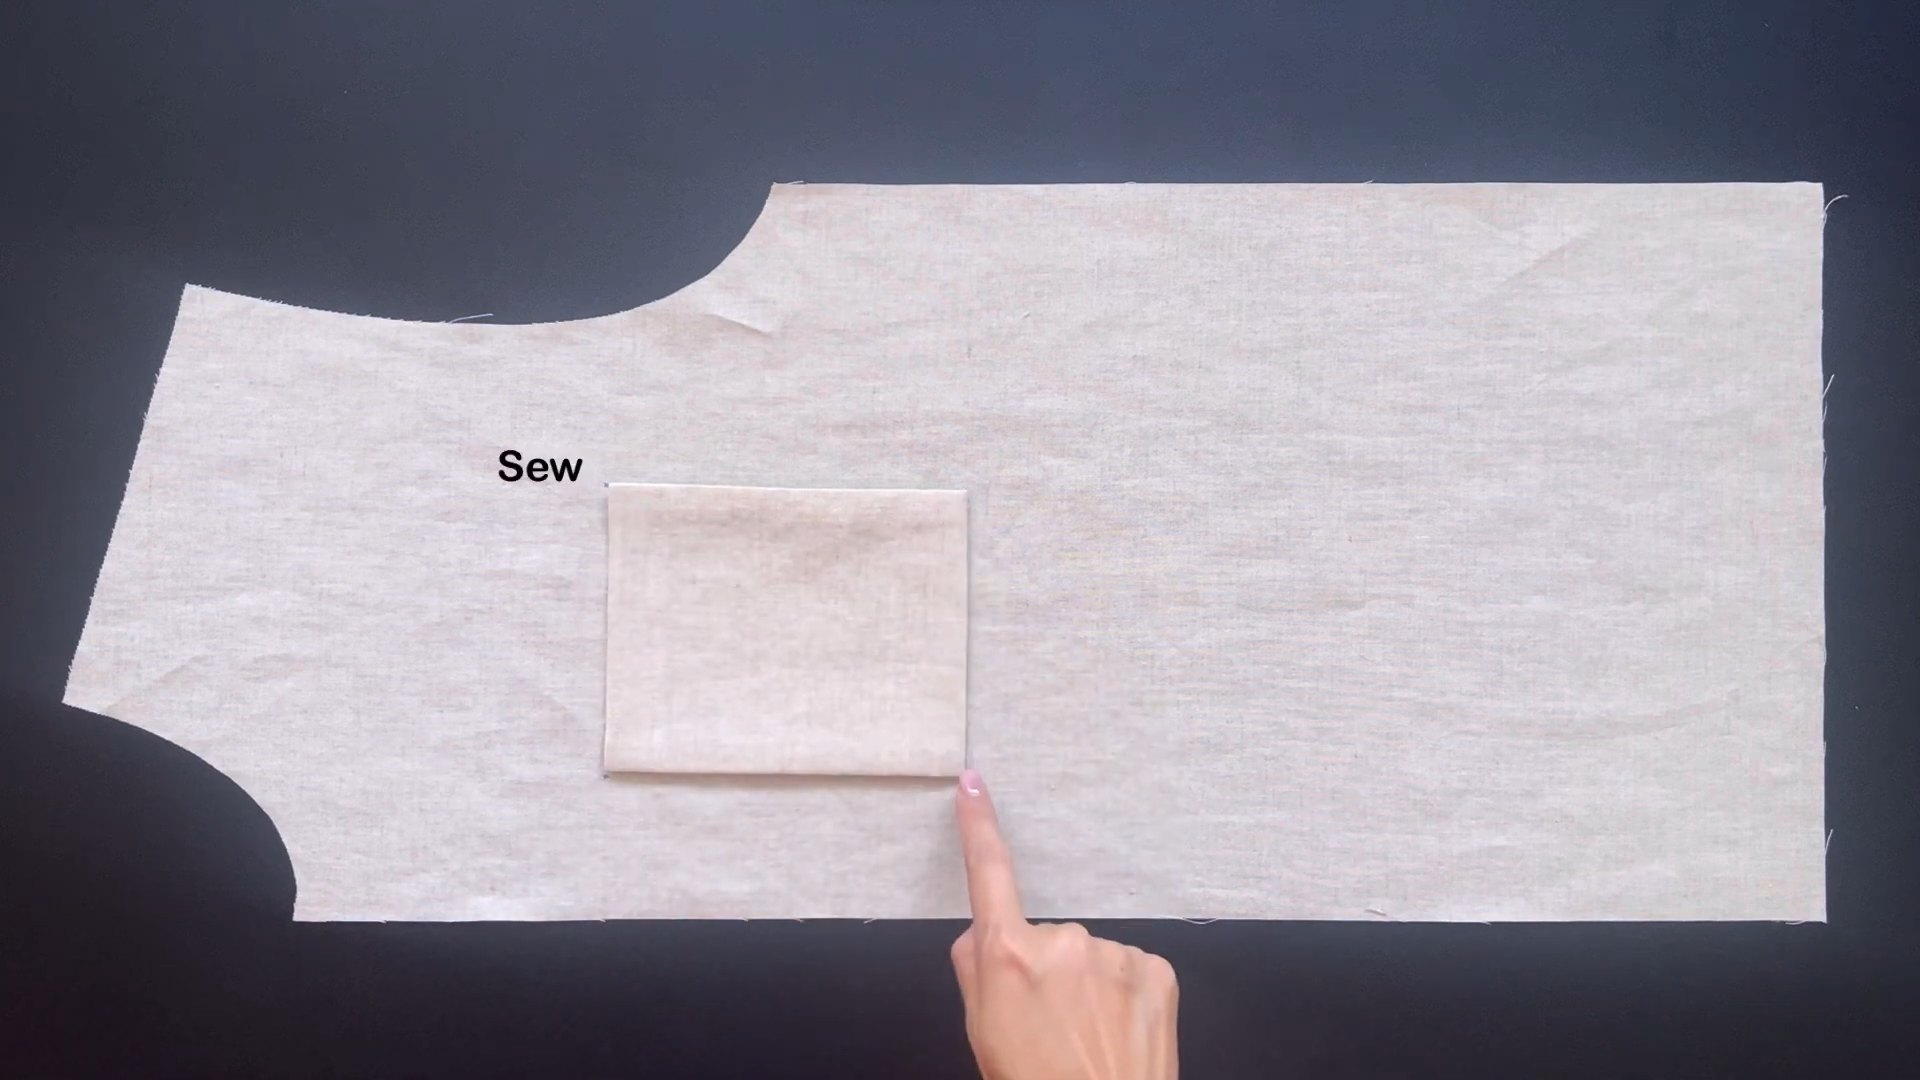
Align the pocket on the left side, right at the heart. Pin it securely in place.
Sew the pocket at 3 sides.
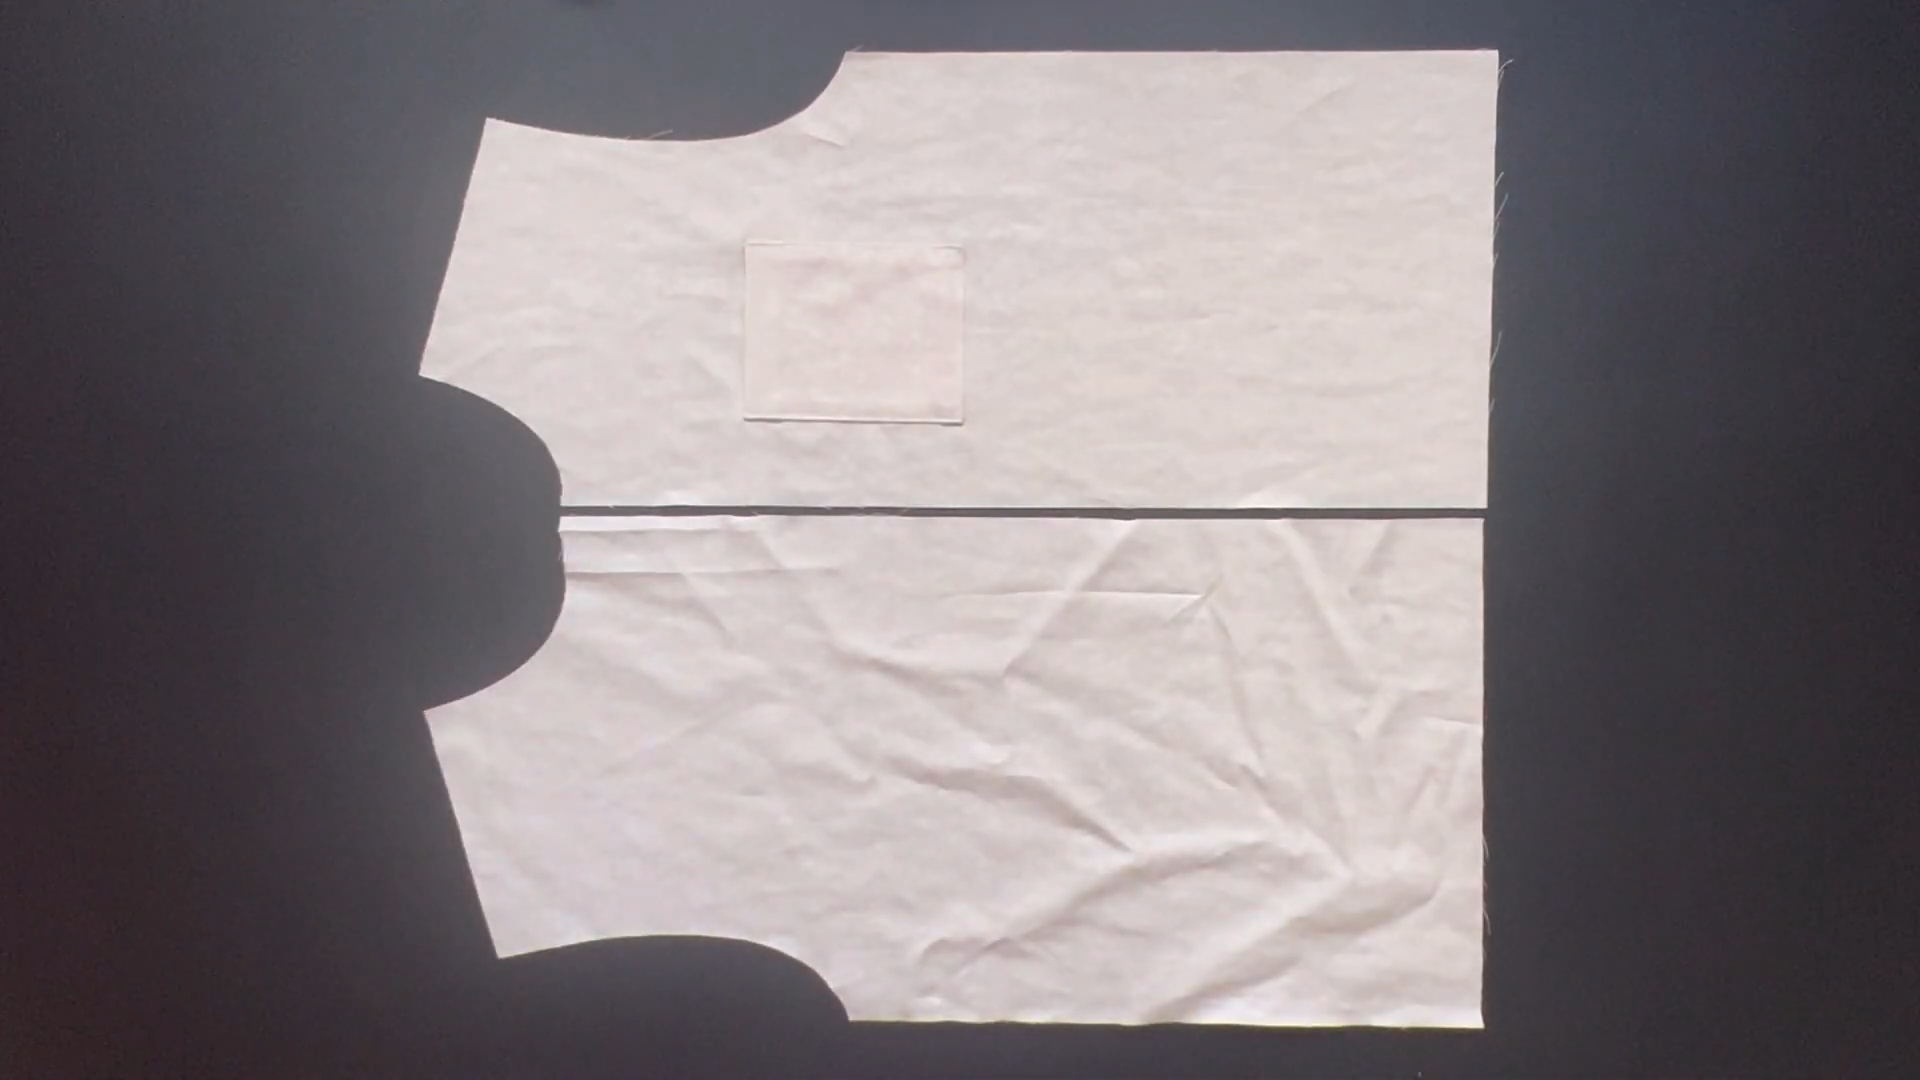
Cut out the pieces for the front bodice.
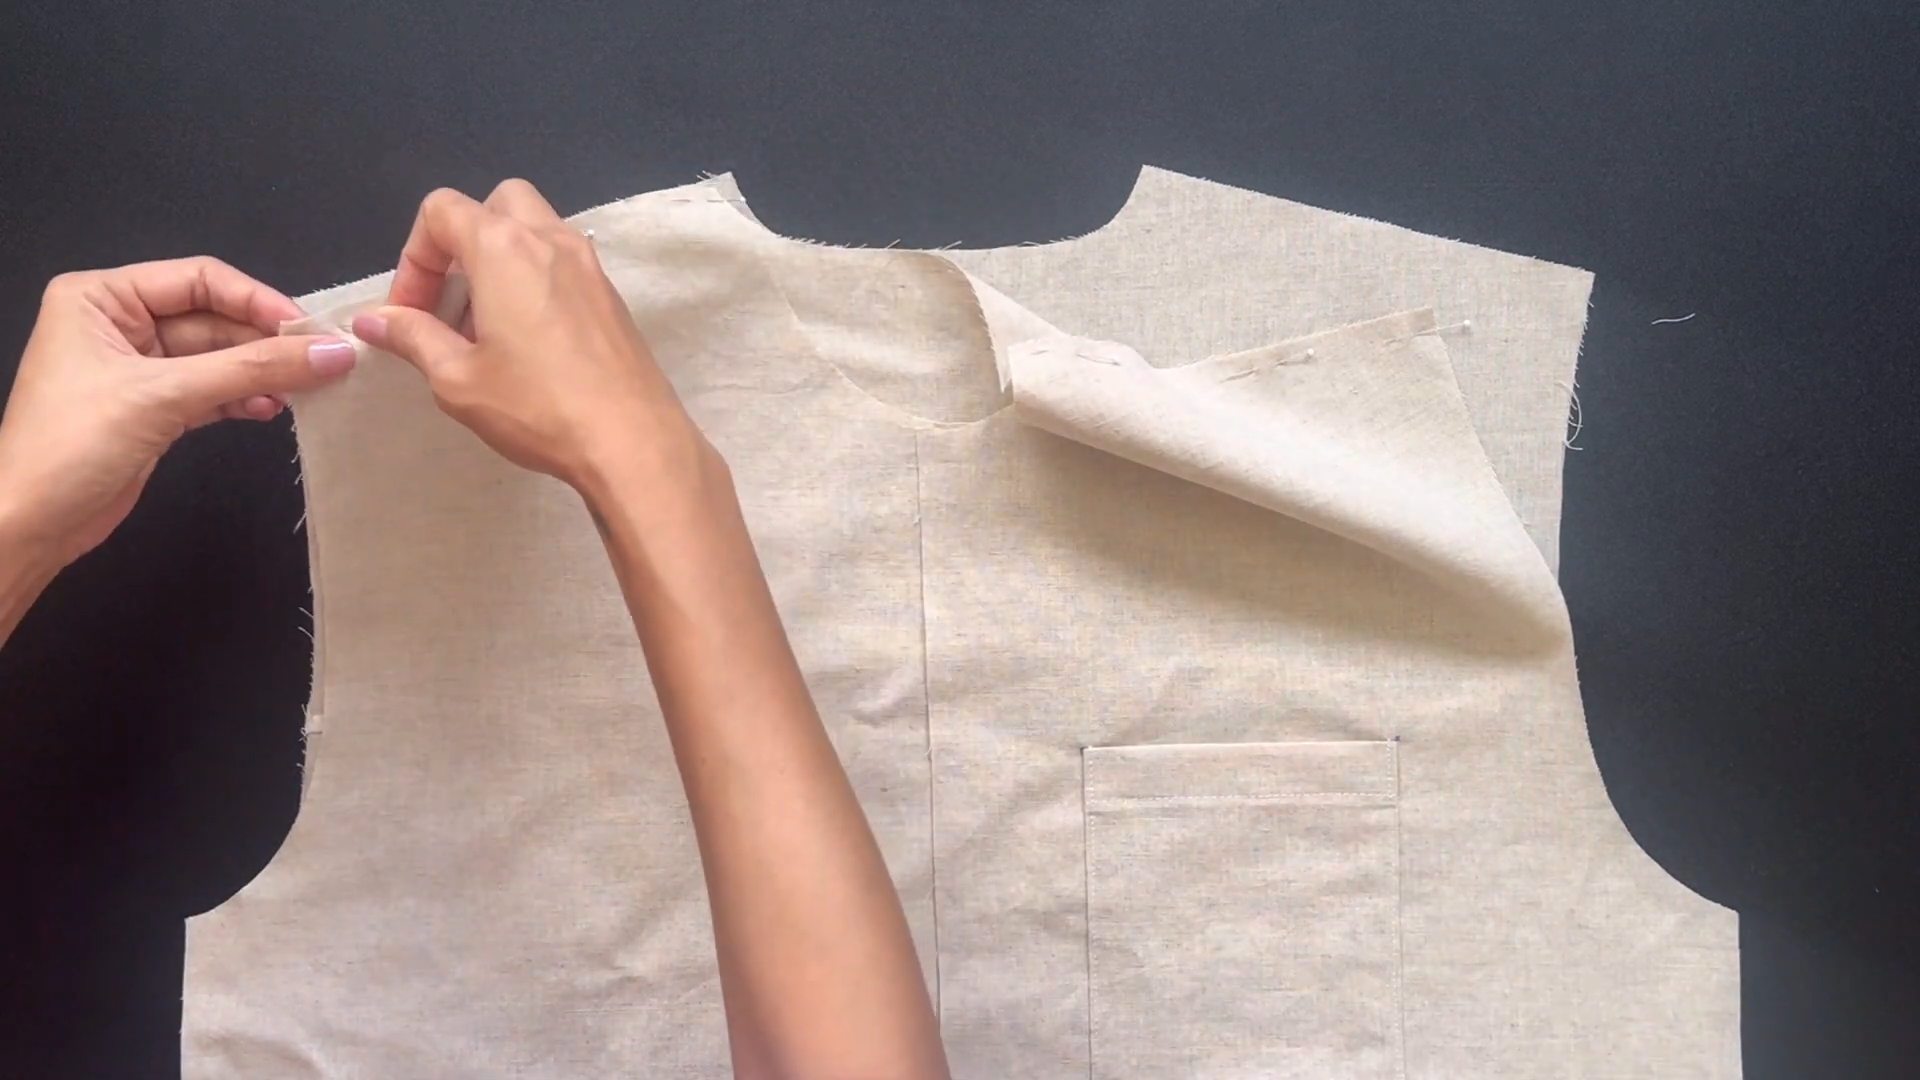
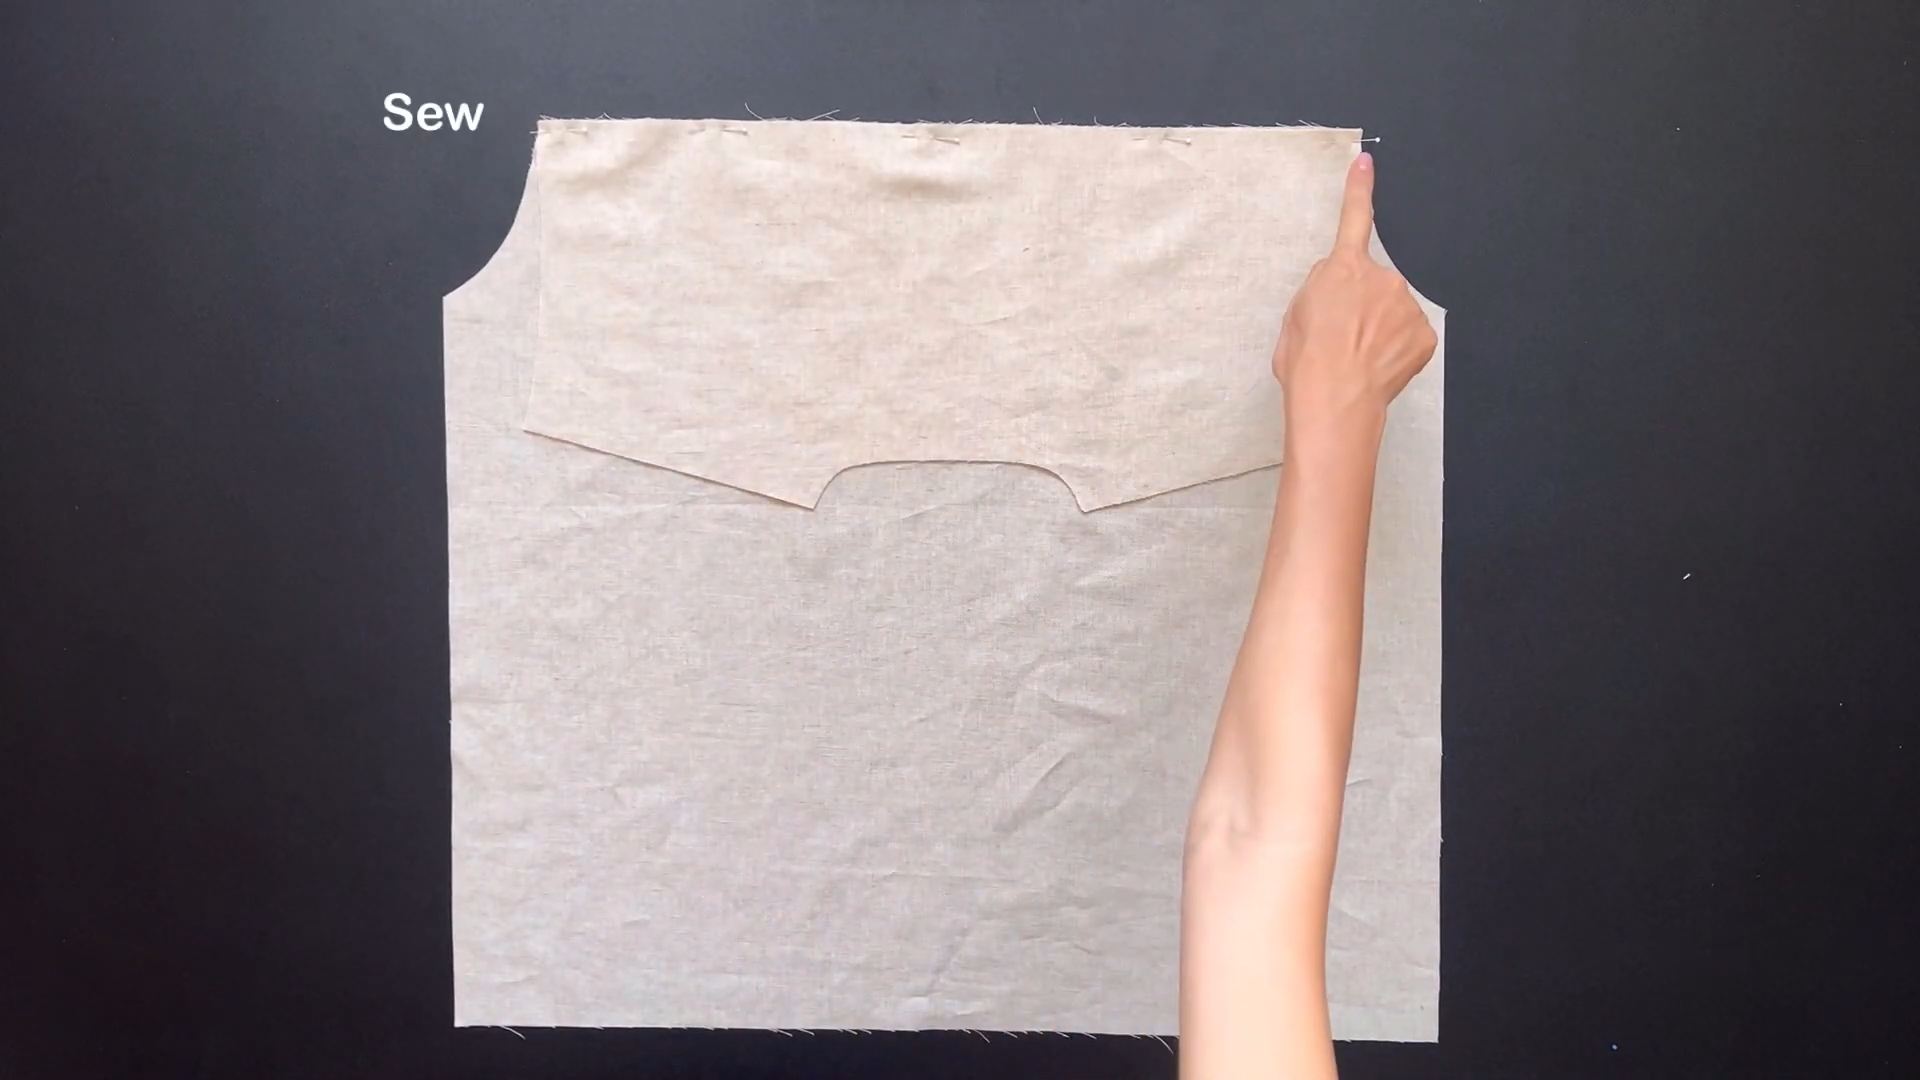
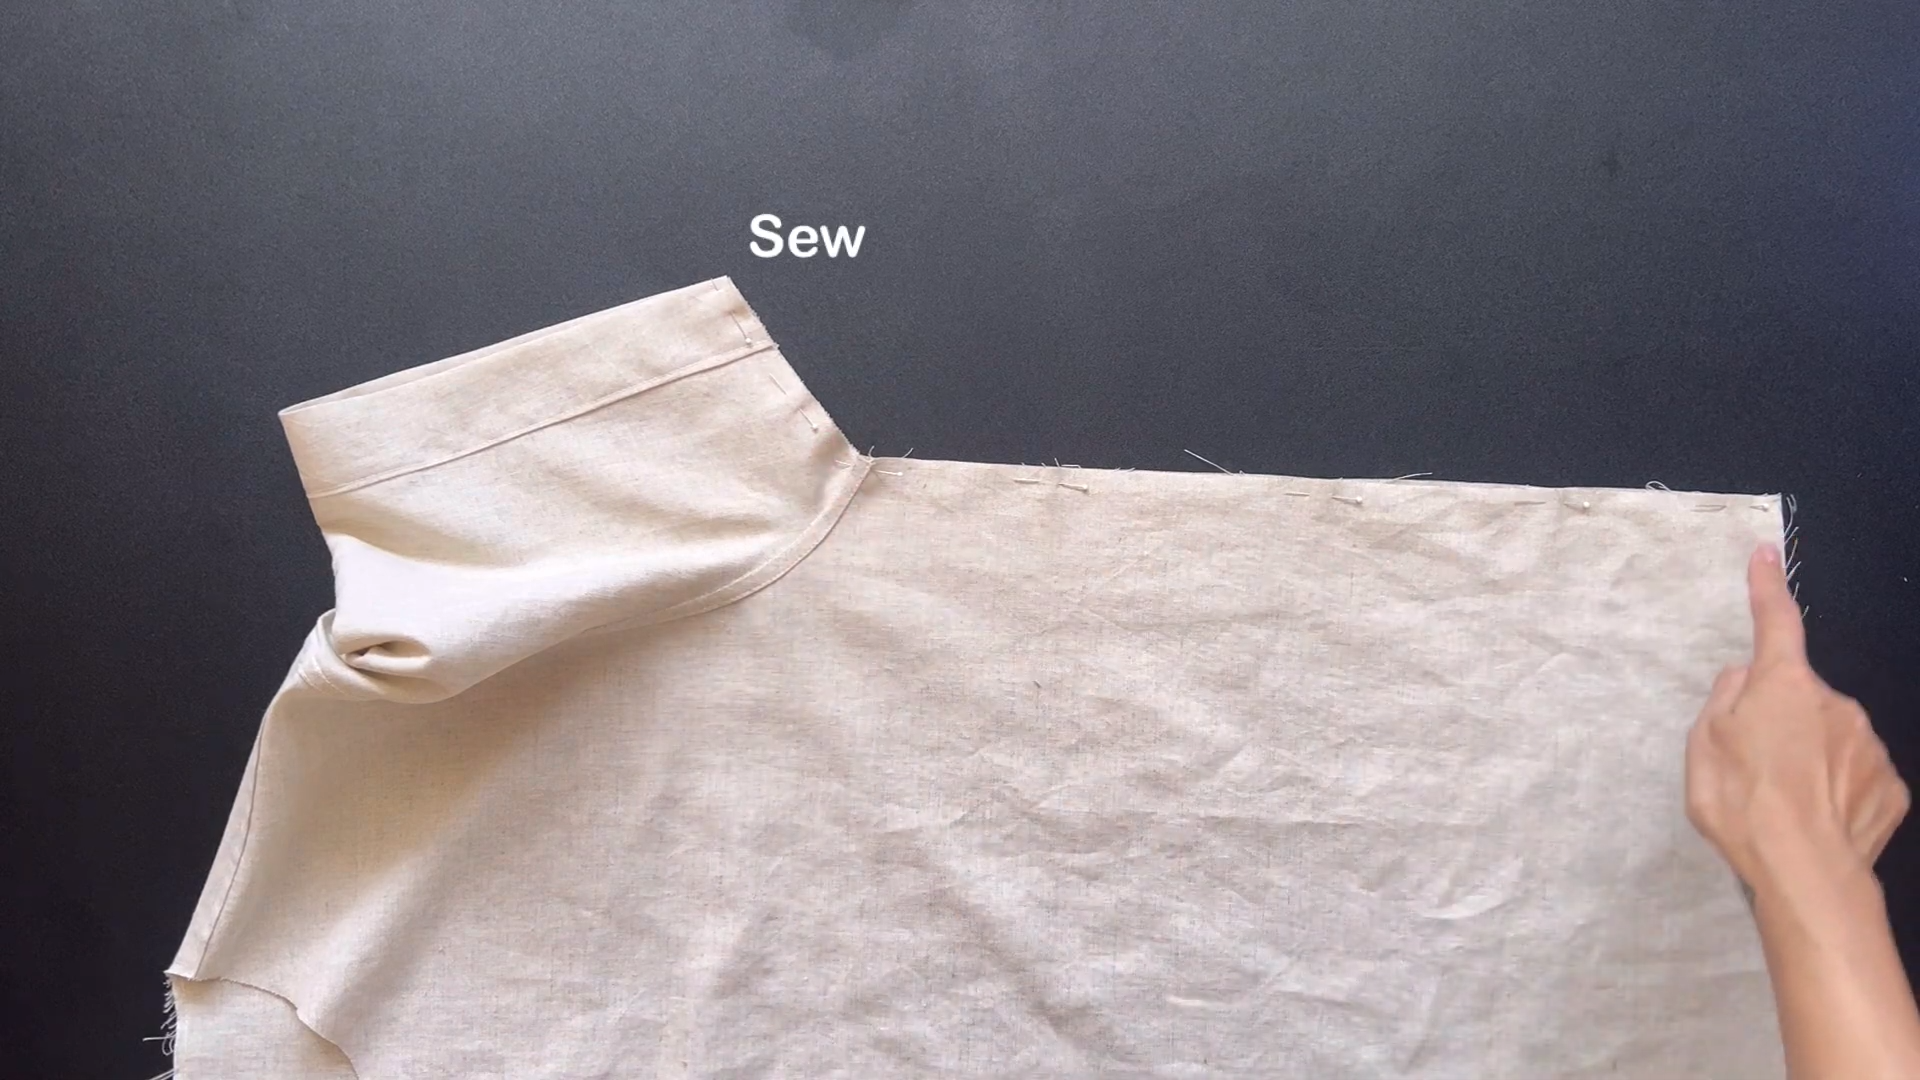
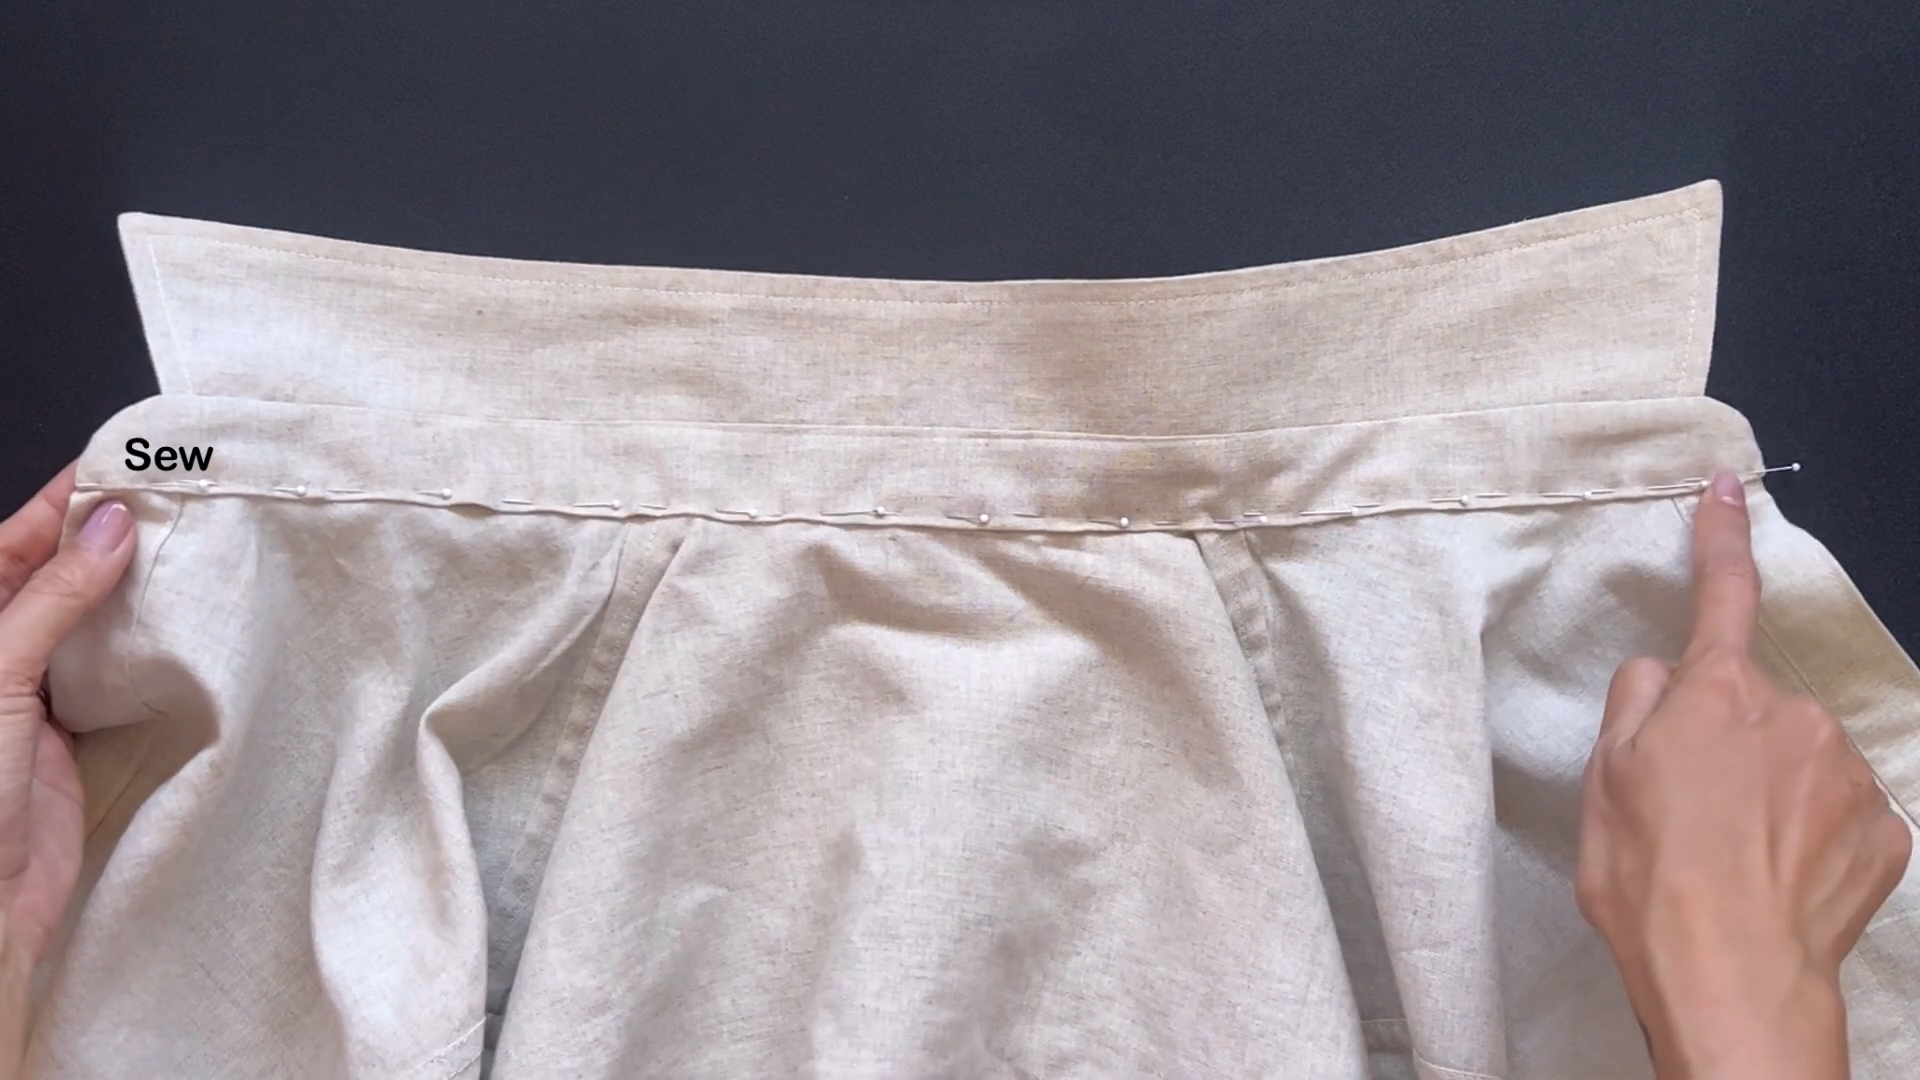
Connect the front bodice parts to one yoke piece at the shoulder lines with pins first.
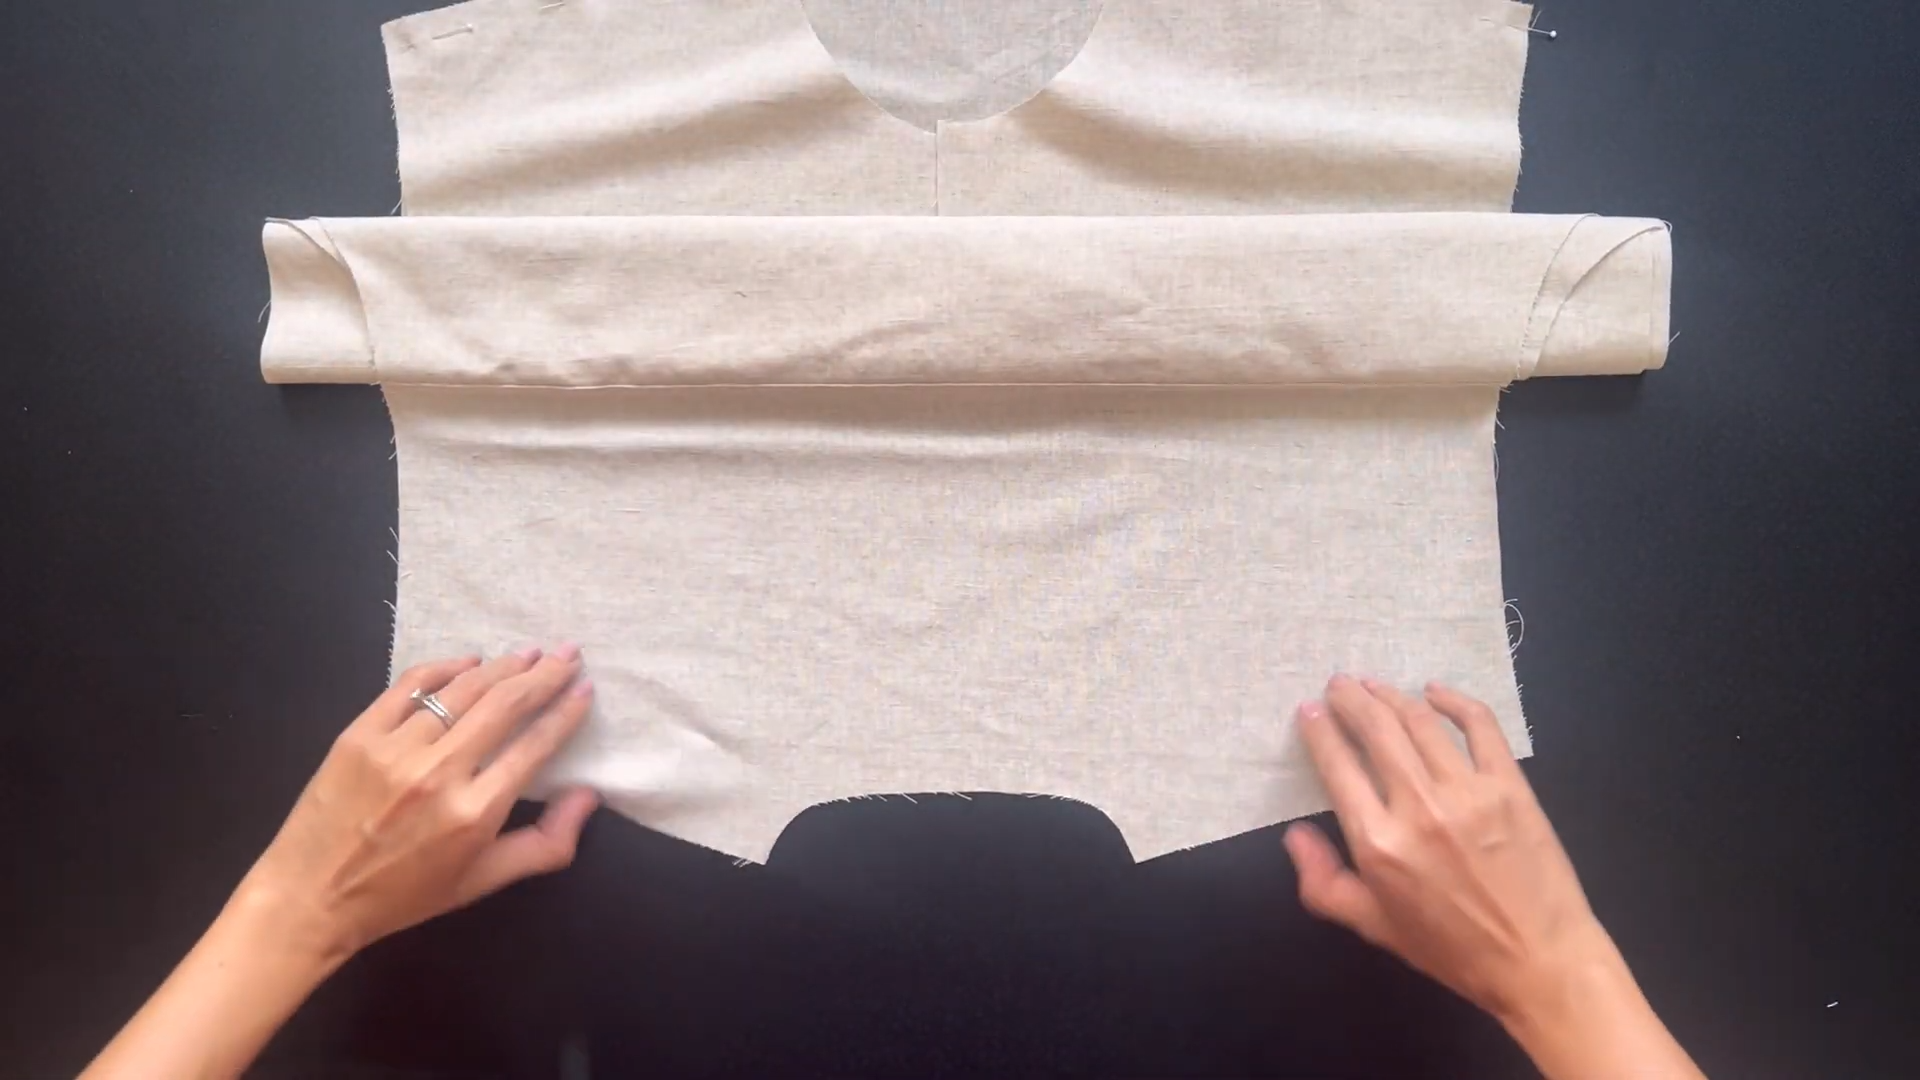
Roll the shirt from the end to the top and move the other yoke piece over.
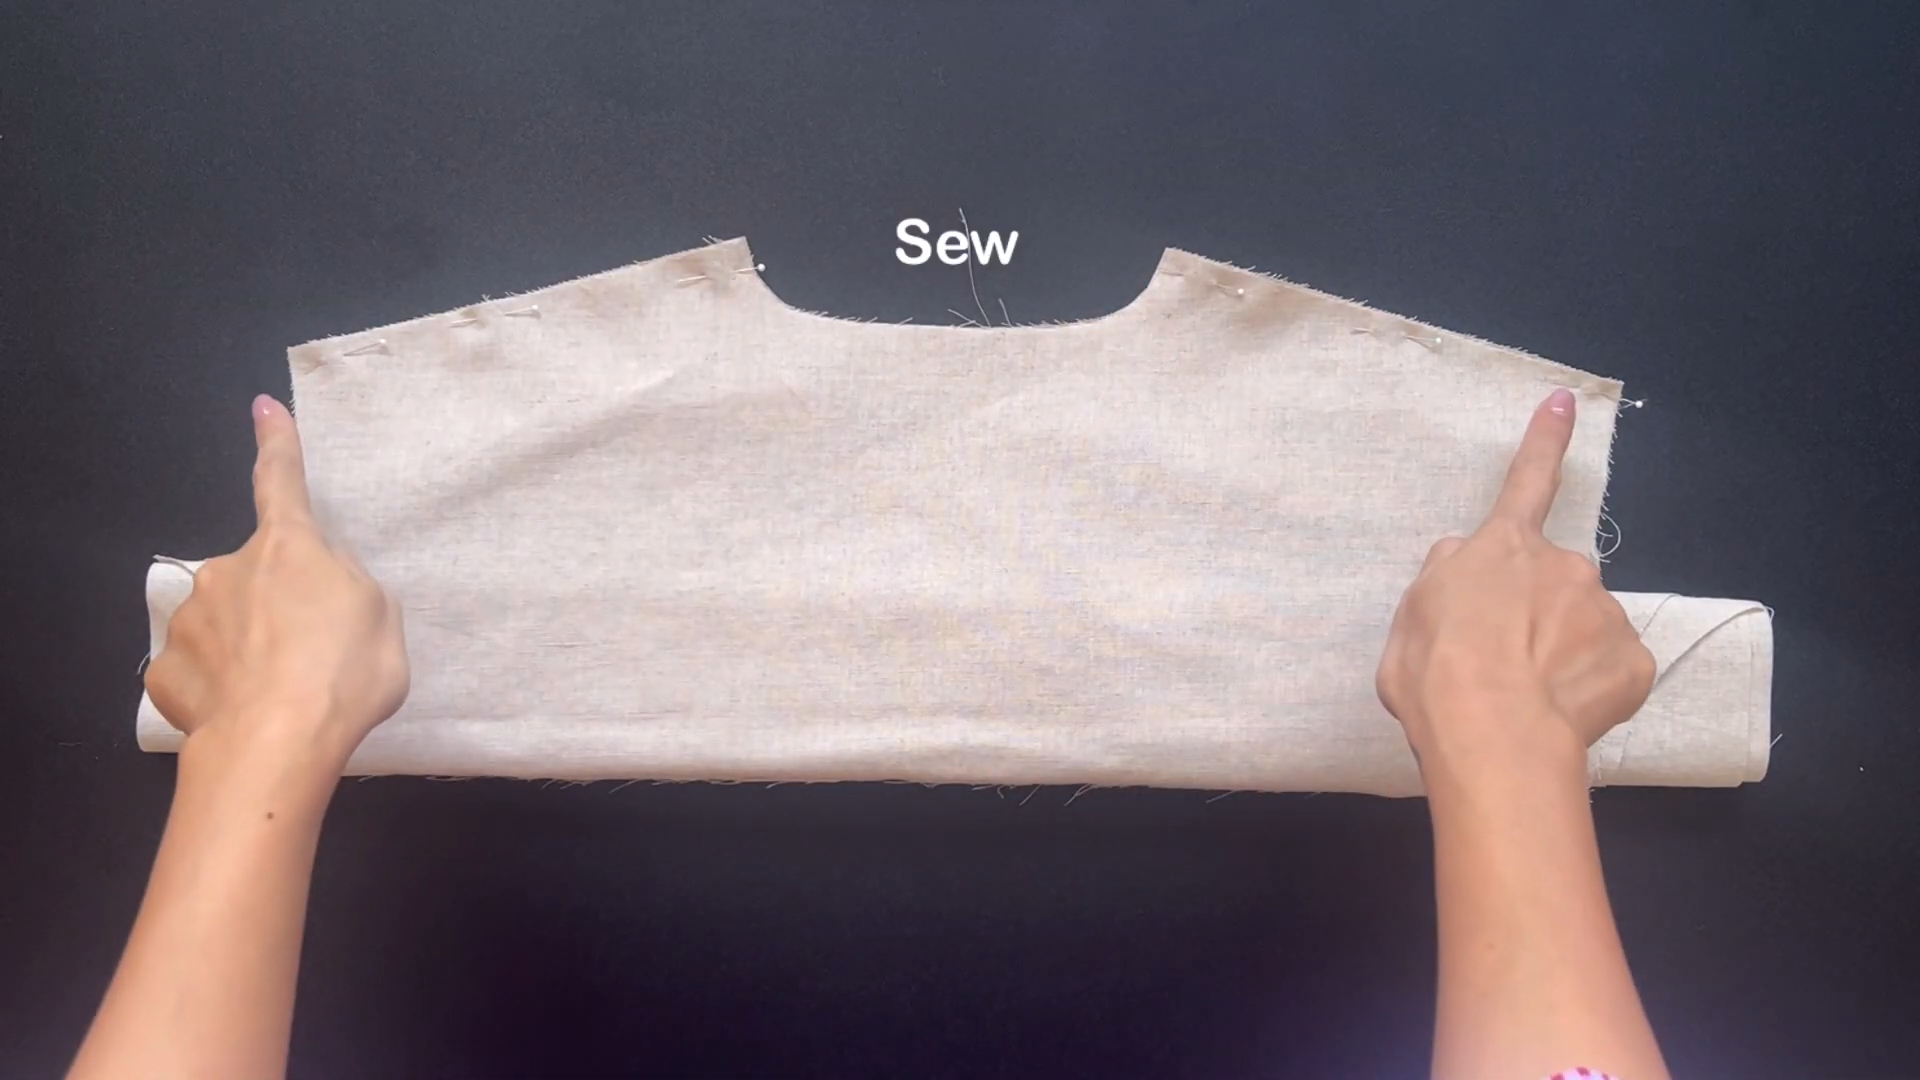
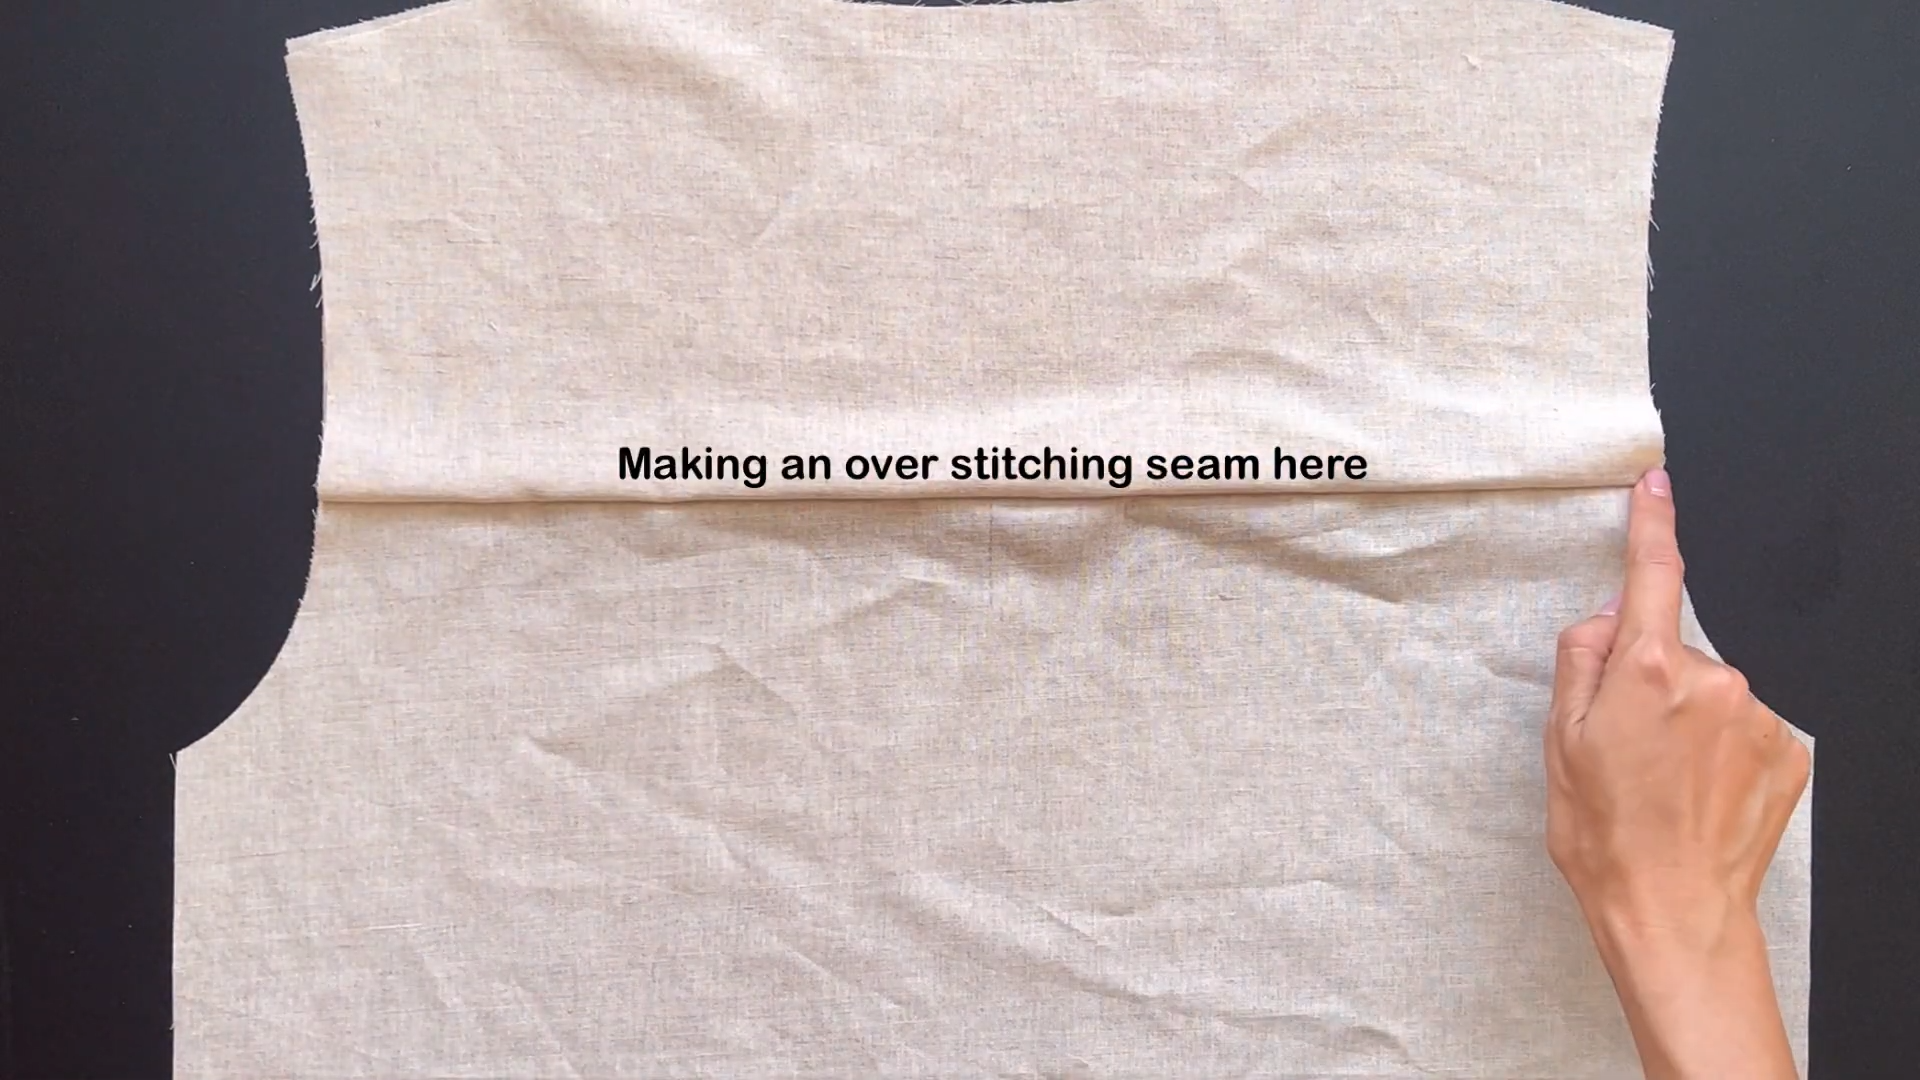
Connect the shoulder together so the shoulder of the front bodice will be in the middle between two yoke pieces and start sewing.
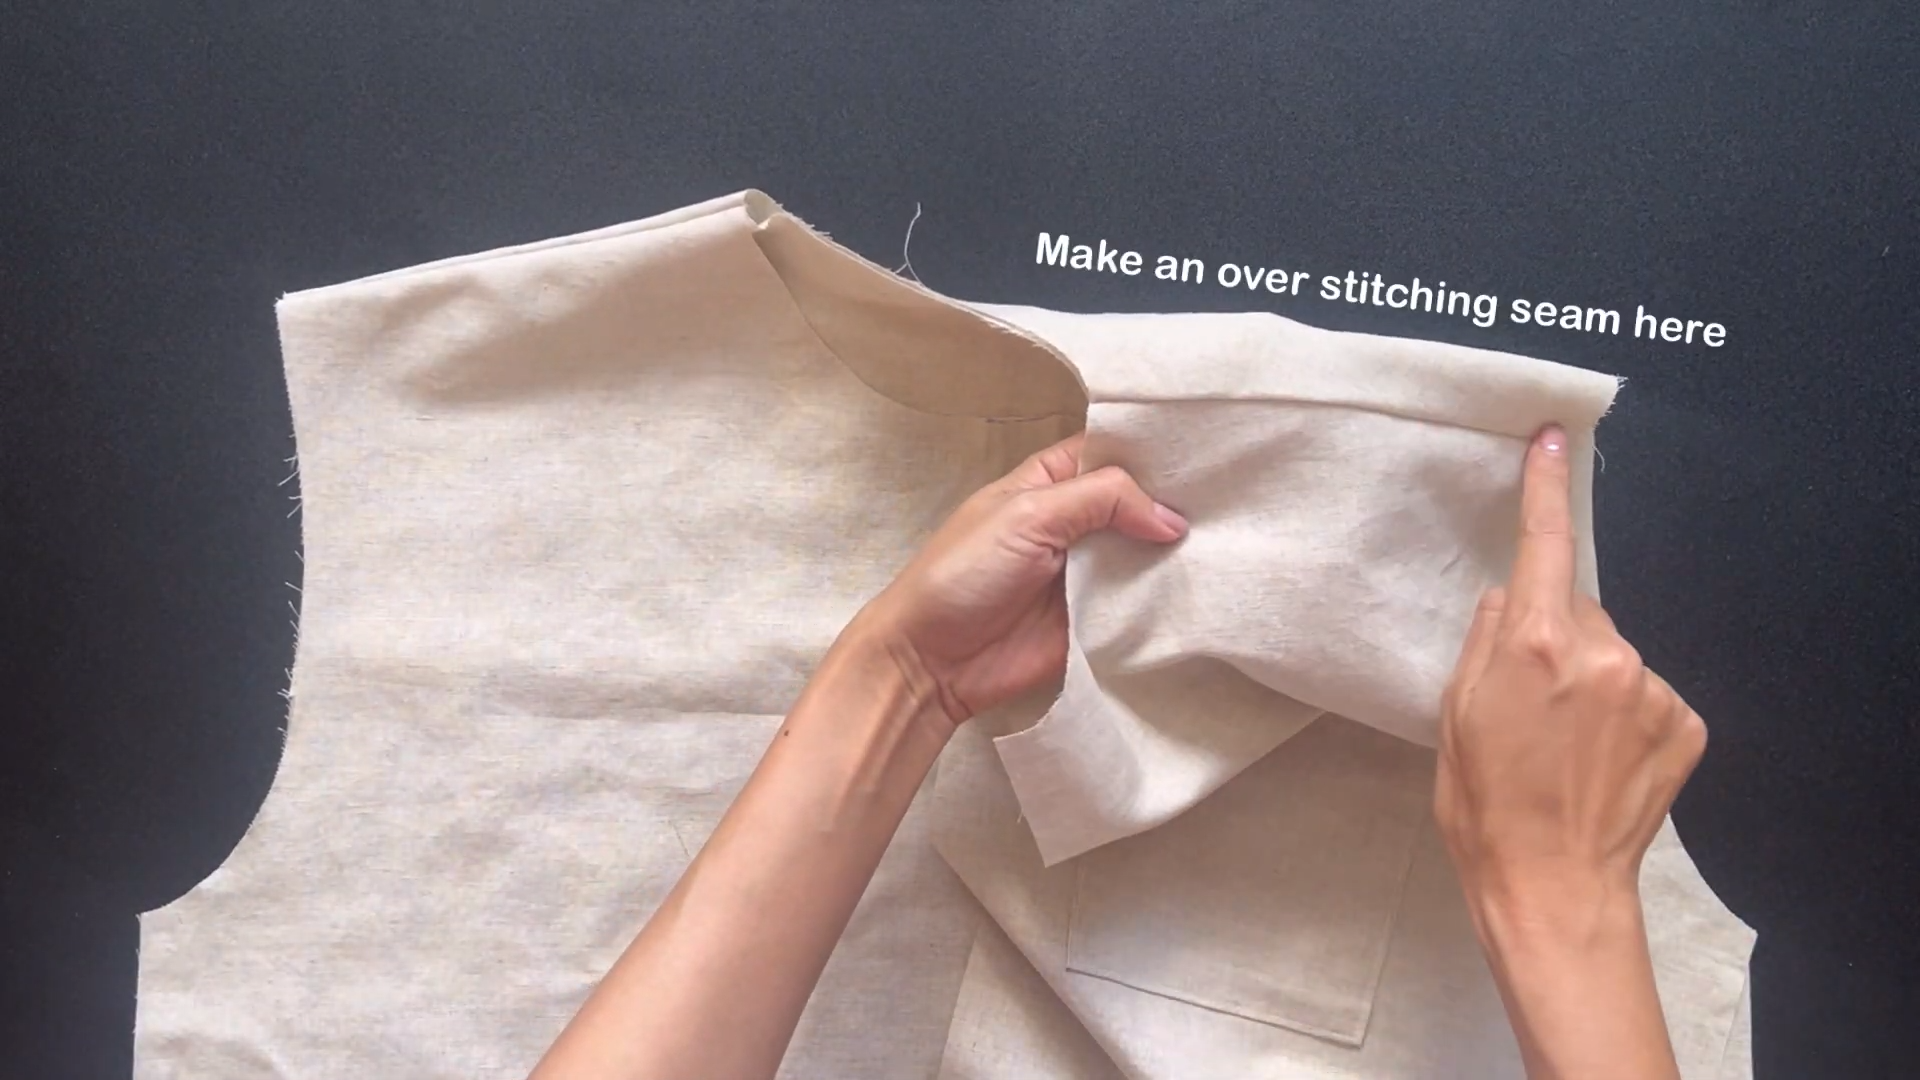
Turn all the seam inside.
Make an over stitching seam to keep all the end fabric to one side.
THE SLEEVE
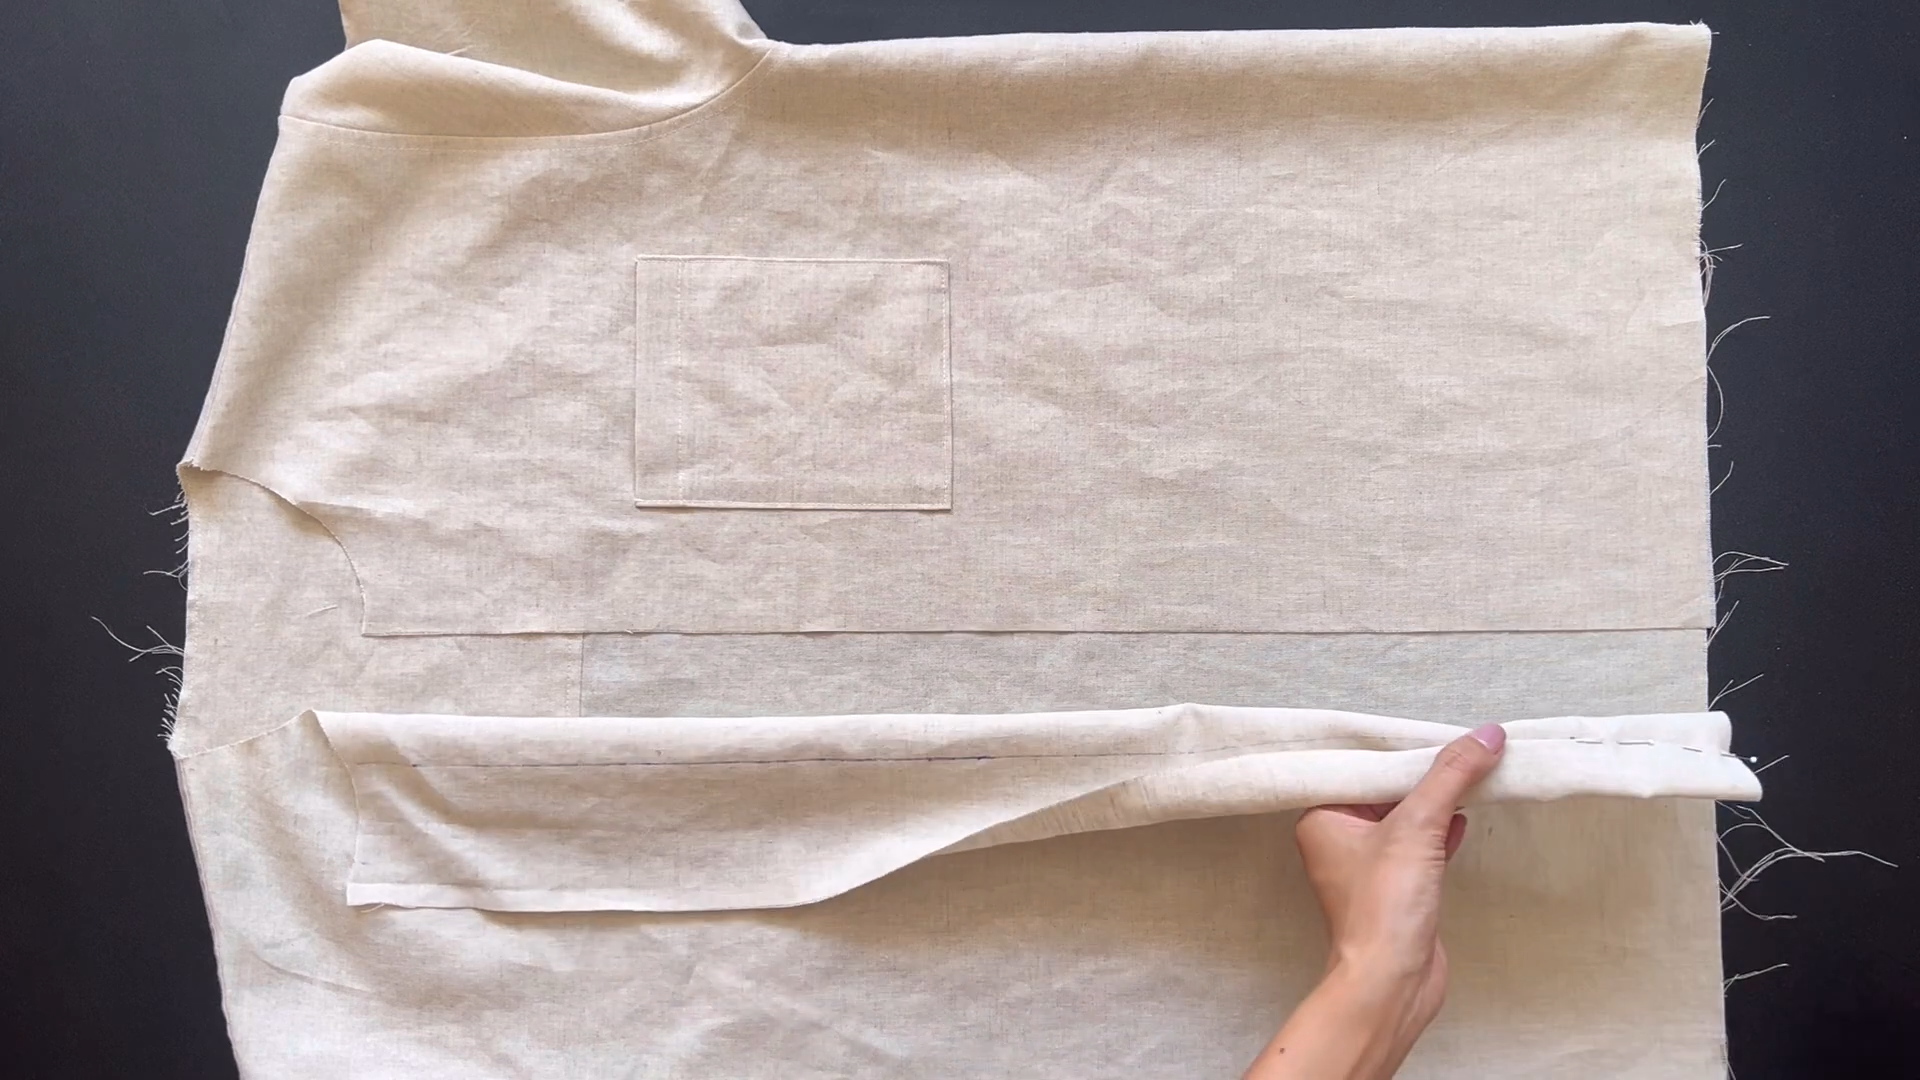
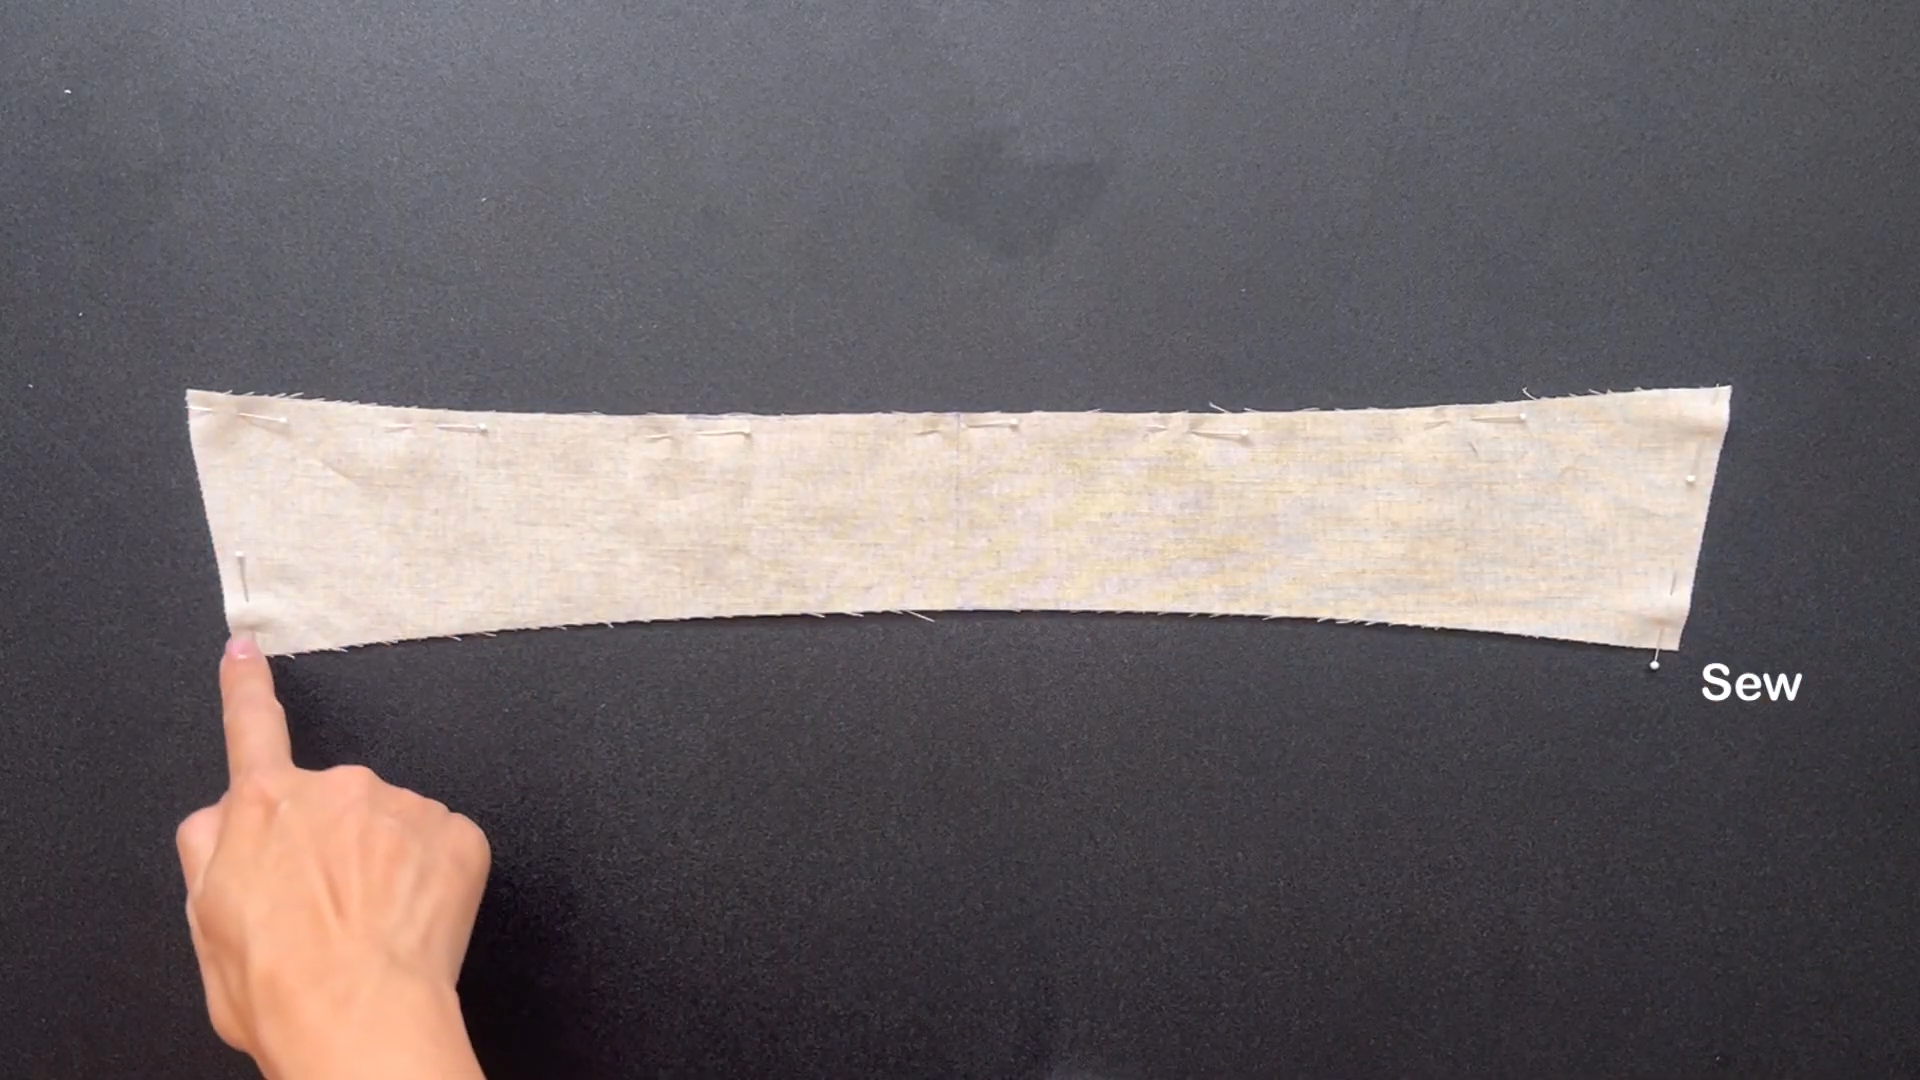
Cut out the sleeve pieces.
Measure up 9 cm from the ending line and draw a line across.

Fold the end of the sleeve twice: first by 1 cm, then up to the 9 cm line.
Sew along the folded edge to secure it.
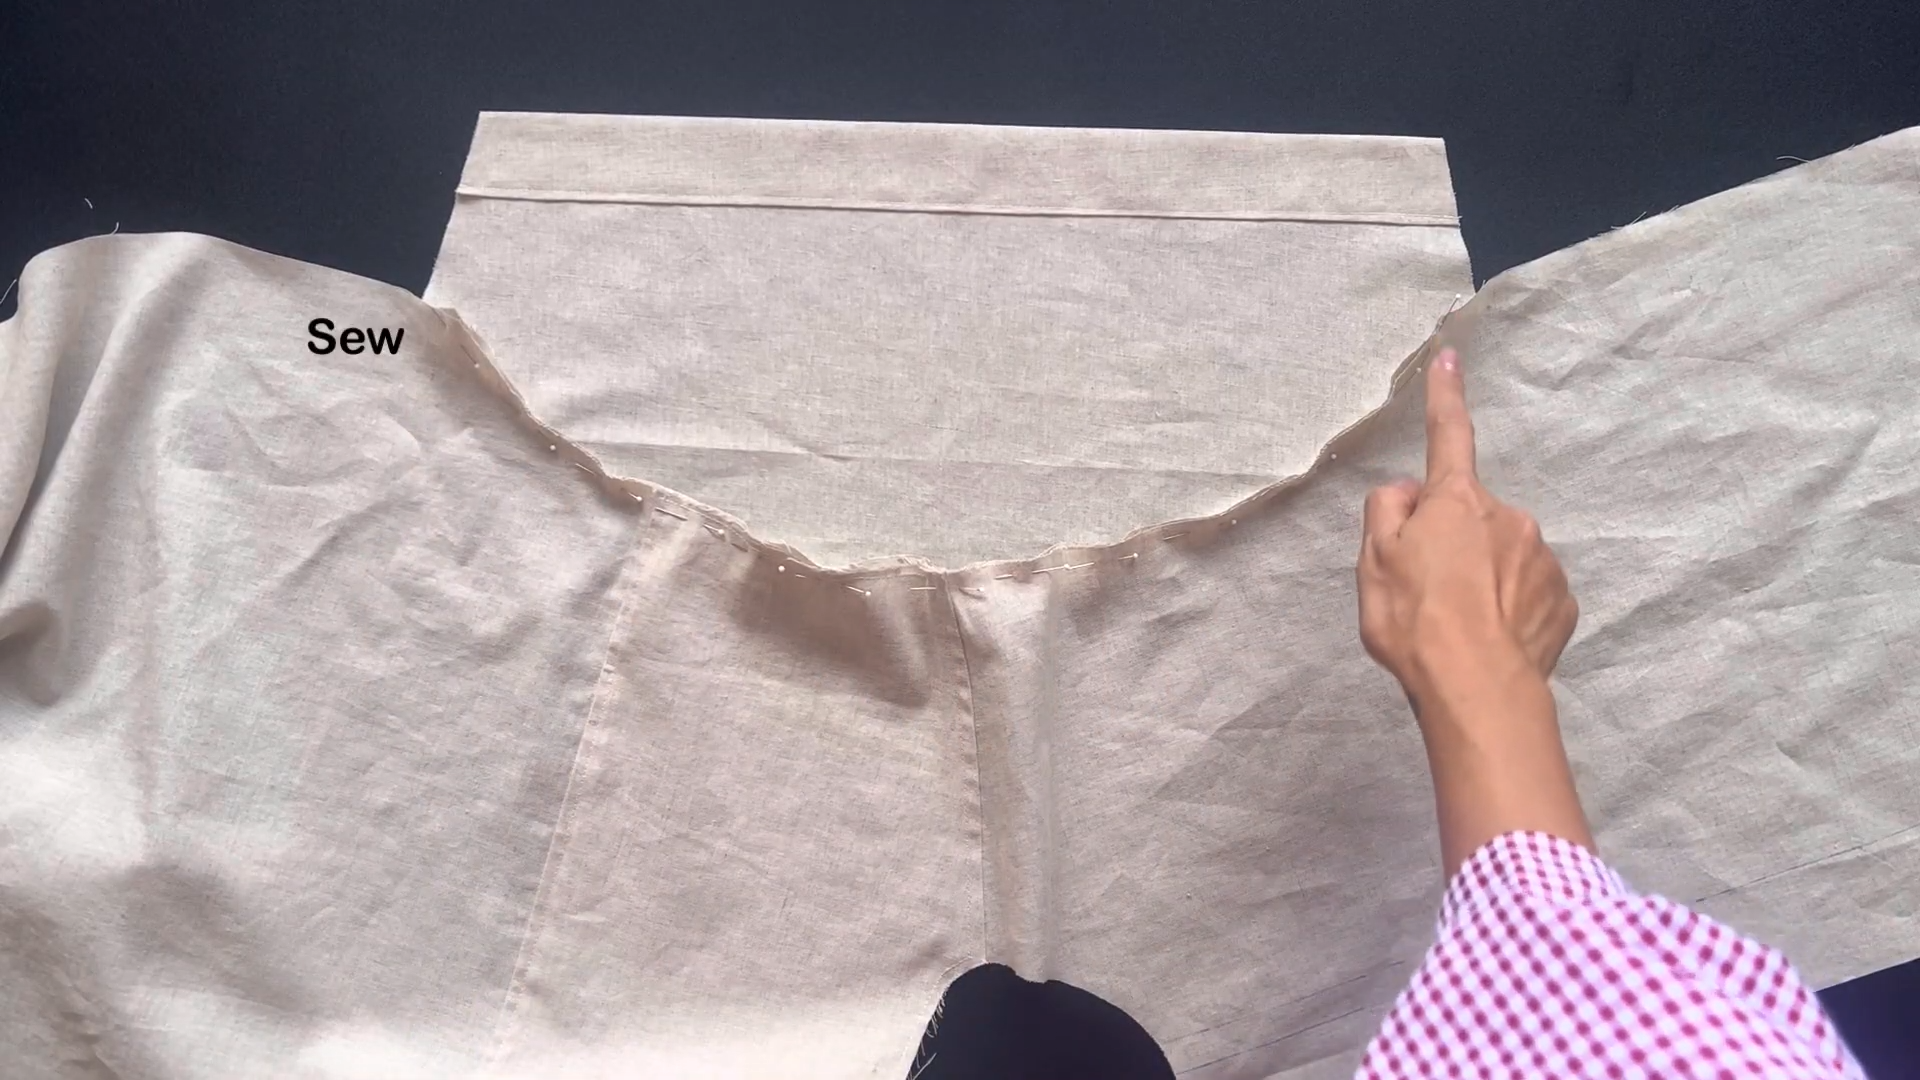
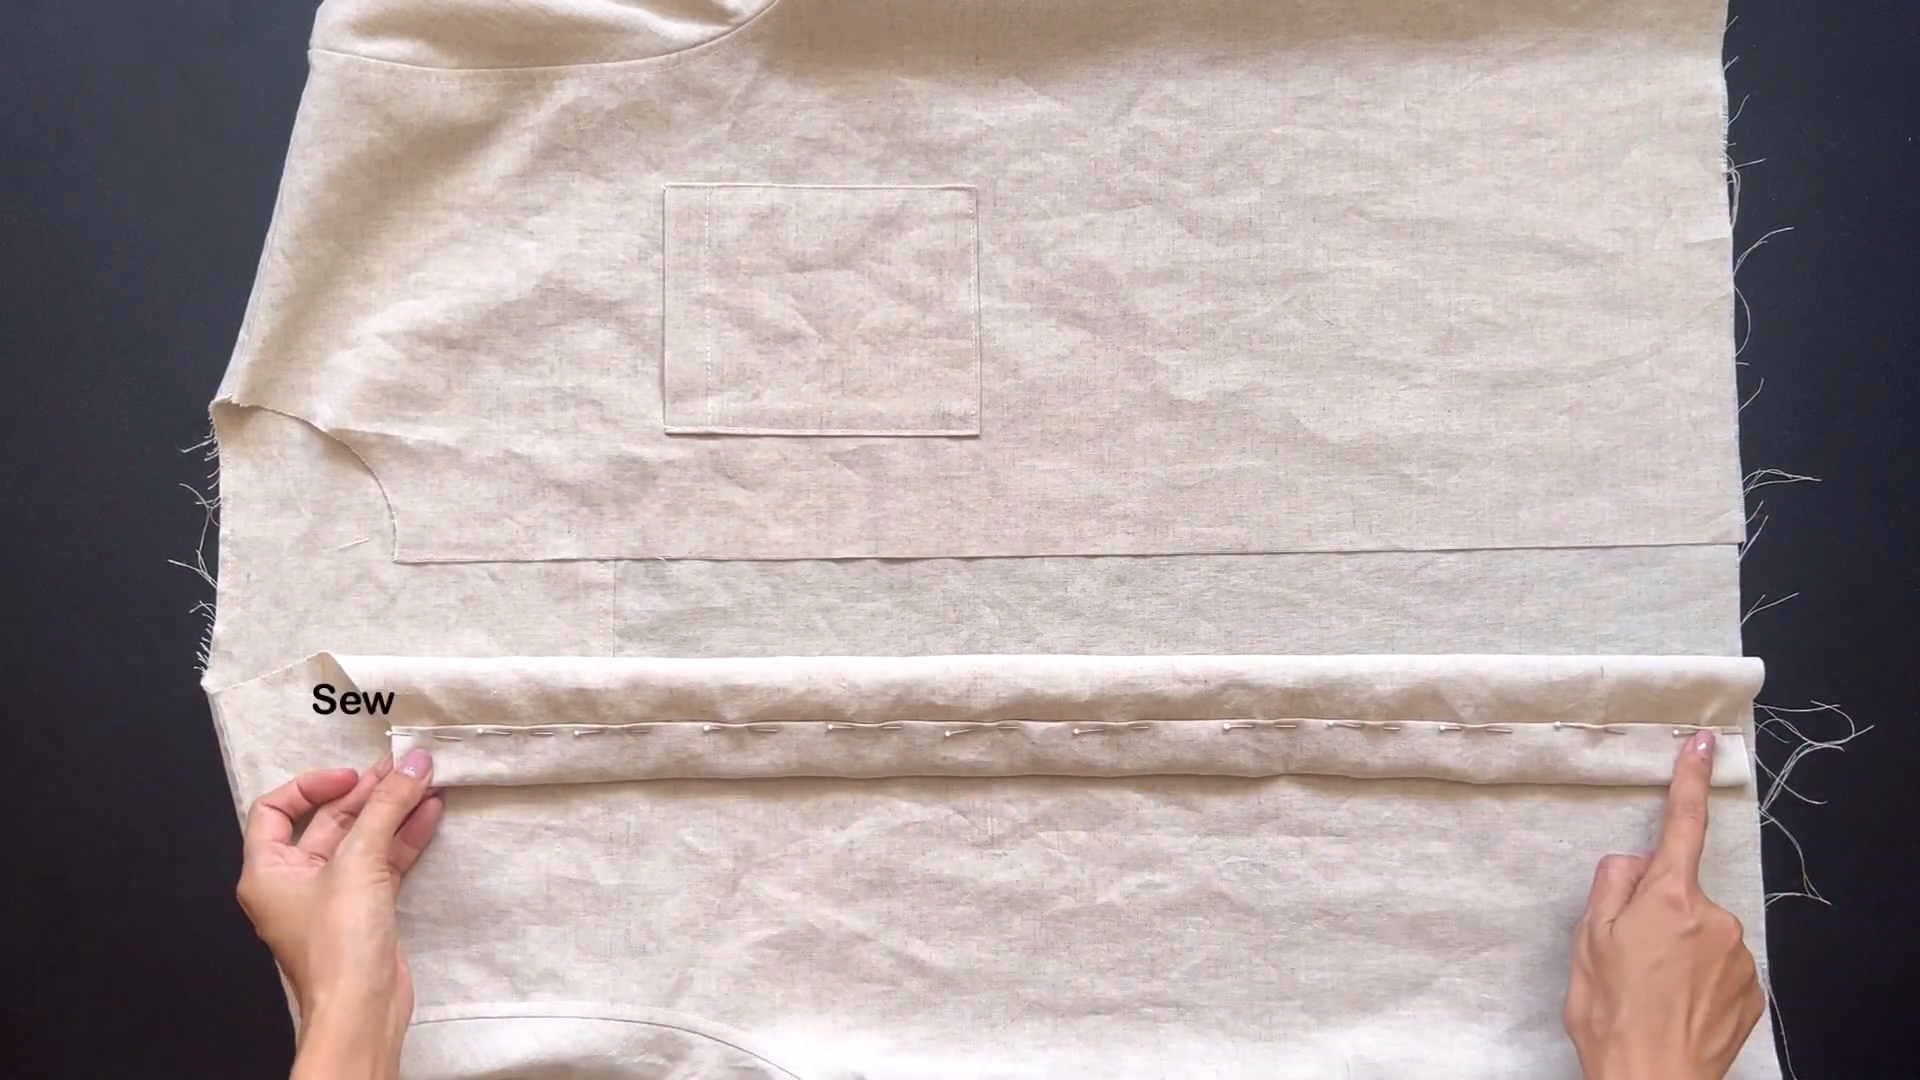
Align the sleeve edge with the bodice’s sleeve line.
Secure them in place with pins and sew them together.
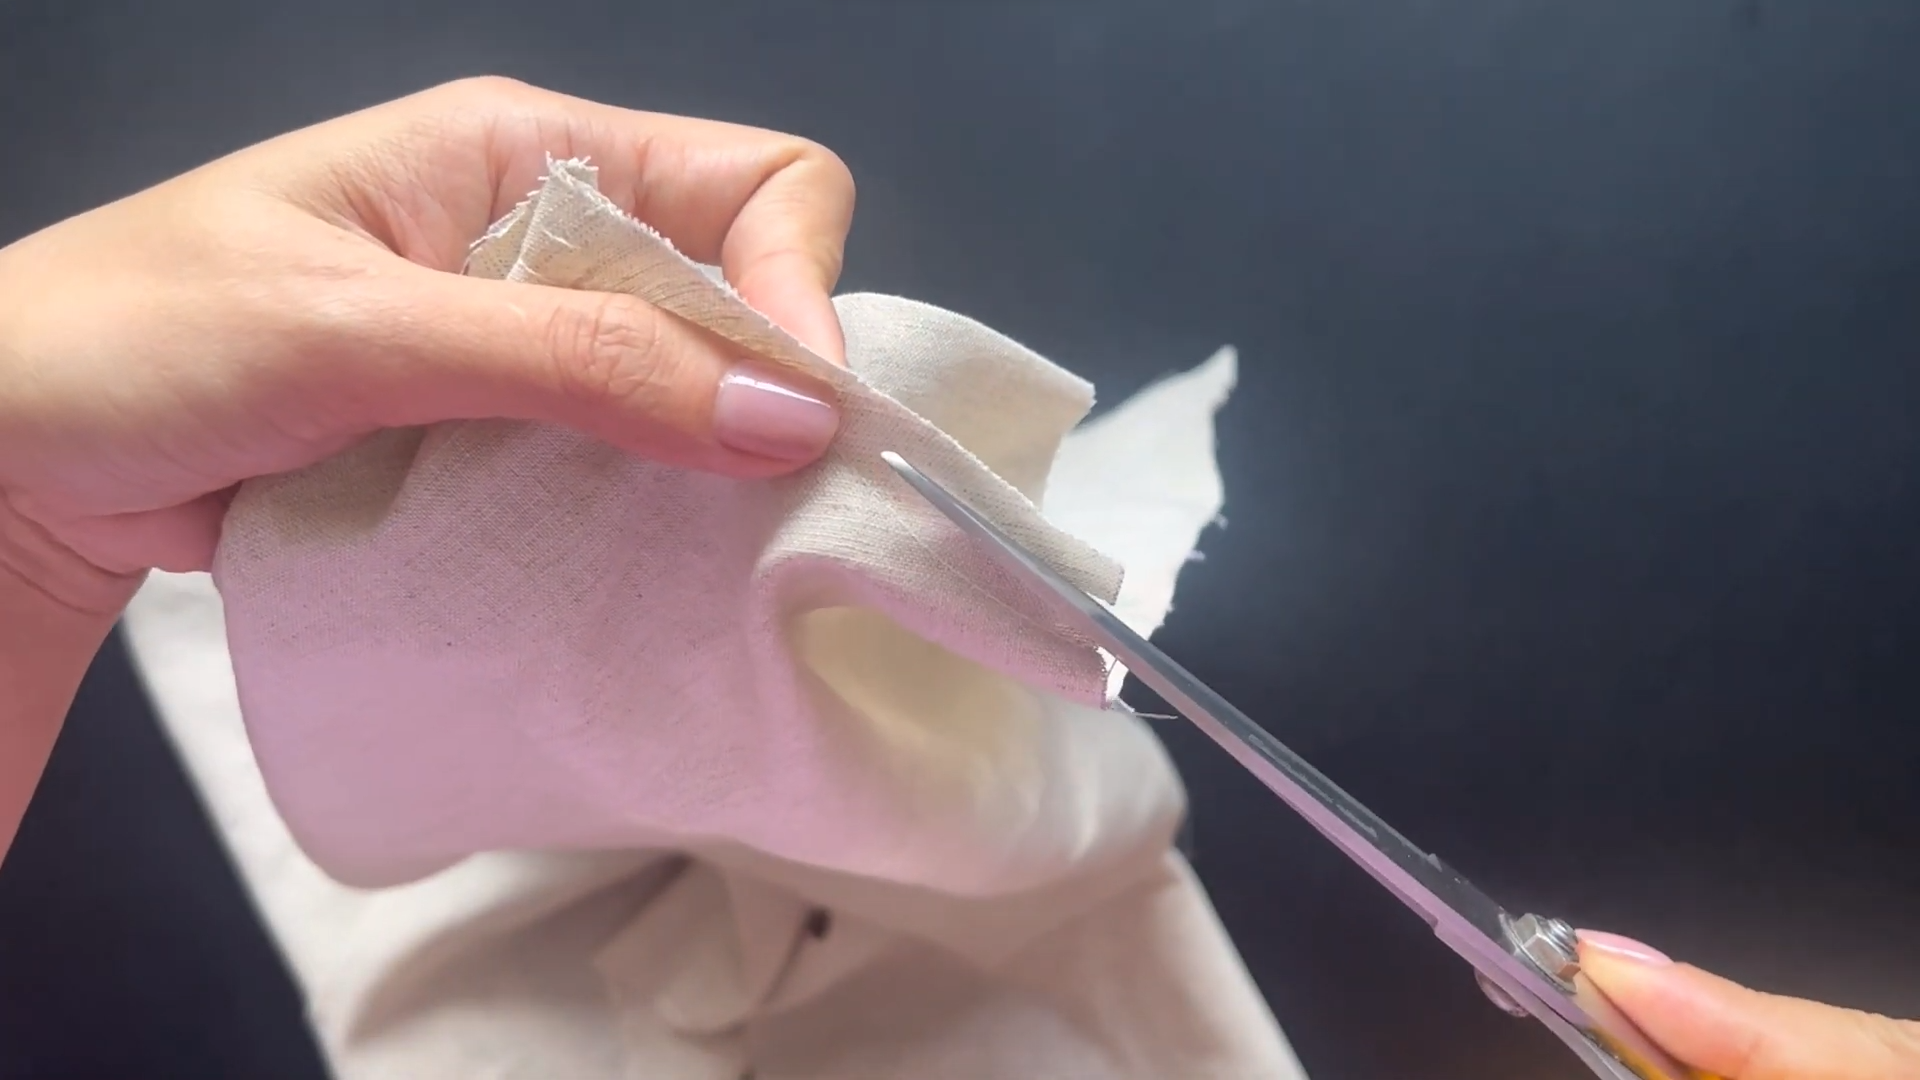
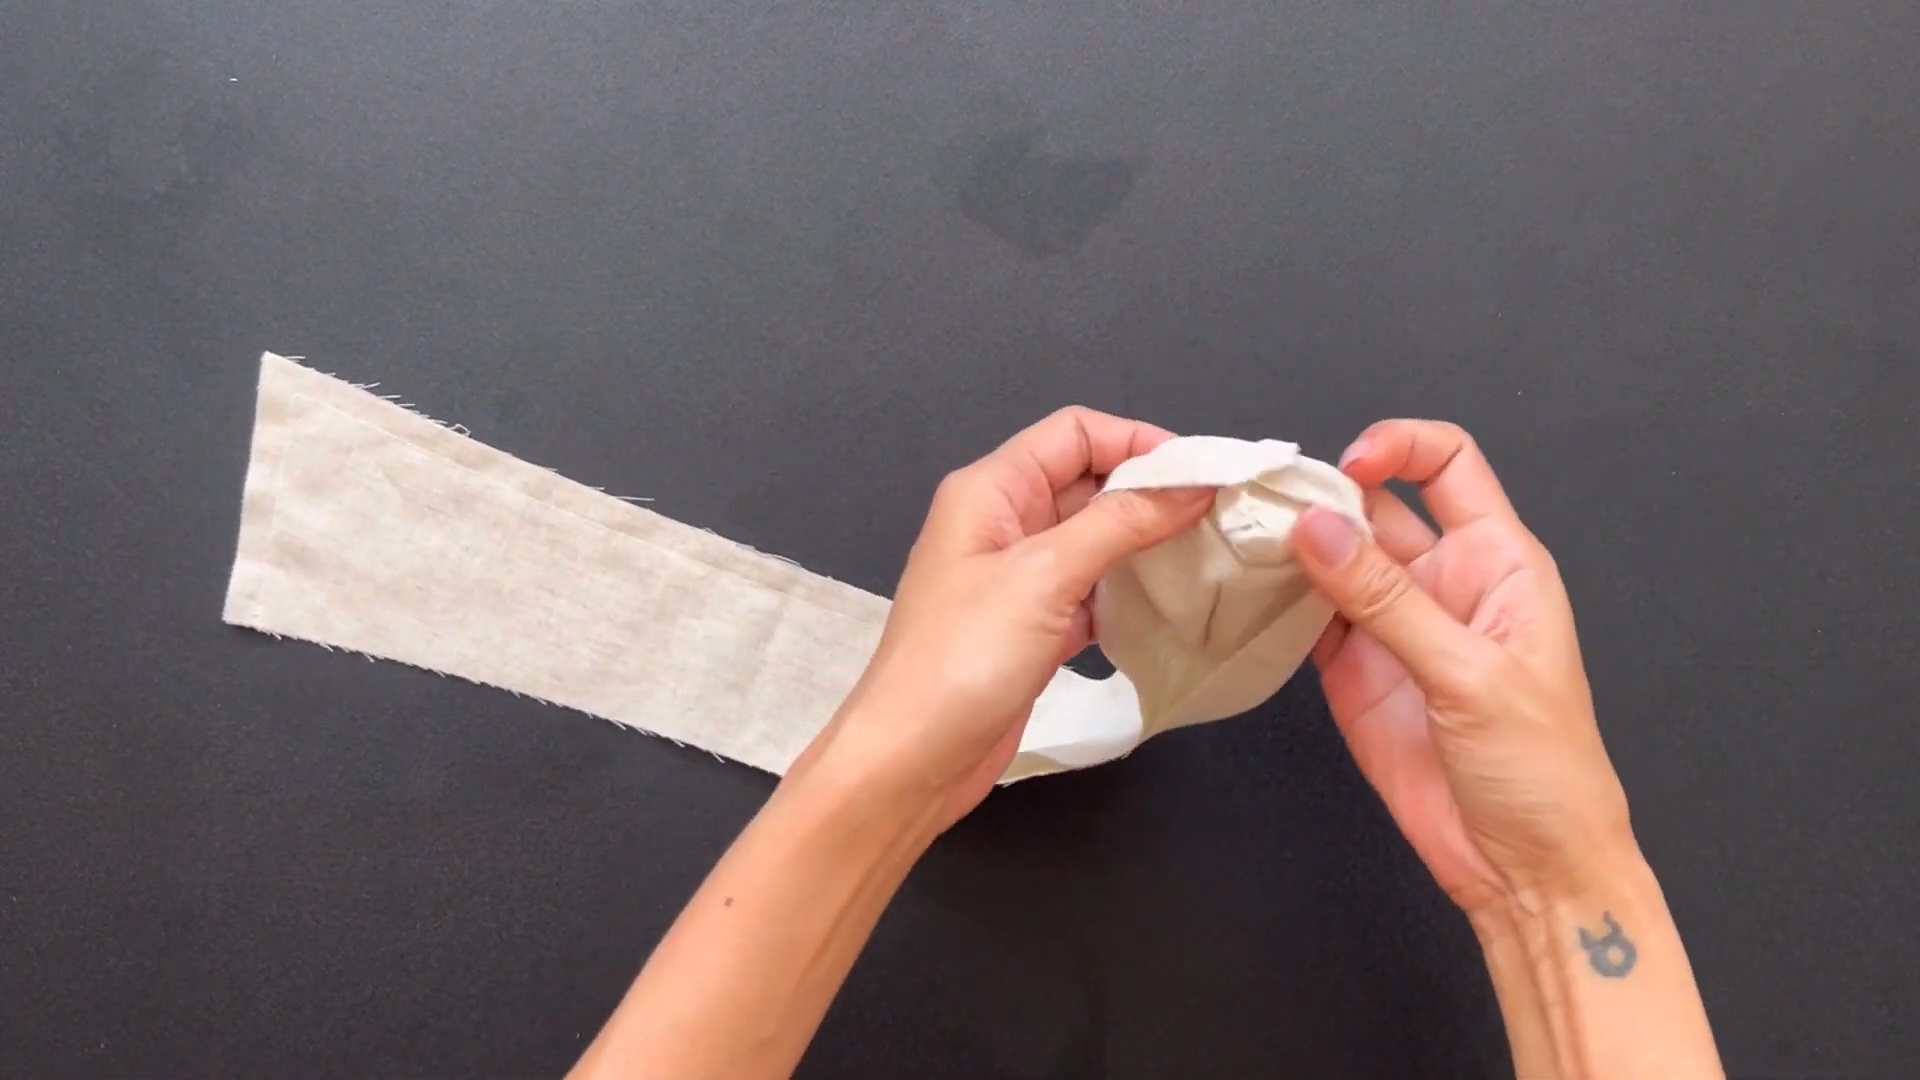
After sewing, cut the extra fabric at the bodice end in half.
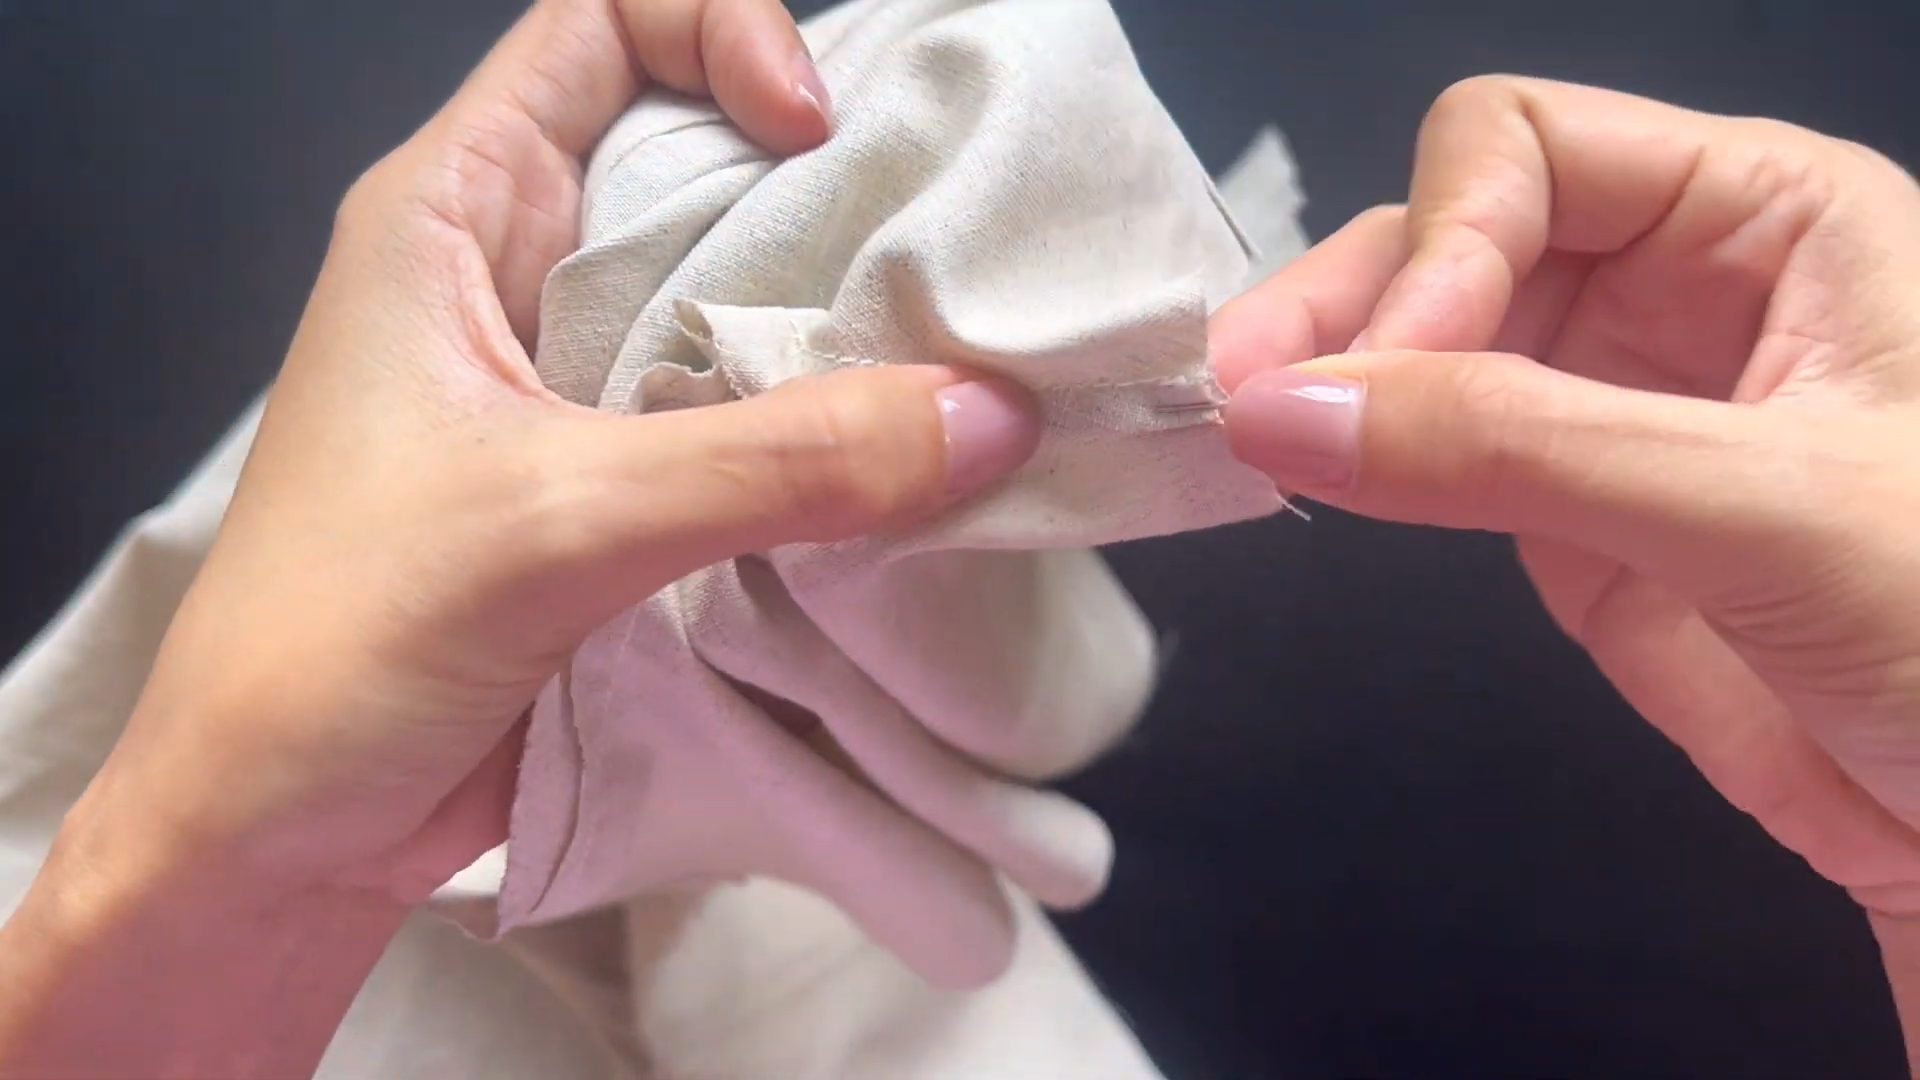
Fold the end fabric of the sleeve twice: first toward the cut edge, then to the bodice.
Sew along the folded edge to secure it.
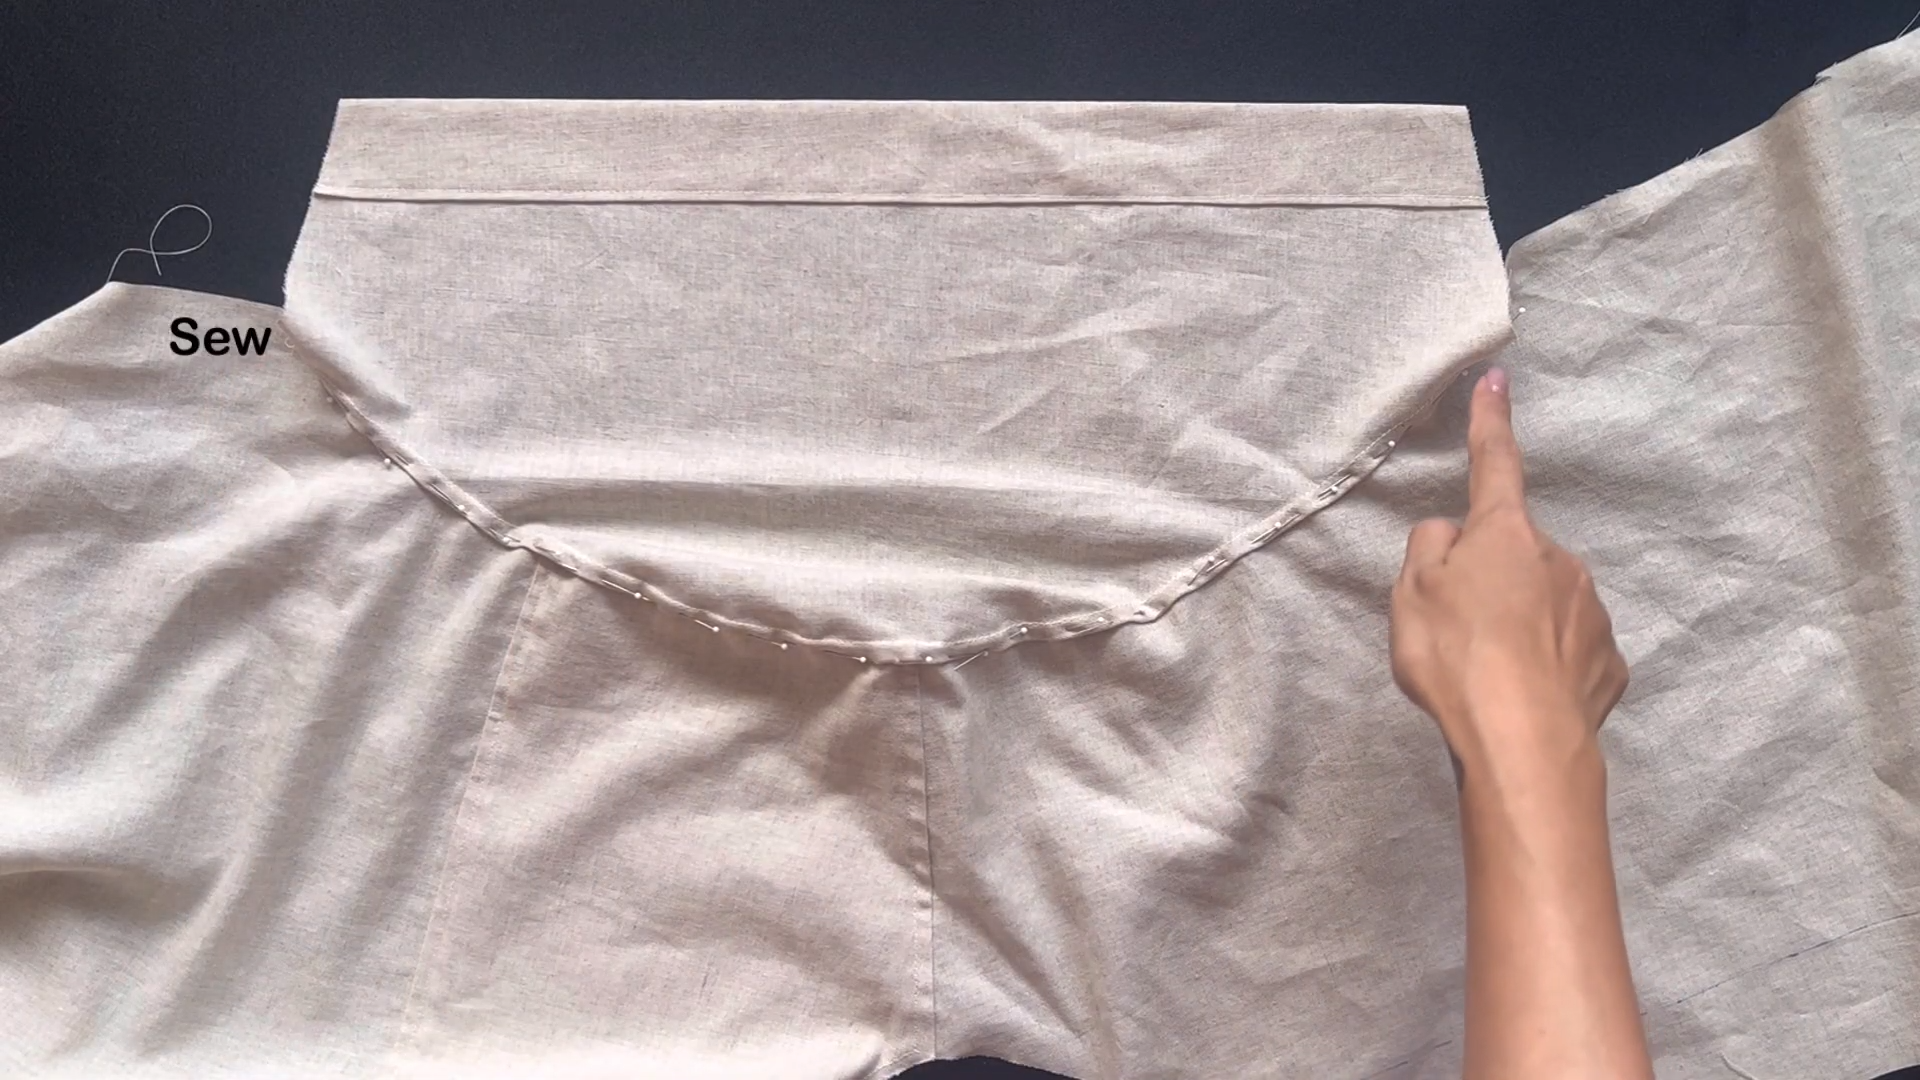
Repeat the folding technique for the underarm seam.
Sew along the side line to secure the edges.
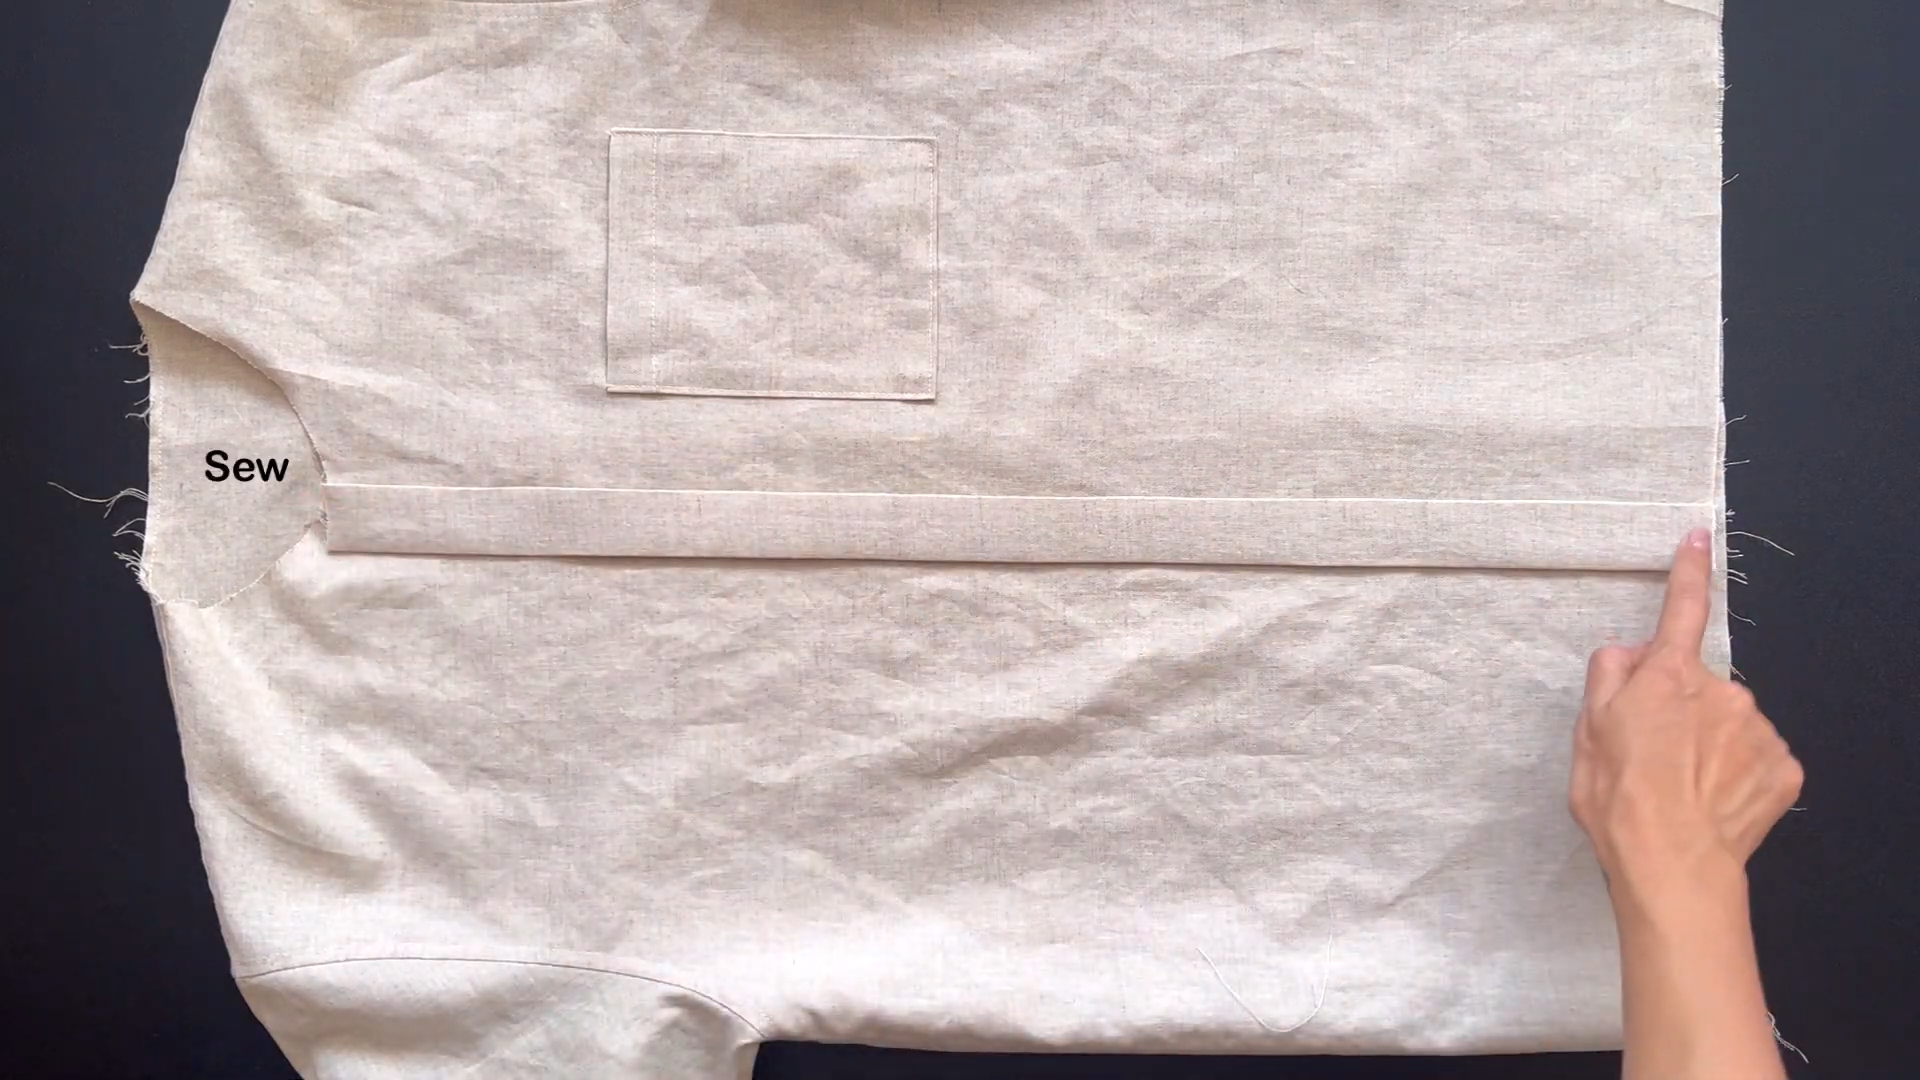
THE BUTTON AREA
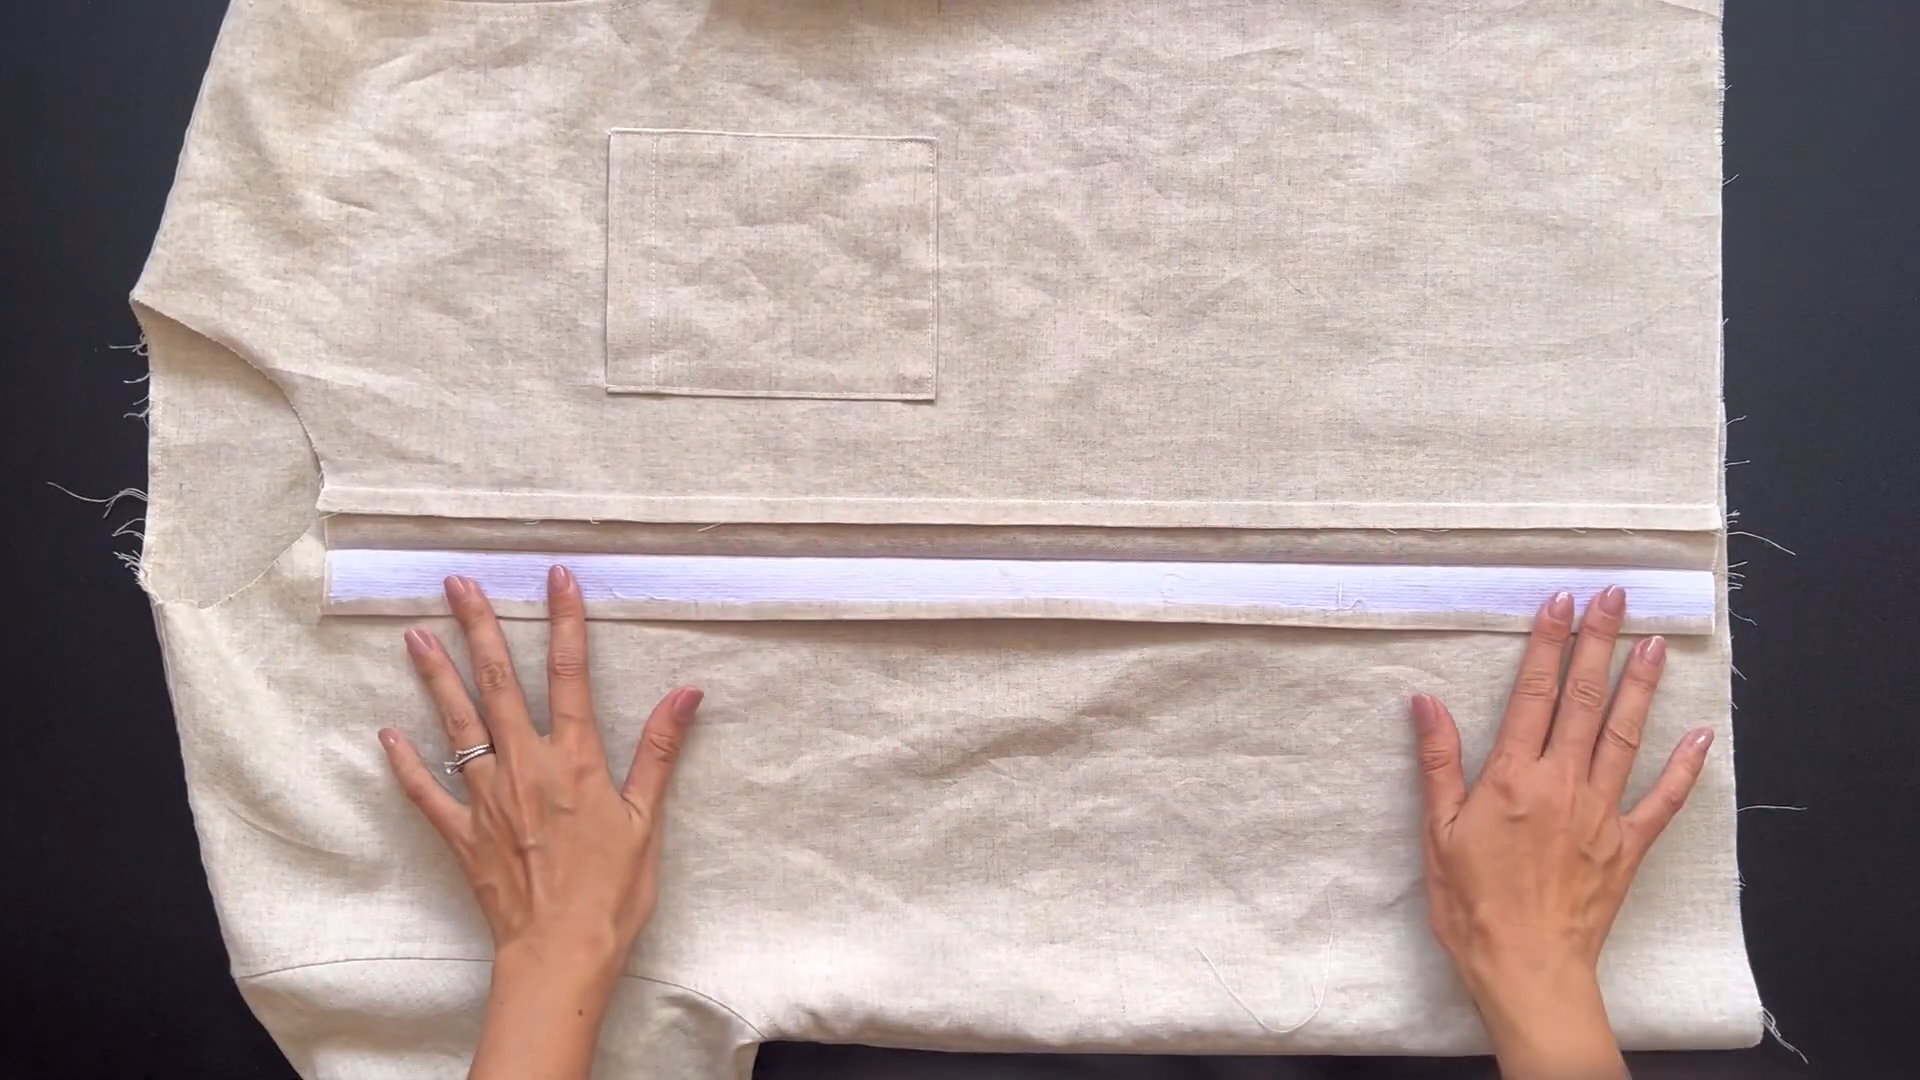
On the right side of your front bodice, draw a line 7 cm inside the edge. This will be your buttonhole zone.
Fold the edge fabric inside by 1 cm, then fold it along the marked line.
Sew along the folded edge to secure it.
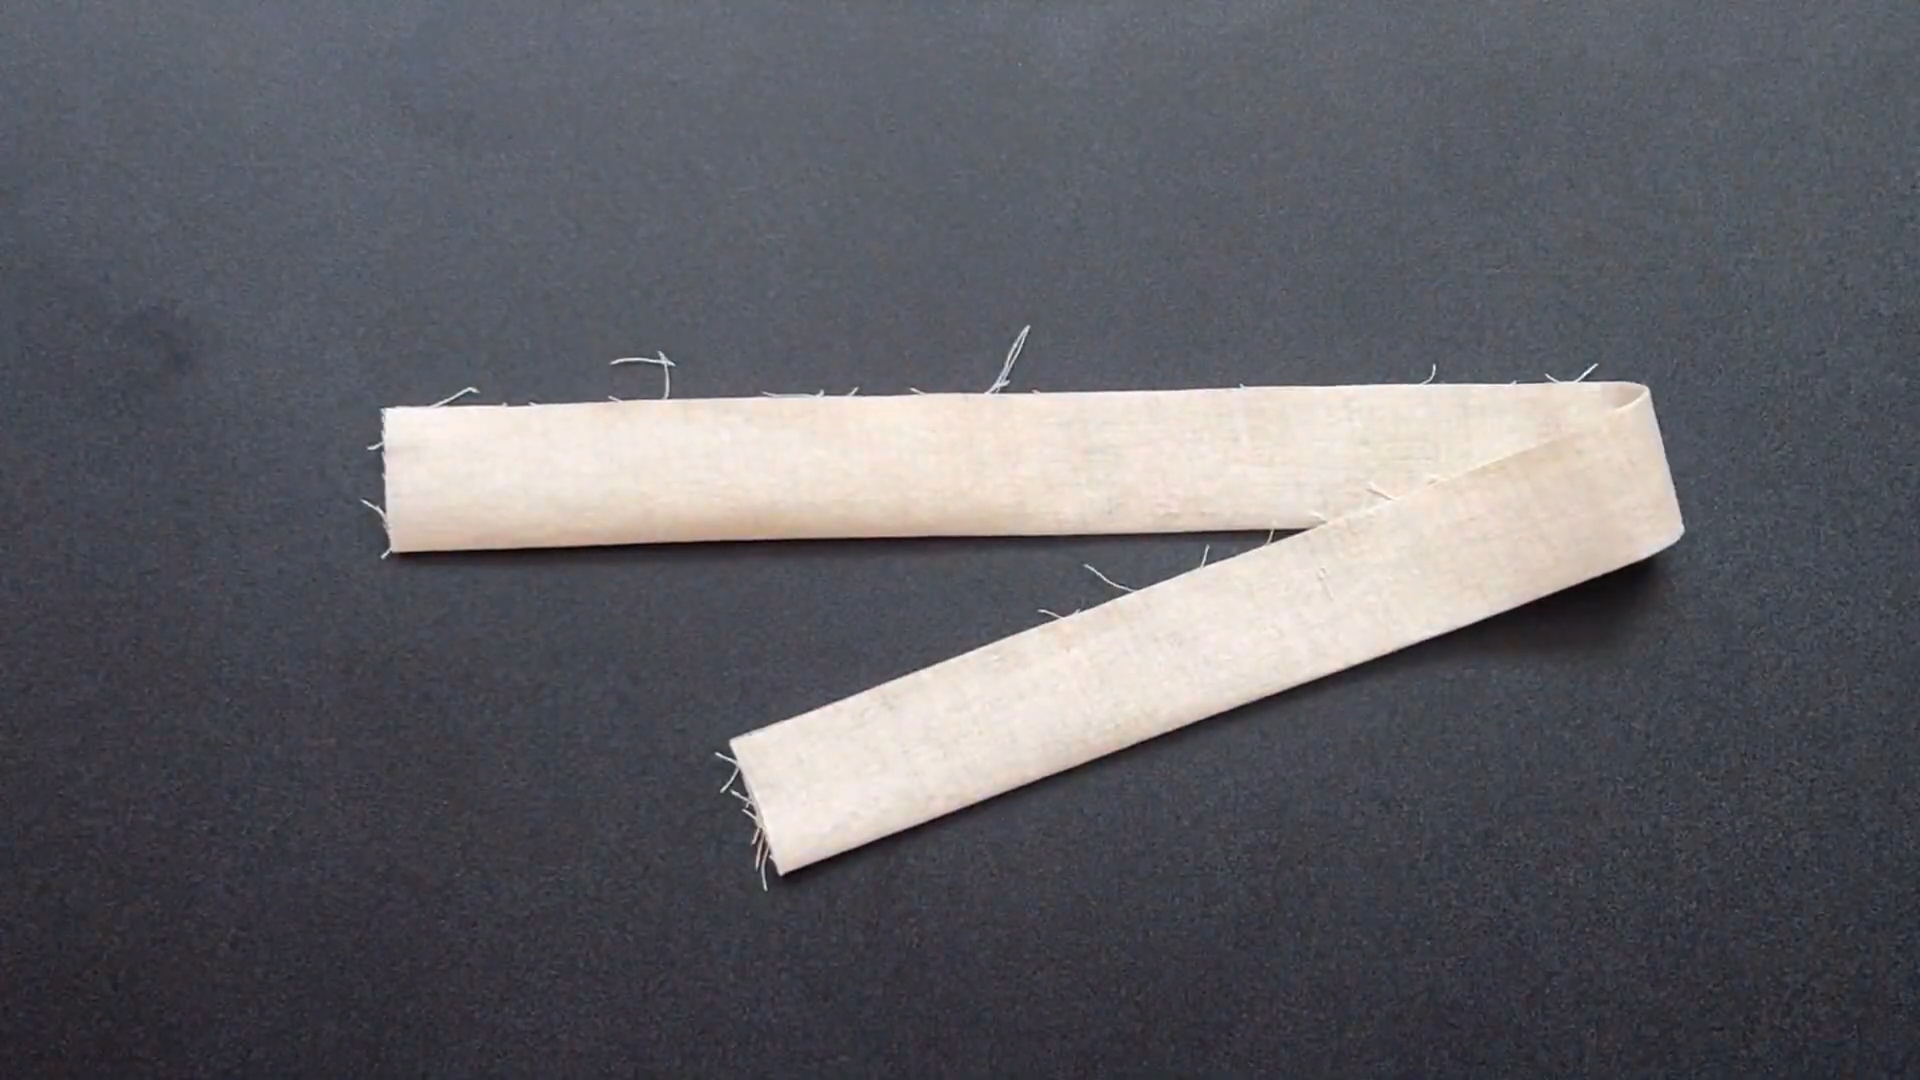
Cut a rectangle with 4 cm width and length matching the length of the button area on the front bodice.
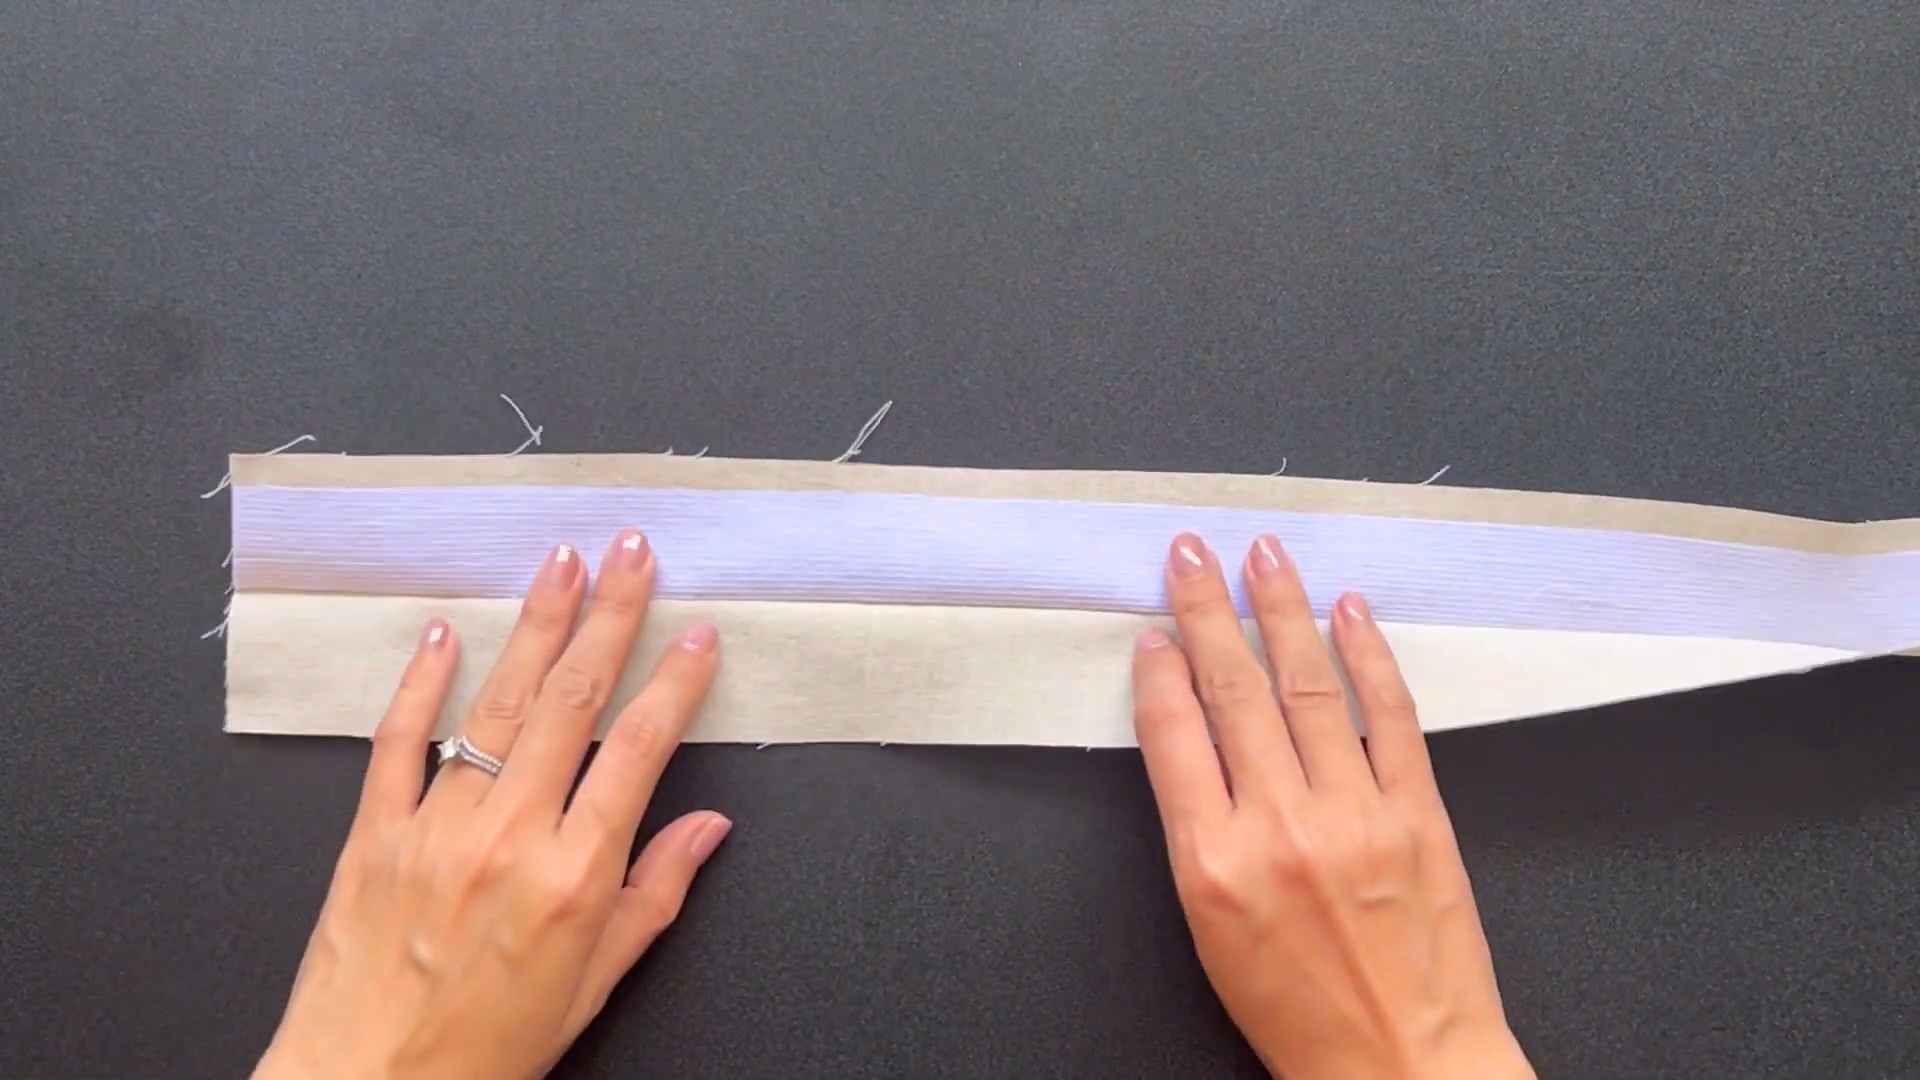
Add interfacing for durability.
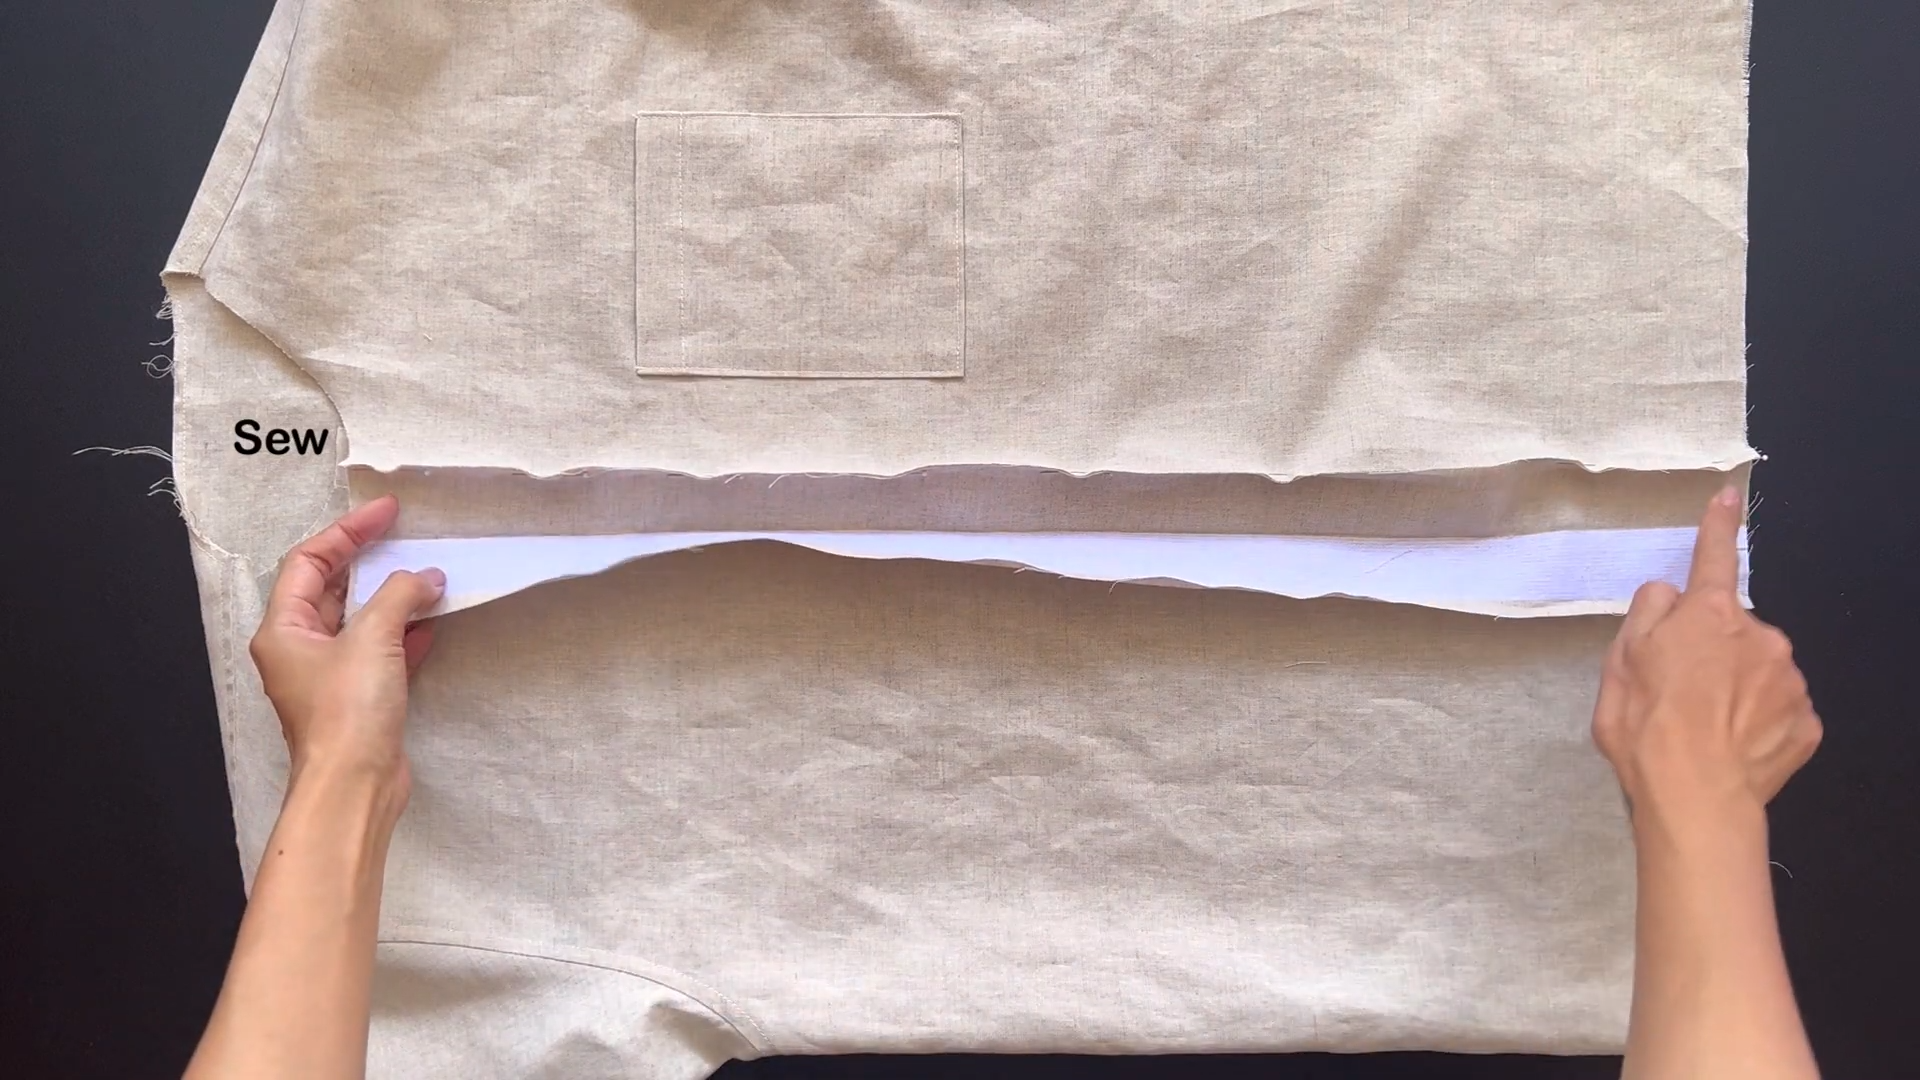
Attach one end of the rectangle to the bodice.
Fold the other end of the folding fabric inside 1 cm then fold into the seam.
Sew it into place.
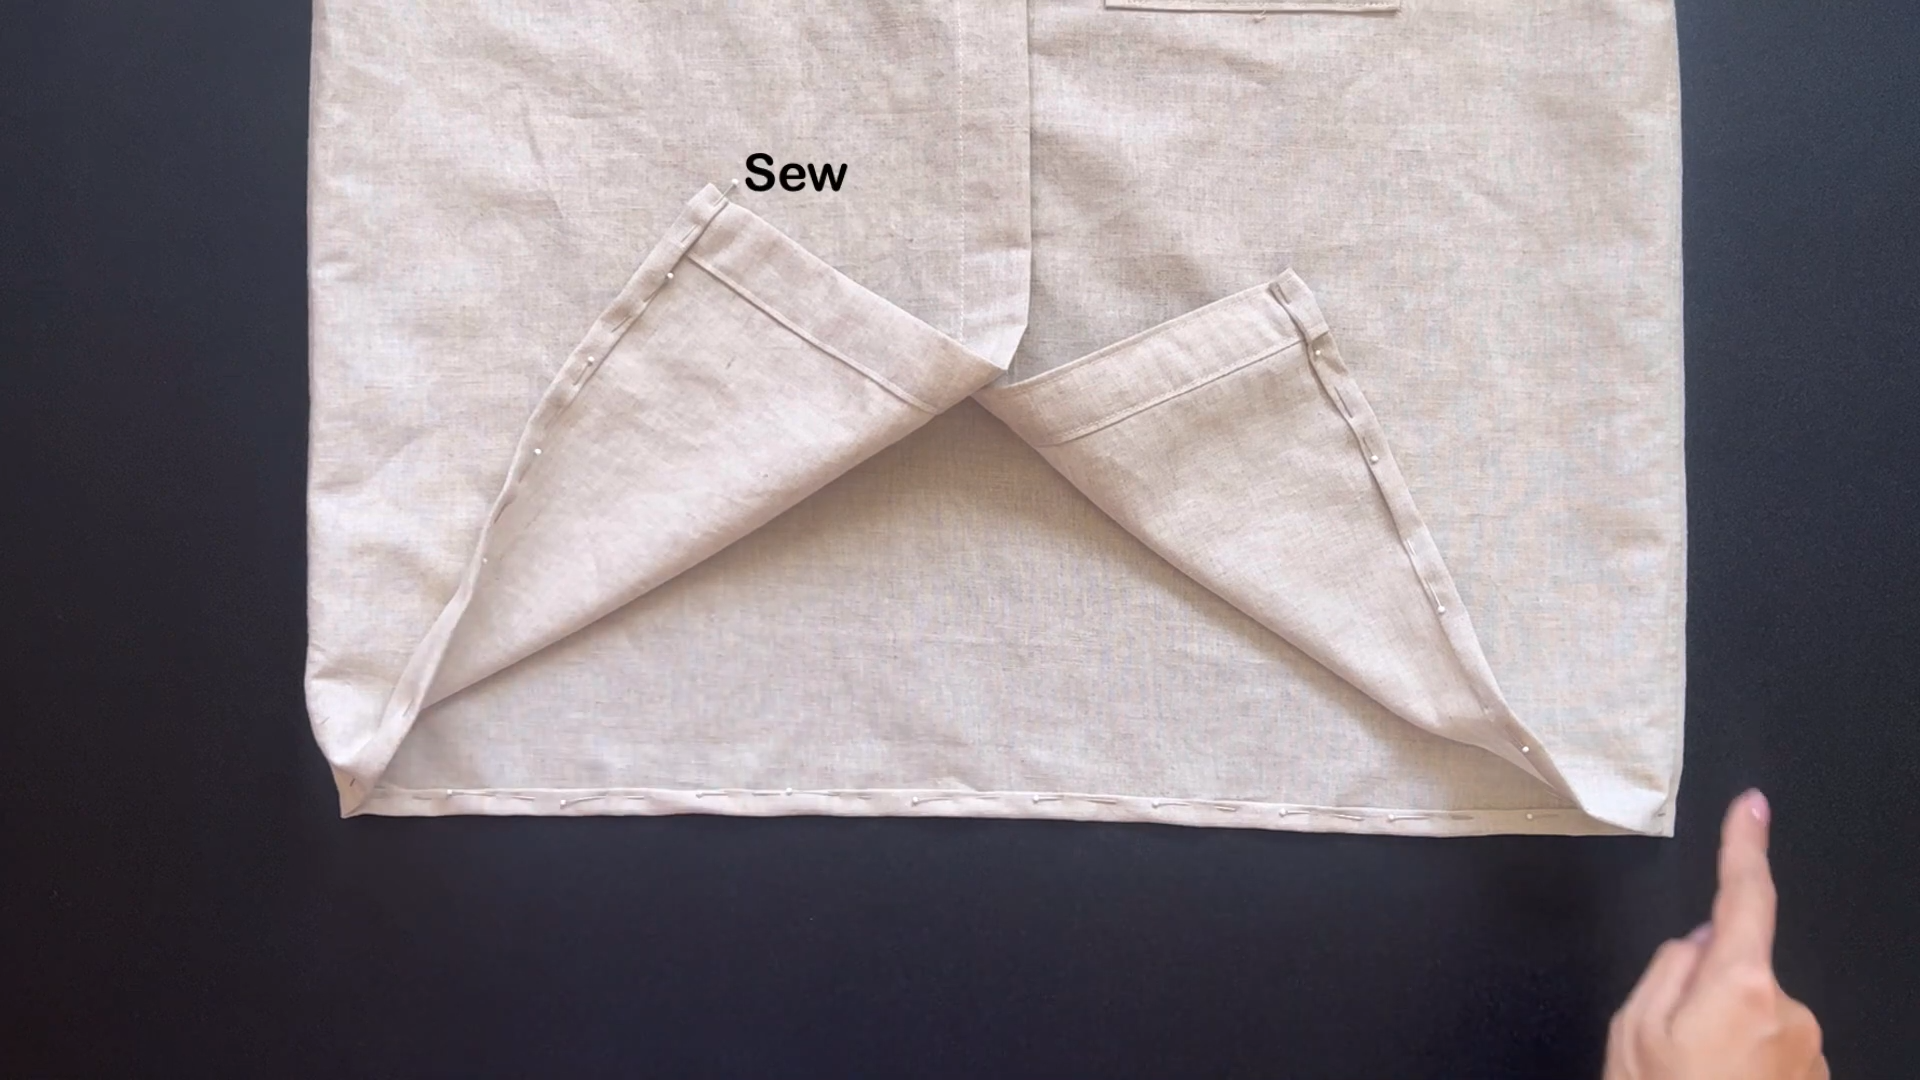
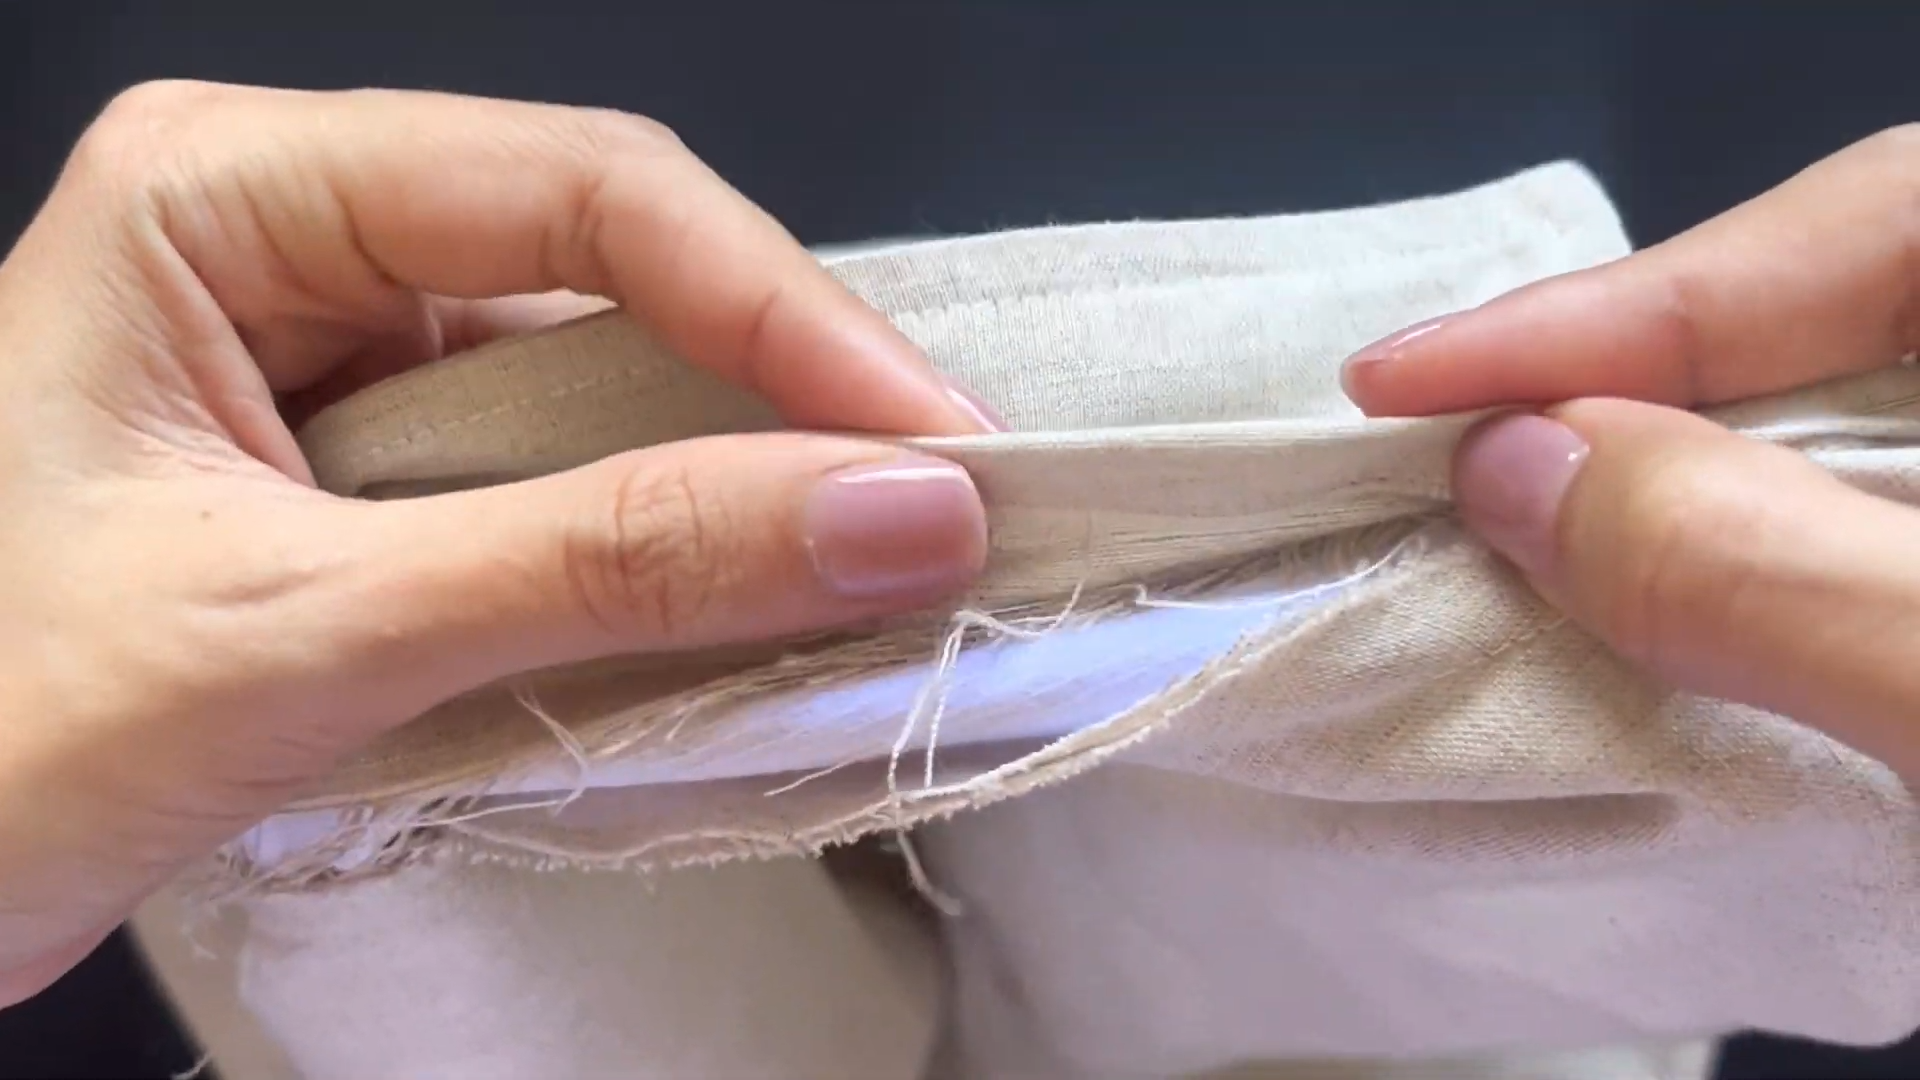
Fold the end of the shirt fabric inside by 1 cm and keep folding.
Sew it up for a polished look.
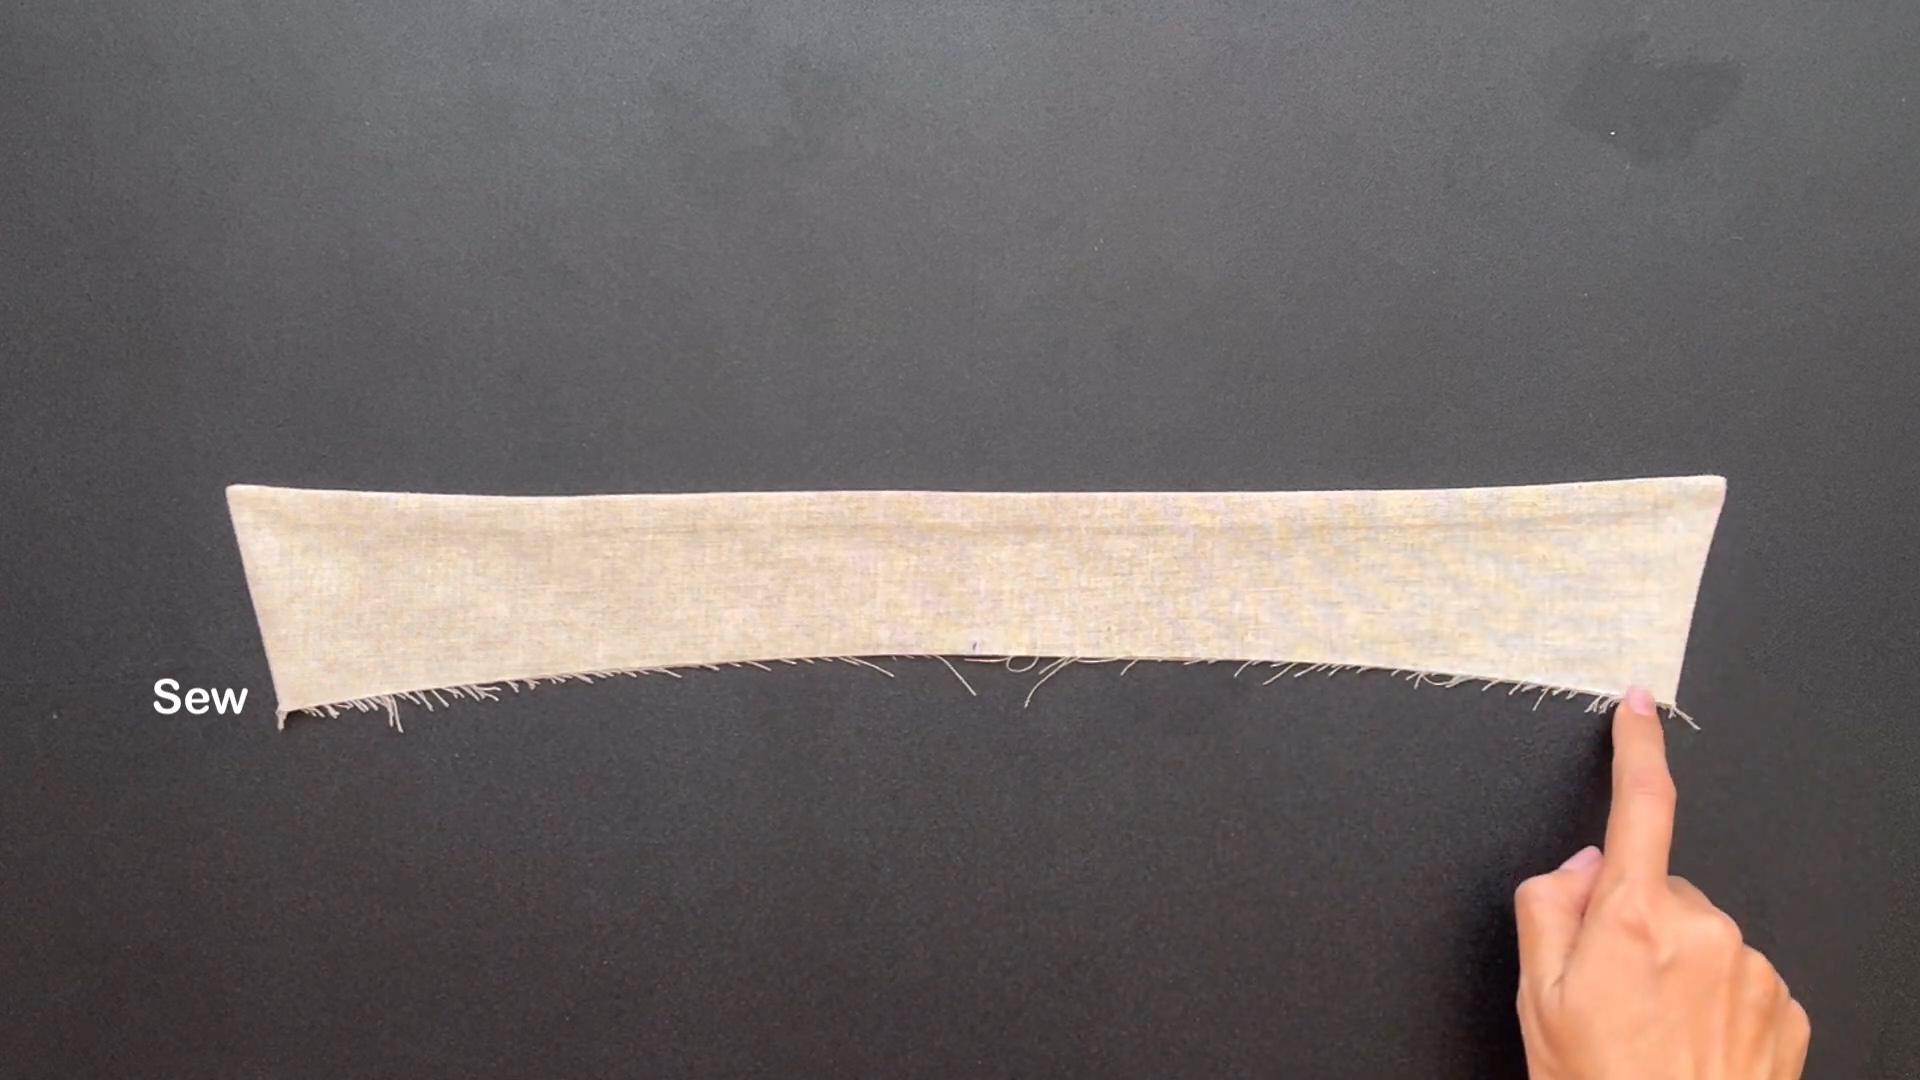
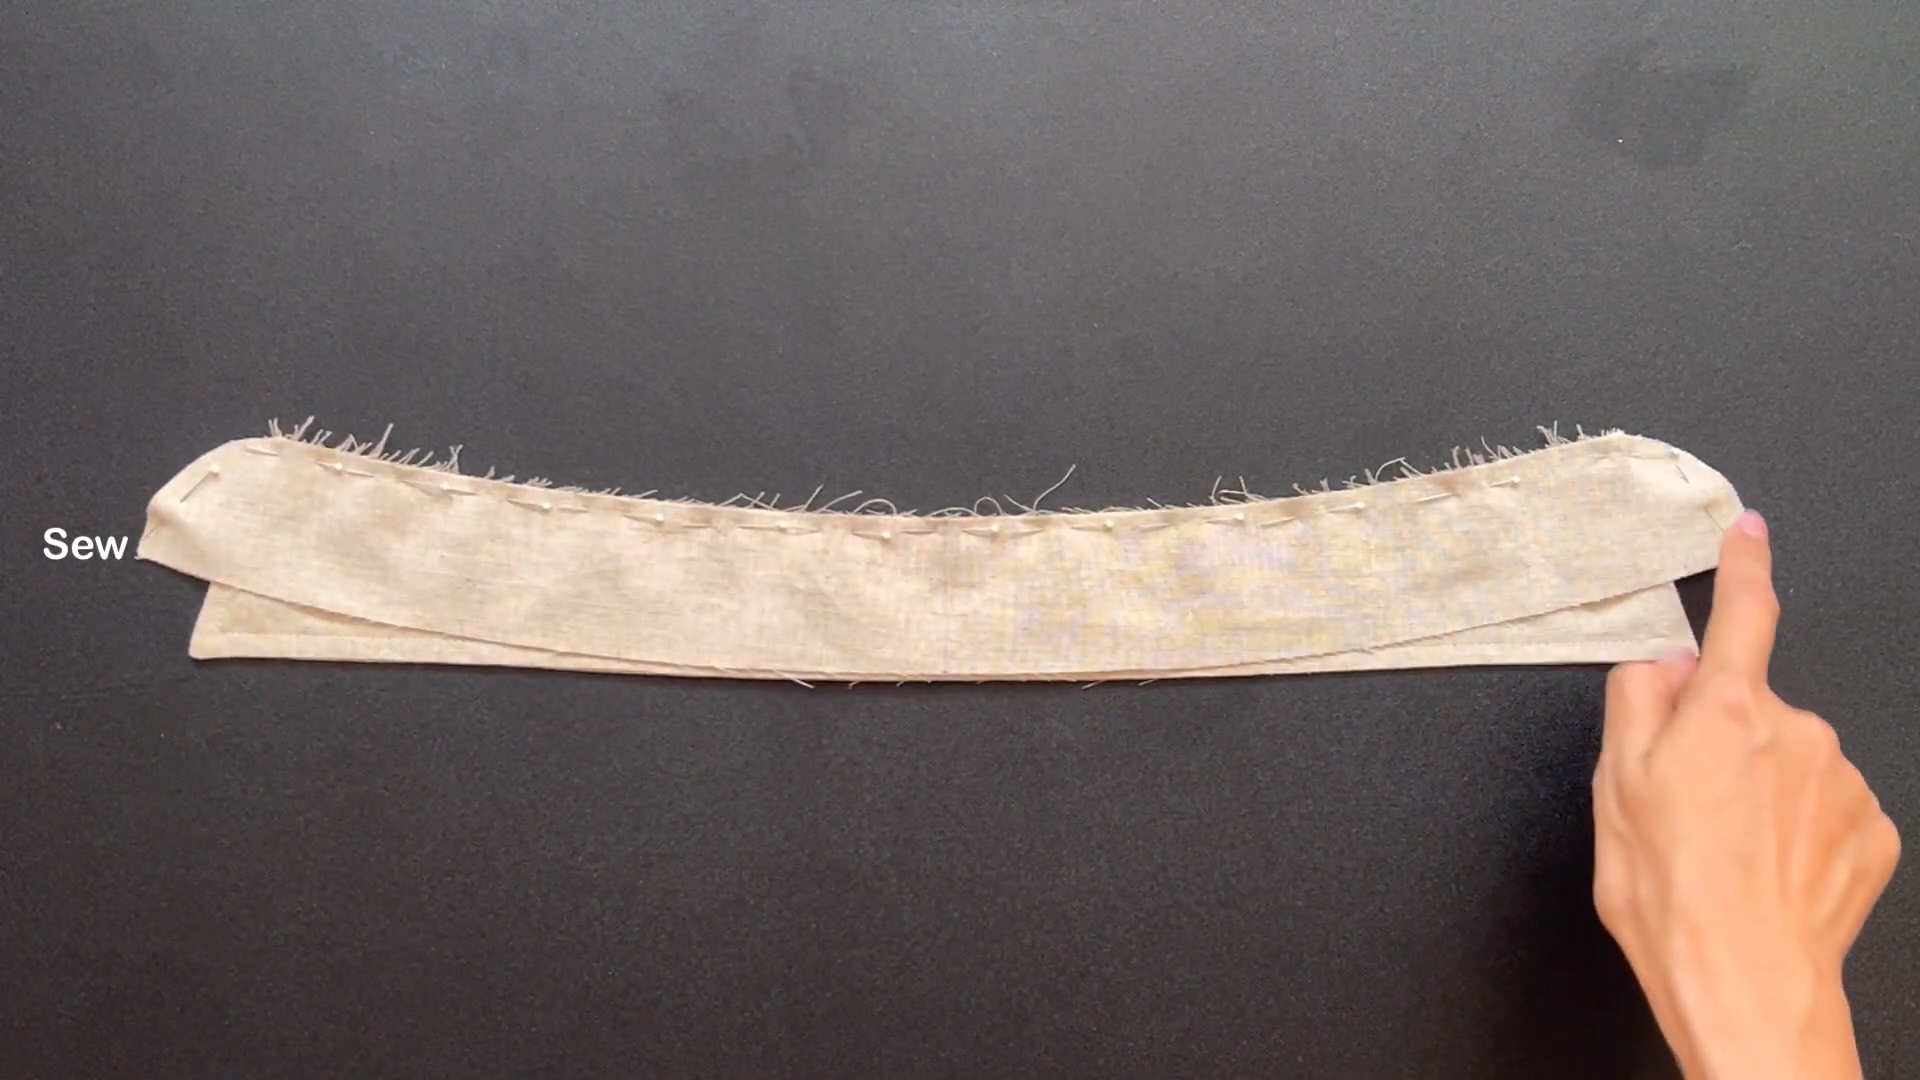
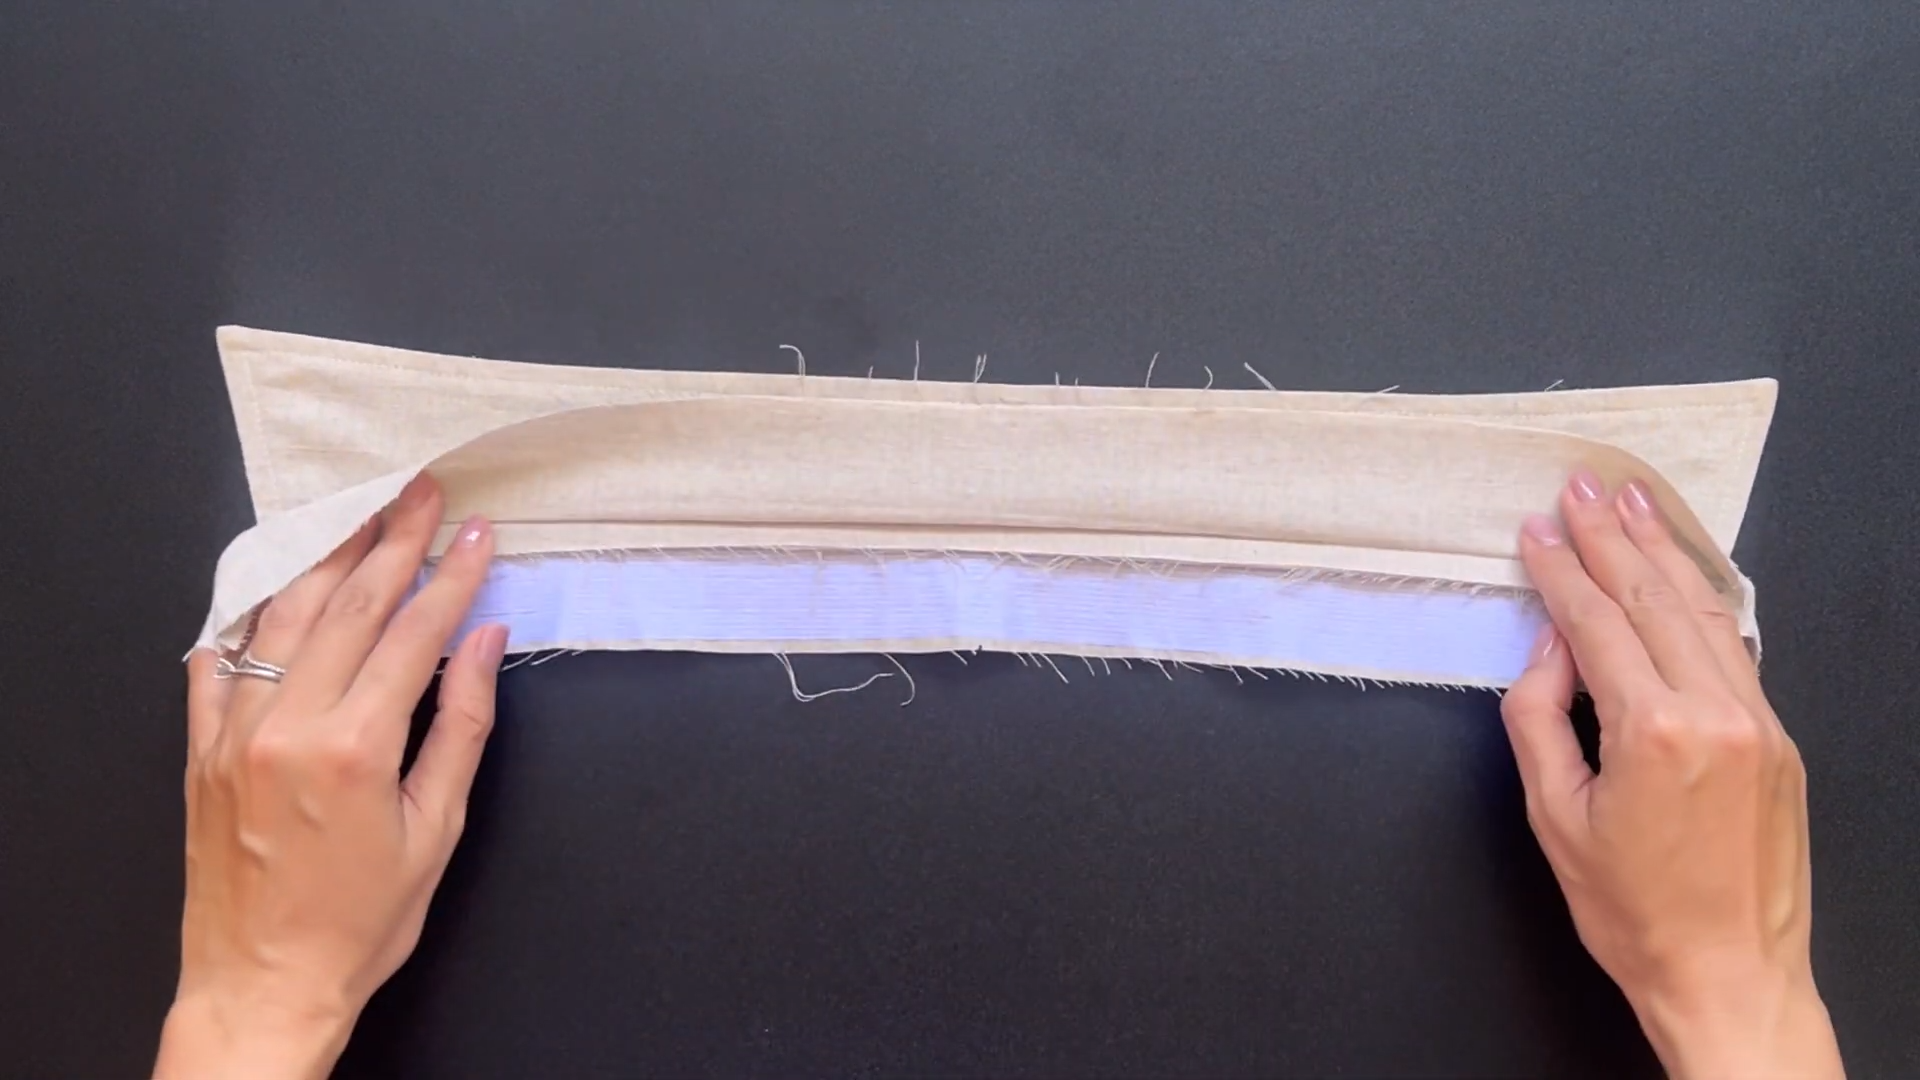
THE COLLAR
Connect the collar pieces at the top line with pins.
Sew them together.
Turn the collar inside to hide the seam.
Press with an iron to keep the folding seam.
Make an over stitching seam after that.
Attach the collar ends to two pieces of collar stand. Make sure the collar is in the middle of the two pieces.
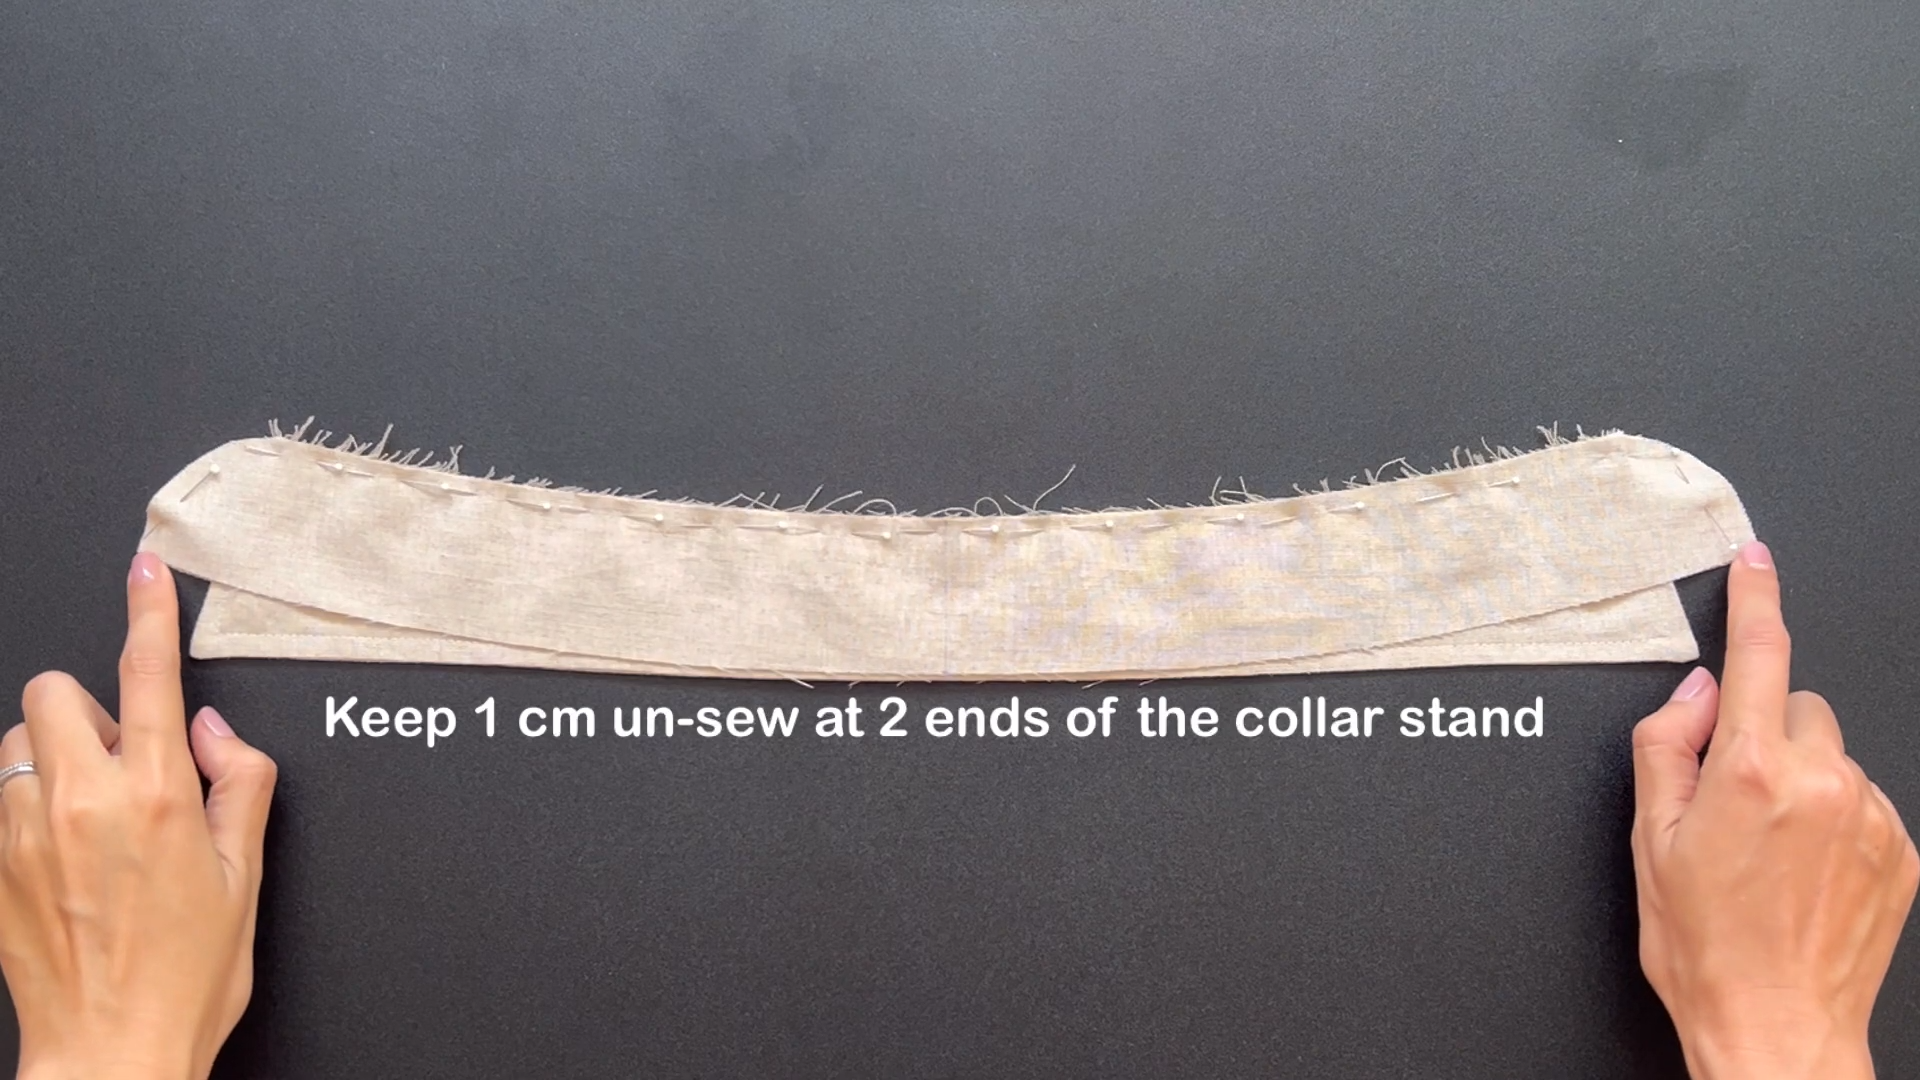
Sew the collar to the collar stand but leave spaces at 2 ends of the collar stand.
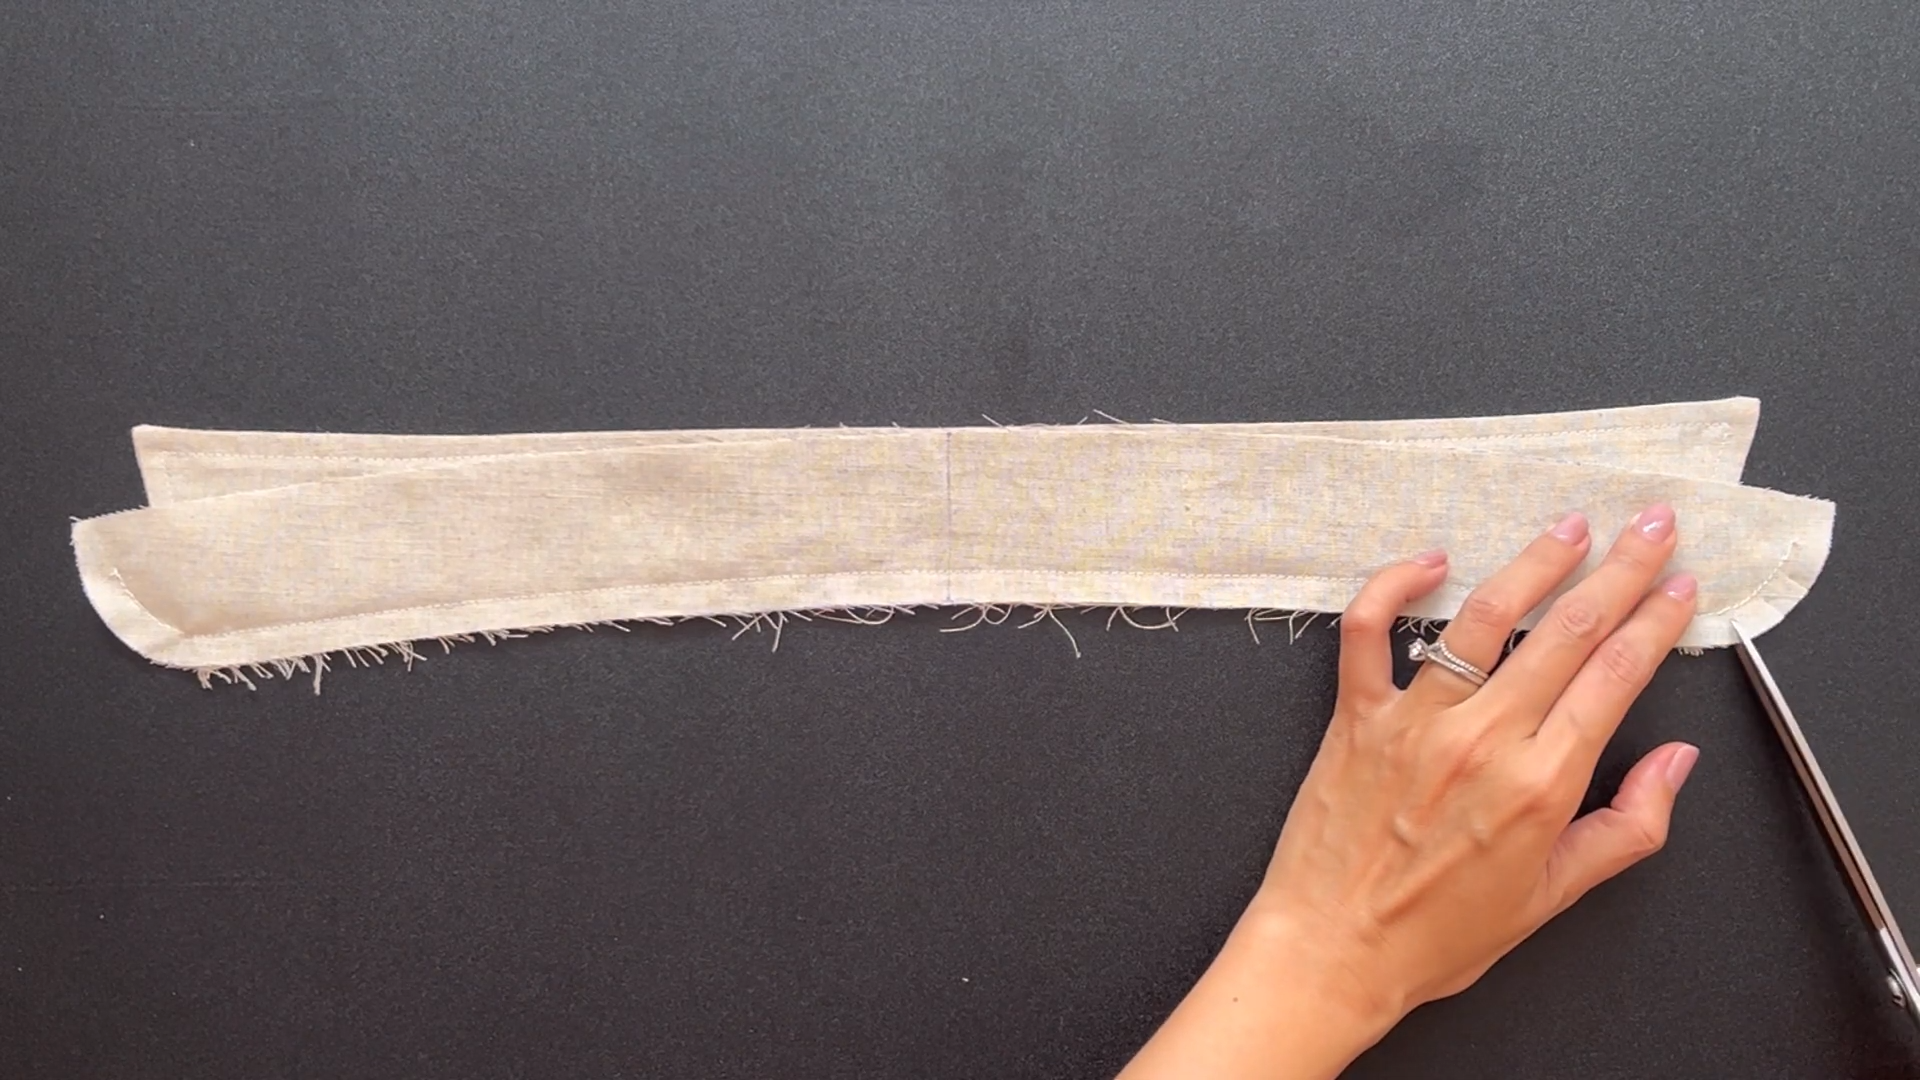
Make small cuts at the collar stand’s curve.
Add interfacing to one side of the collar stand for durability.
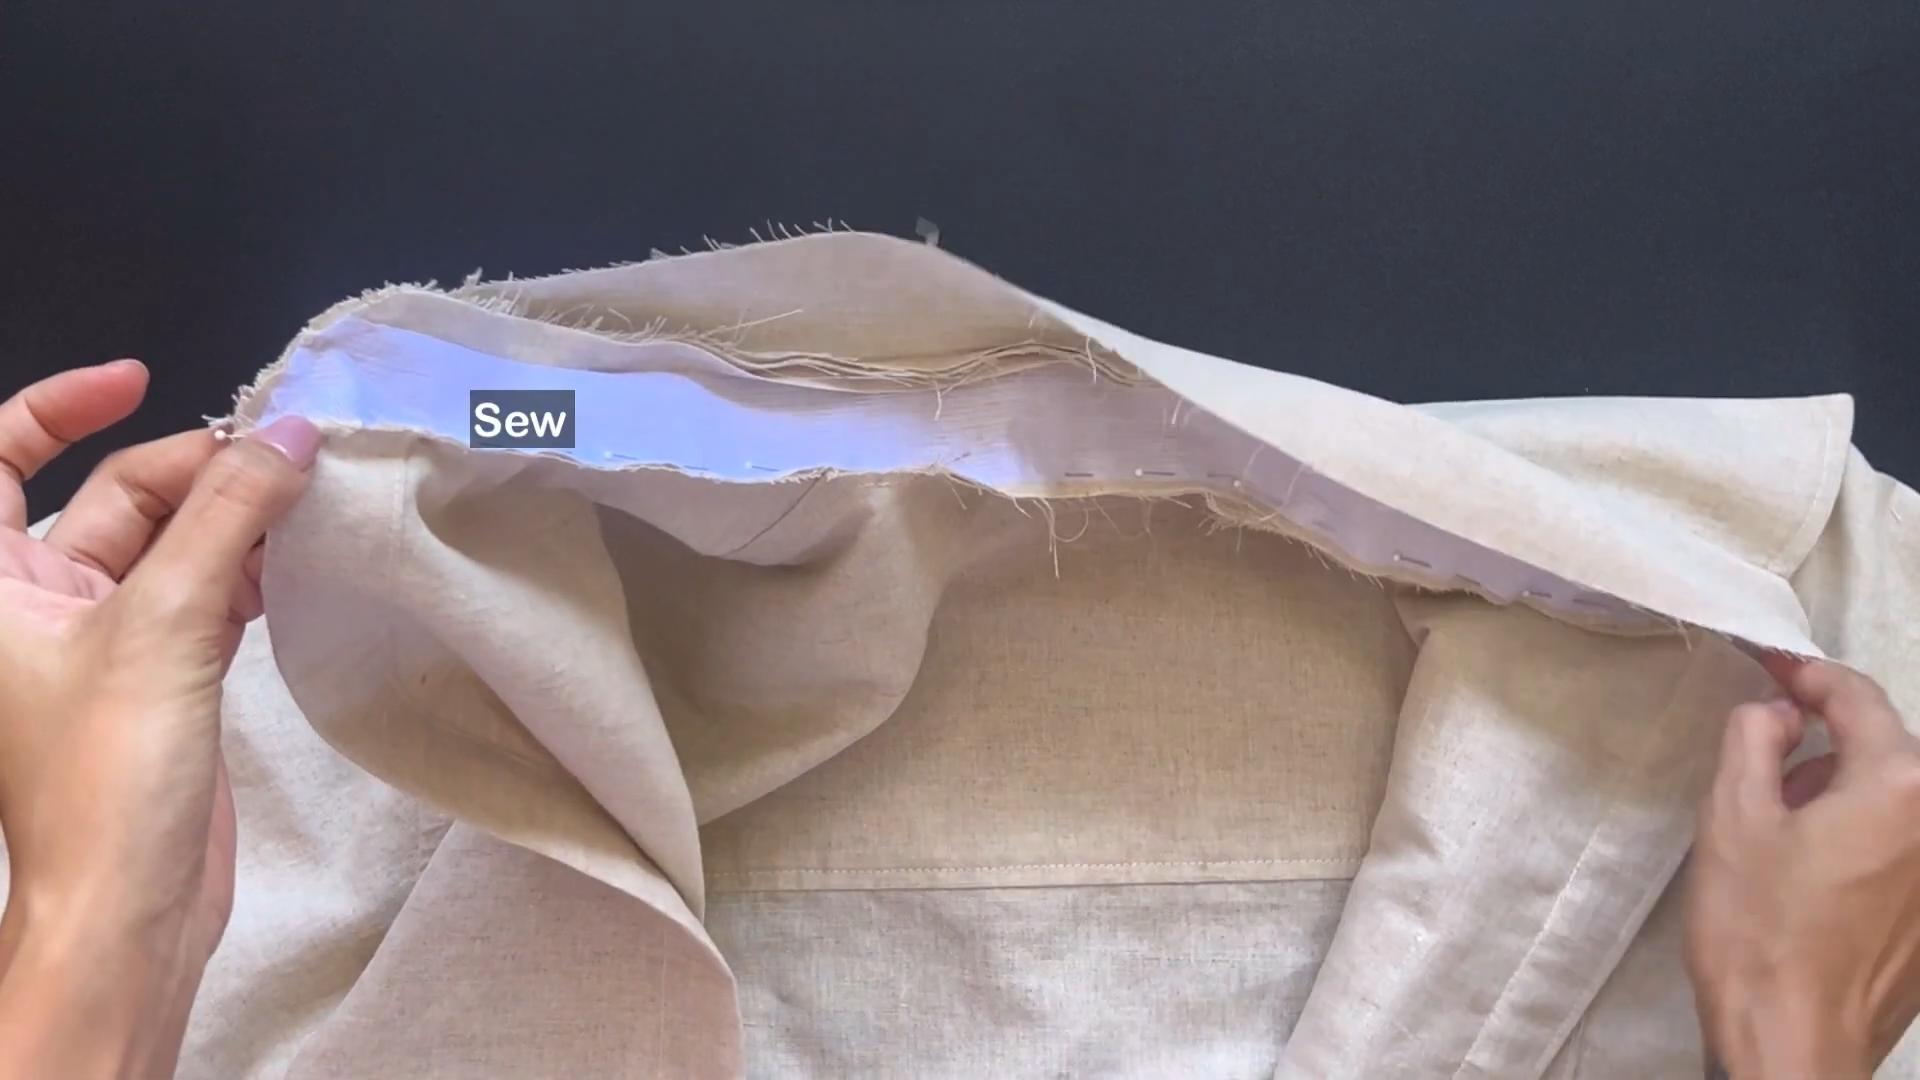
Align one end of the collar stand with the neckline and sew them together.
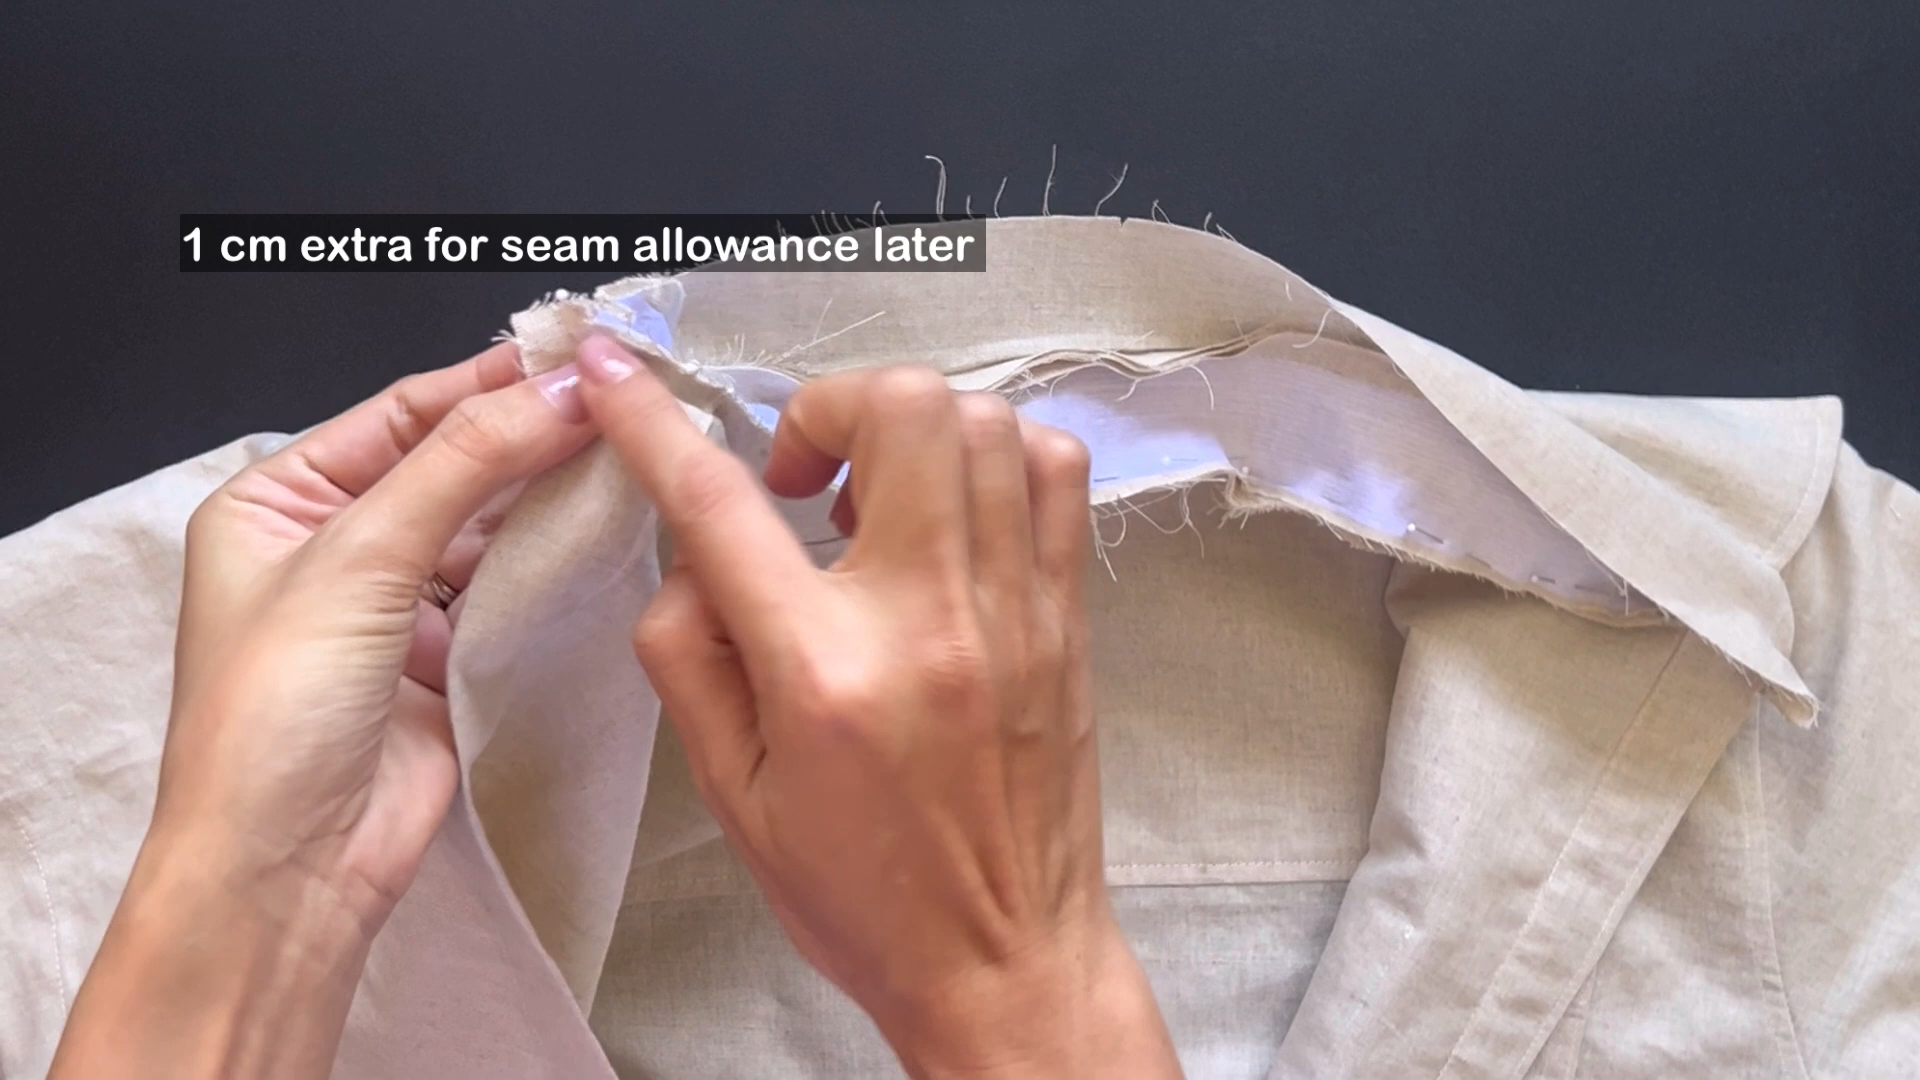
Make sure to leave 1 cm extra on both ends for seam allowance.
Sew to connect two end of the collar stand together.
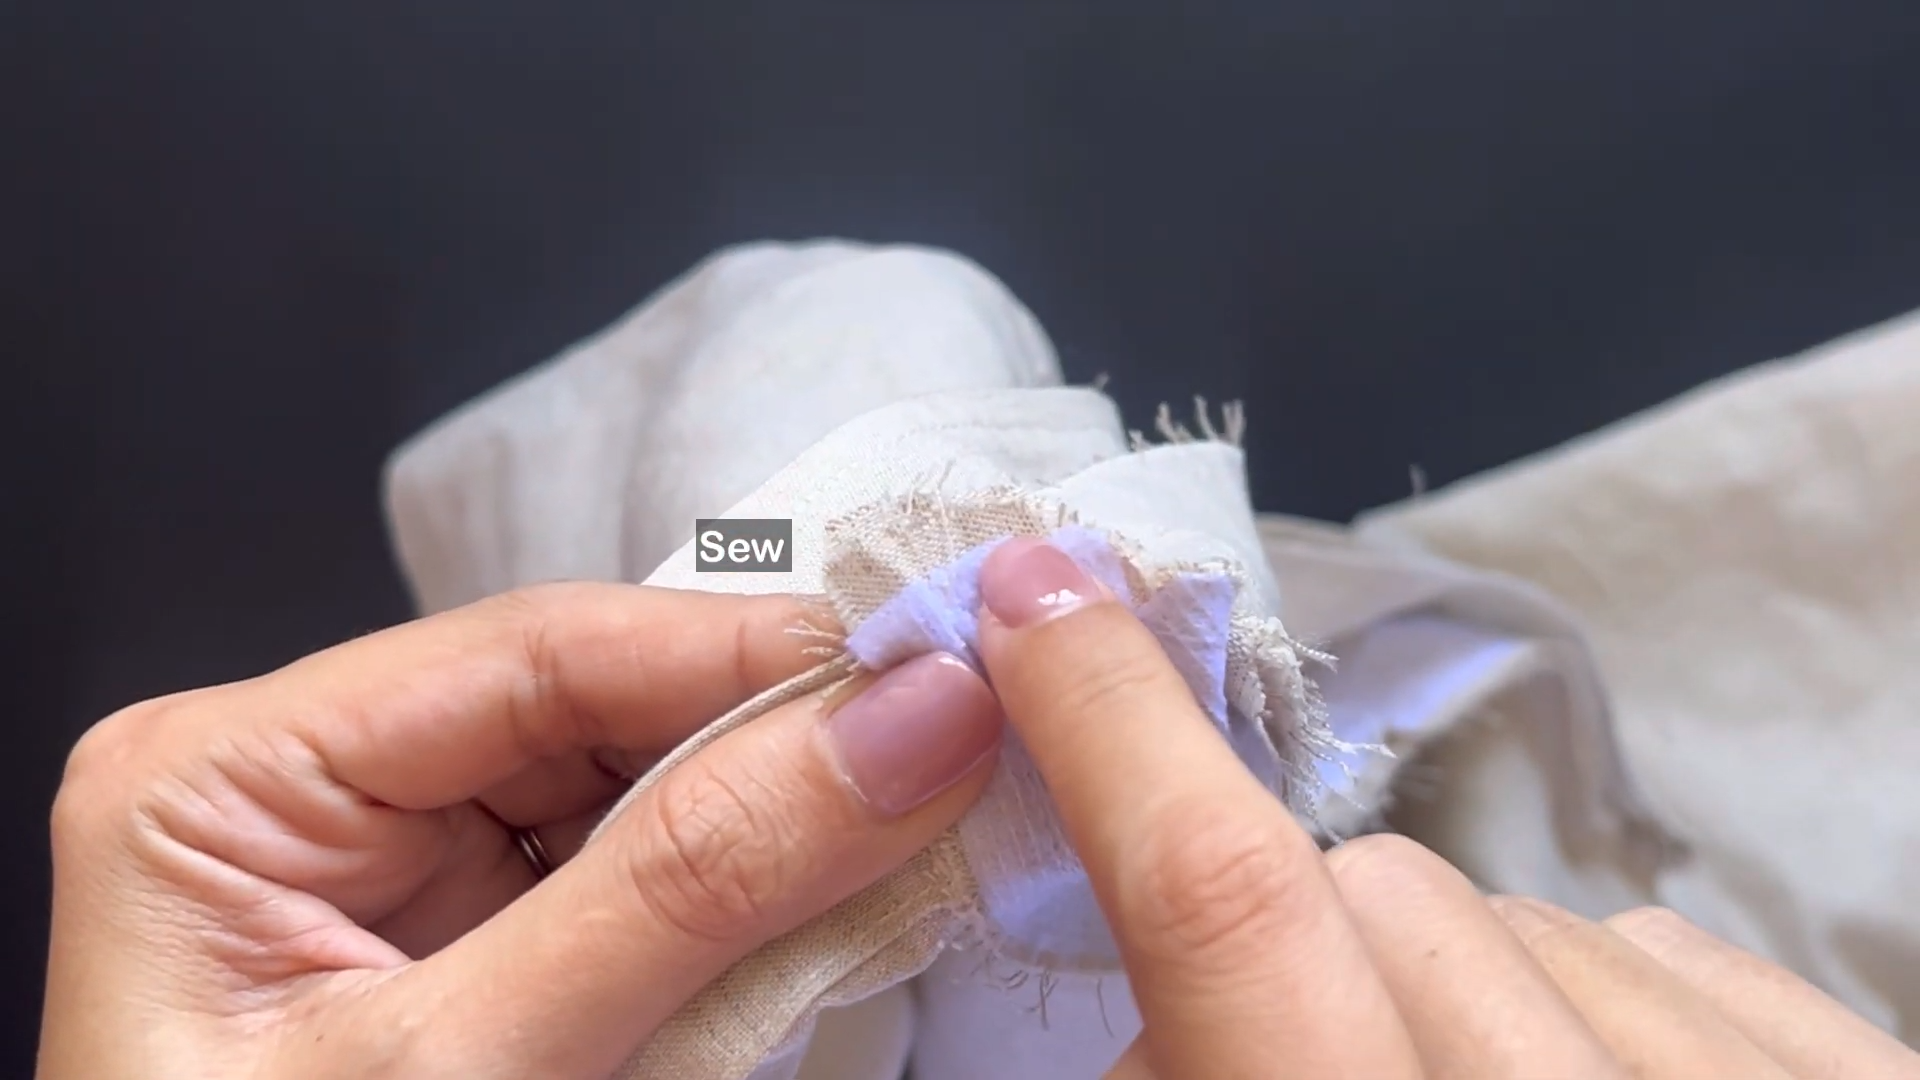
Fold the opposite end of the collar stand inside by 1 cm, then keep folding to the first seam.
Sew along the folded end to make the second seam.

Position the buttons on the button area.
Add the buttons and button holes accordingly.

Making a Men's shirt for my husband | My Valentine's project
And there you have it!
The shirt fits my husband just right and it looks not too bad. Convincing him to be my model wasn’t easy (he’s not a fan of posing), but his support meant the world to me. I’m glad that he loves it.
Now it’s your turn to give this a try and create meaningful gifts for your loved ones. Stay tuned for more adventures—I’ll see you in the next video!

I hope you’ll give it a try and rock it with confidence. Stay tuned for more exciting creations next week!
Until then, happy sewing!